


May 26, 2021
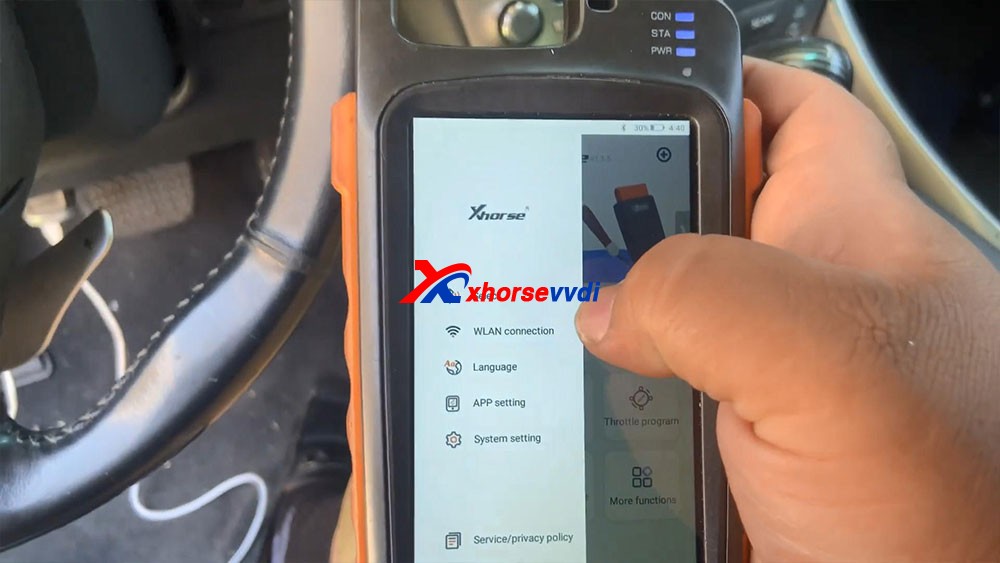
Tools option:Xhorse VVDI Key Tool Plus Pad

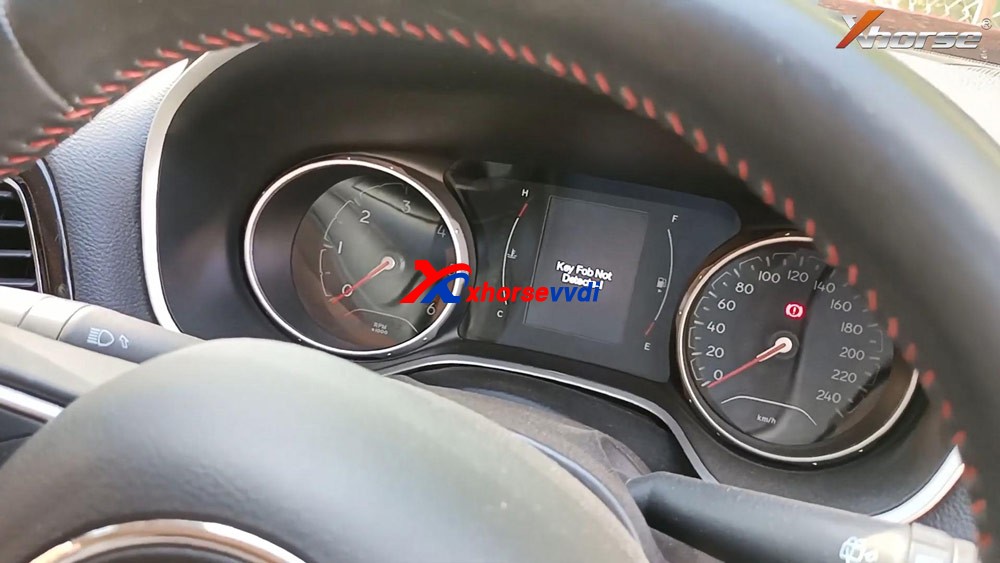
Plug VVDI Key Tool Plus to the car, press the Start /Stop button and you will see "Key Fob no detected" on the dashboard.
Insert the key into the keyhole of pad.
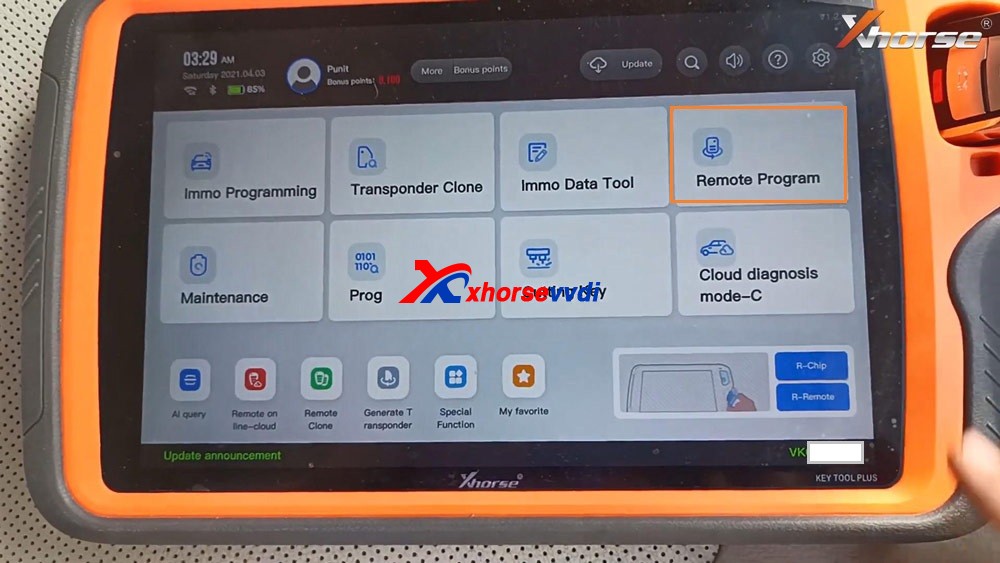
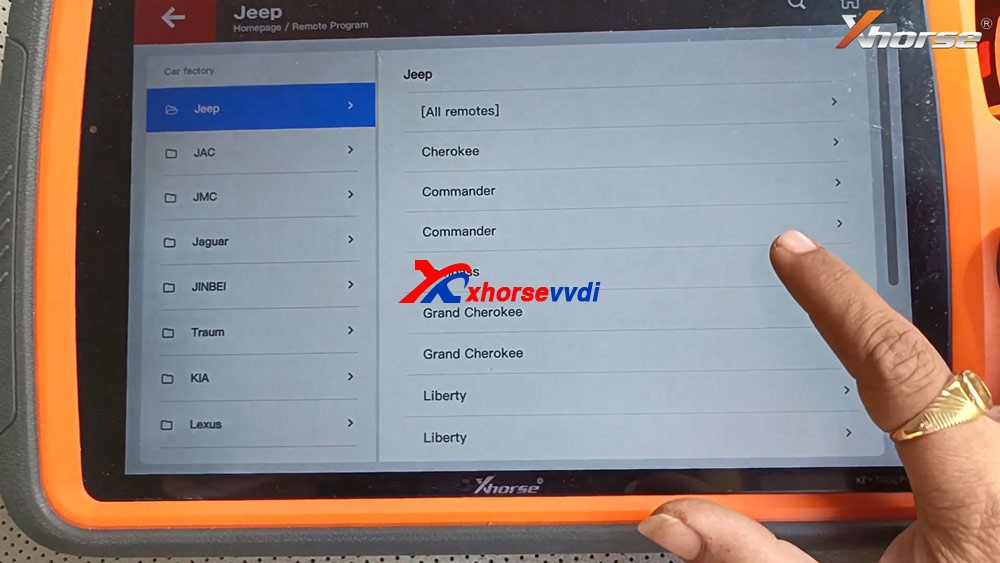
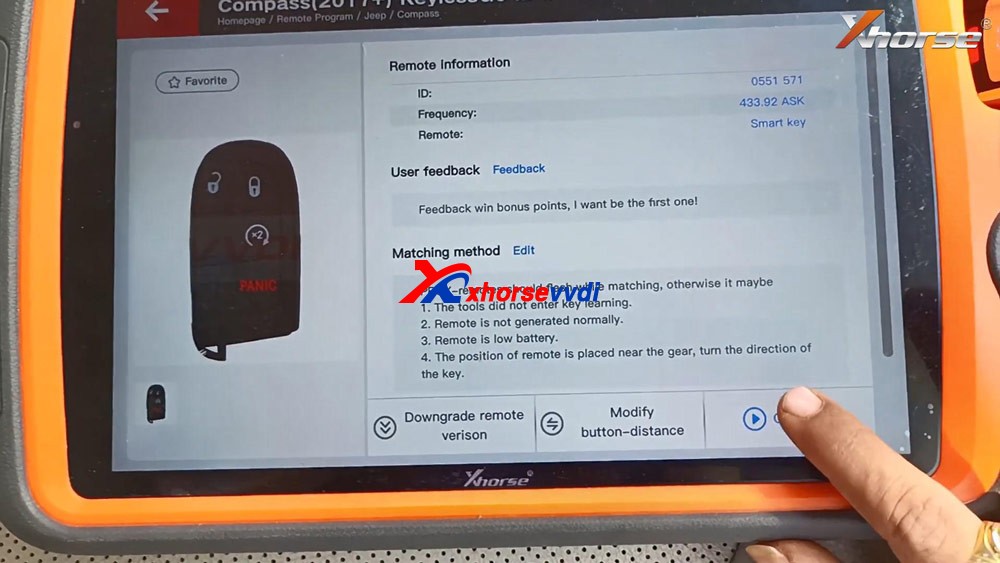
Tap "Remote Program", select "Jeep" and then " Compass".
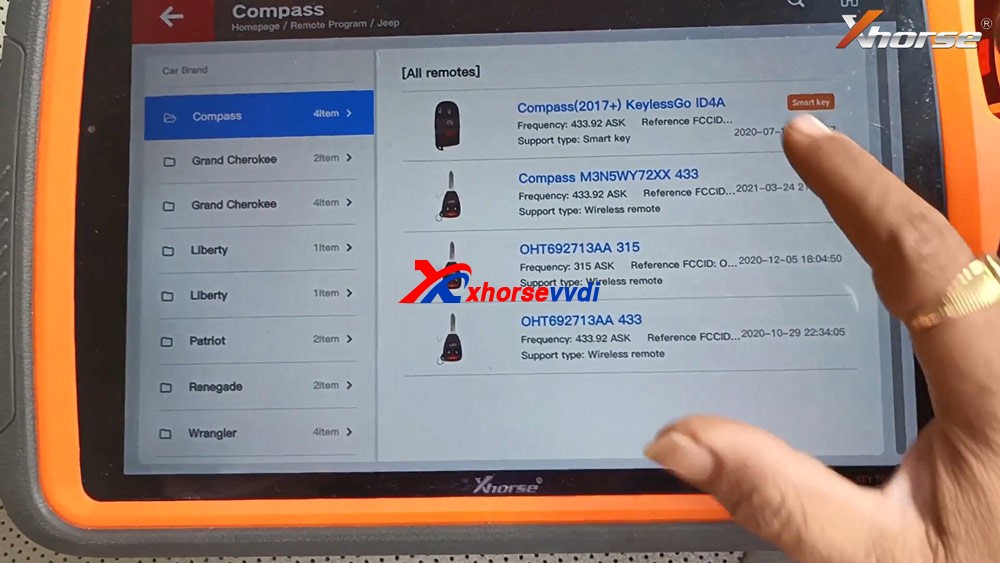
Select "Compass (2017+) KeylessGo ID4A".
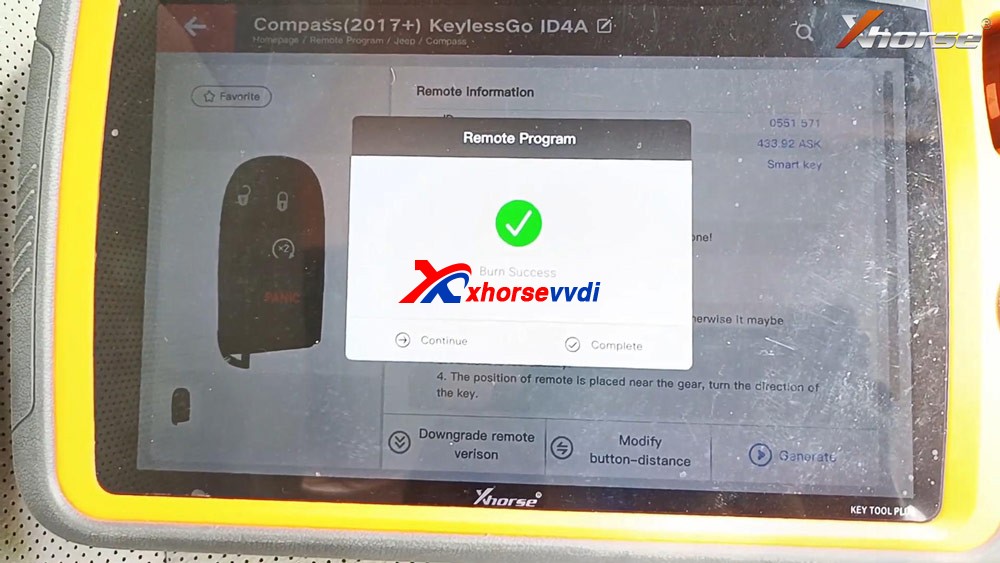
Tap "Generate".
Detecting remote.
Writing data.
Burn success and tap "Complete".
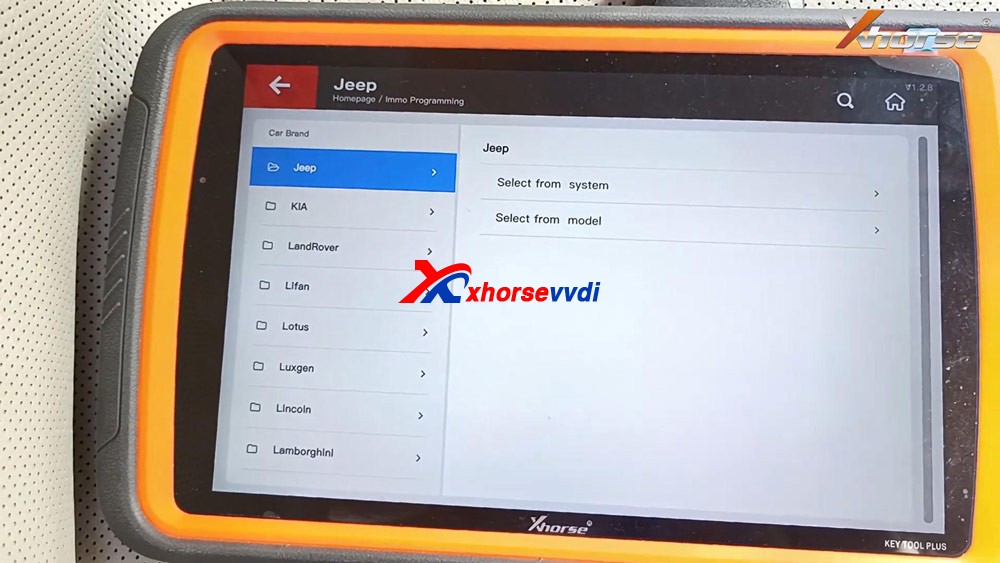
Back to select "Immo Programming", select all brands and "Jeep" and "Select from model" and then "Asia", then "Compass", then "2017 -", then "Keyless Go".
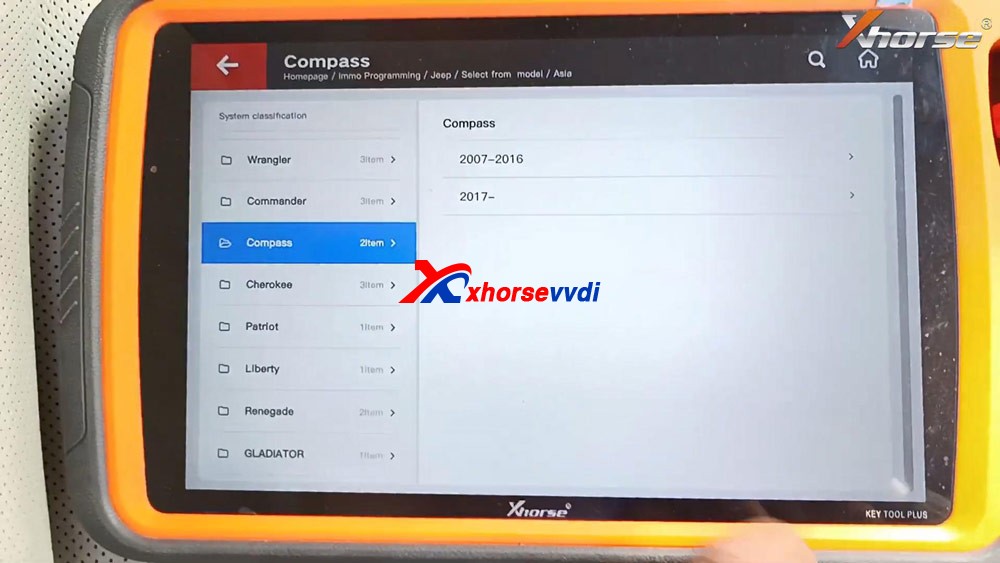
Select "Start programming".
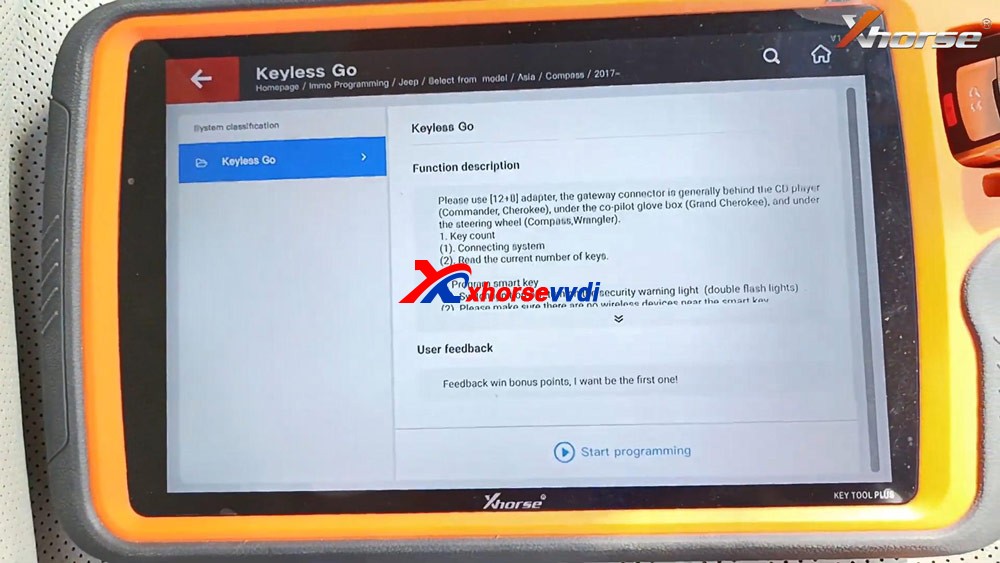
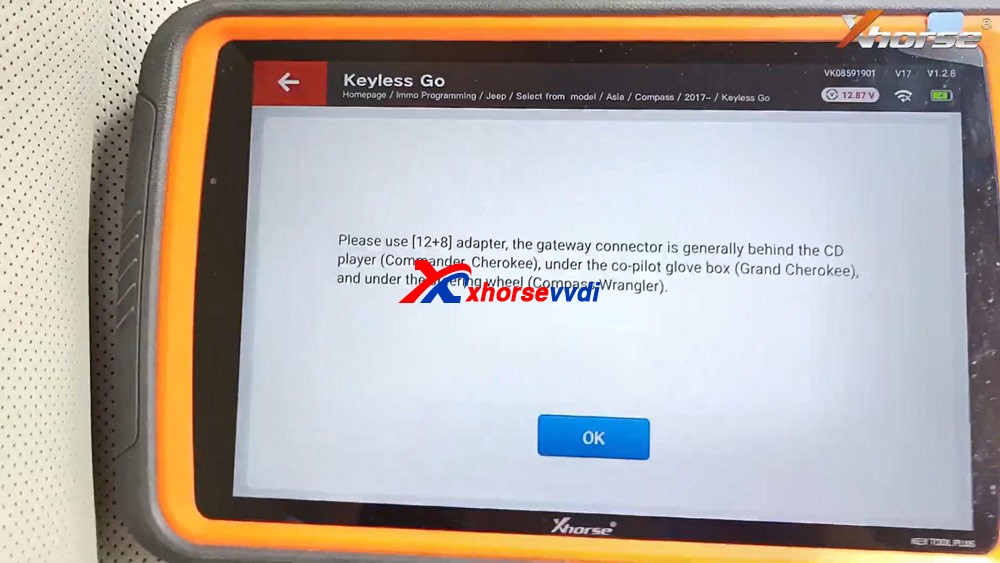
Please use [12+8] adapter, the gateway connector is generally behind the CD player (Commander, Cherokee), under the co-pilot glove box (Grand Cherokee), and under the steering wheel (Compass, Wrangler).
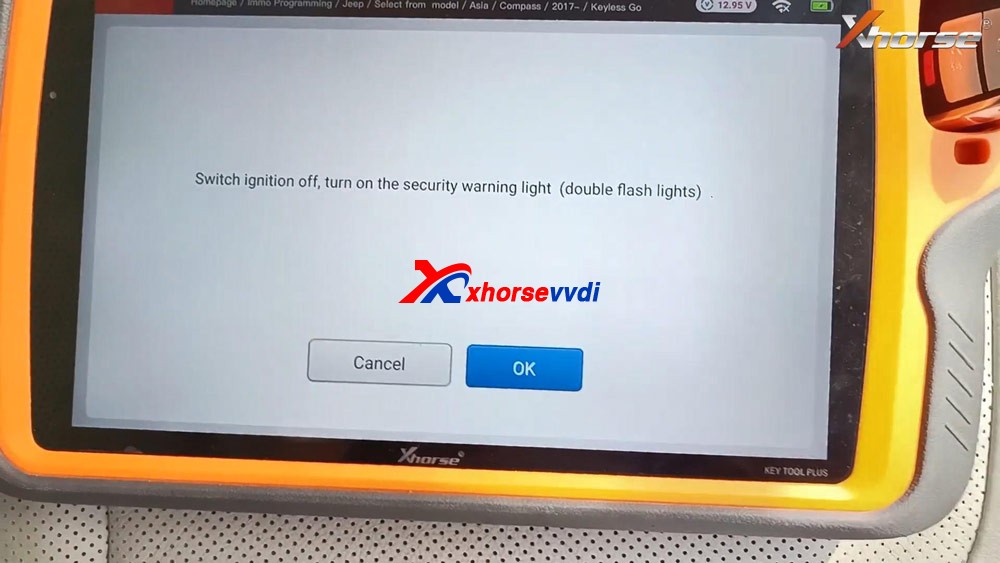
Tap "Program smart key".

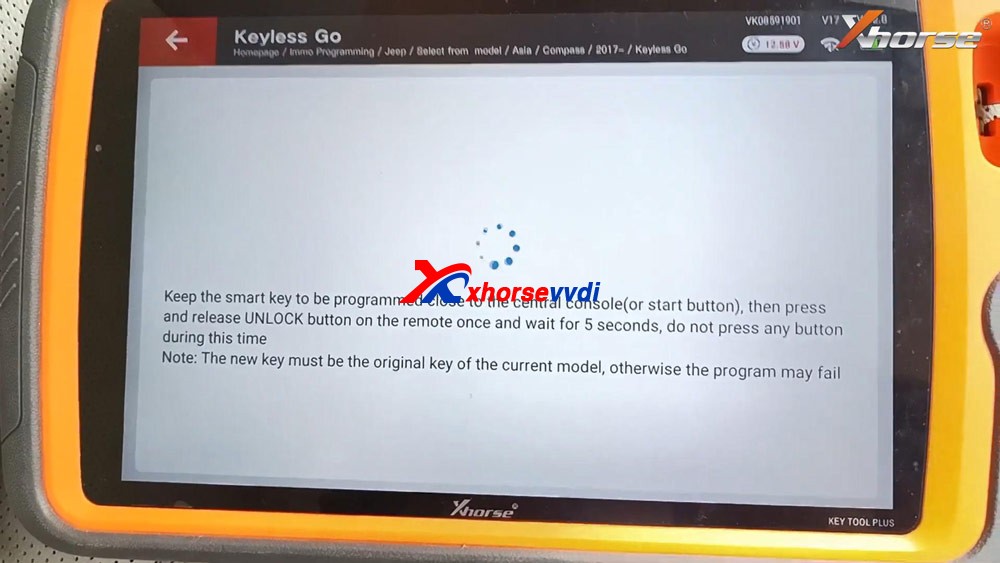
Switch ignition off, turn on the security warning light (double flash lights).
Please make sure there are no wireless devices near the smart key.
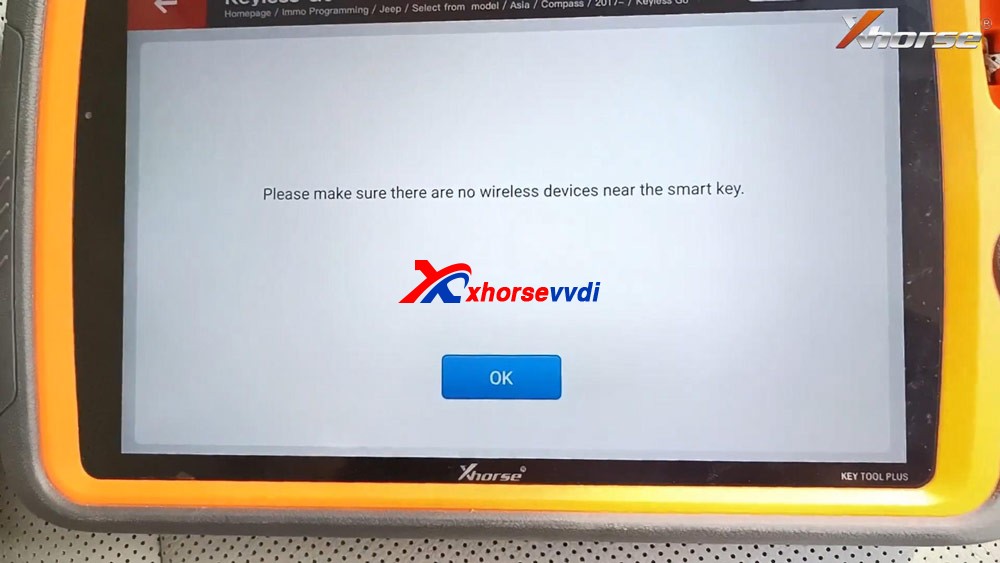
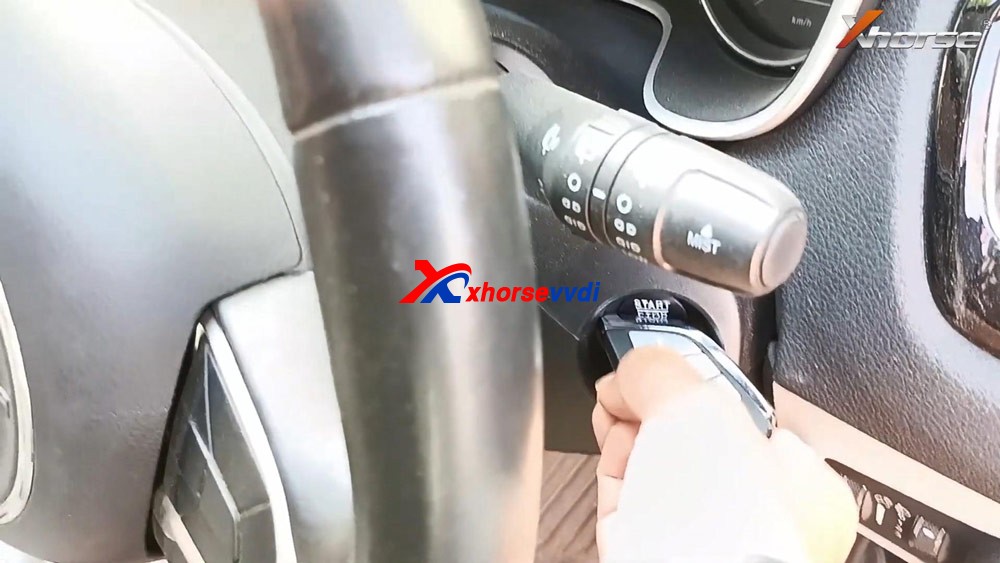
Keep the smart key to be programmed close to the central console (or start button), then press and release UNLOCK button on the remote once and wait for 5 seconds, do not press any button during this time.
Note: the new key must be the original key of the current model, otherwise the program may fail.
Match successfully. current key number: 2
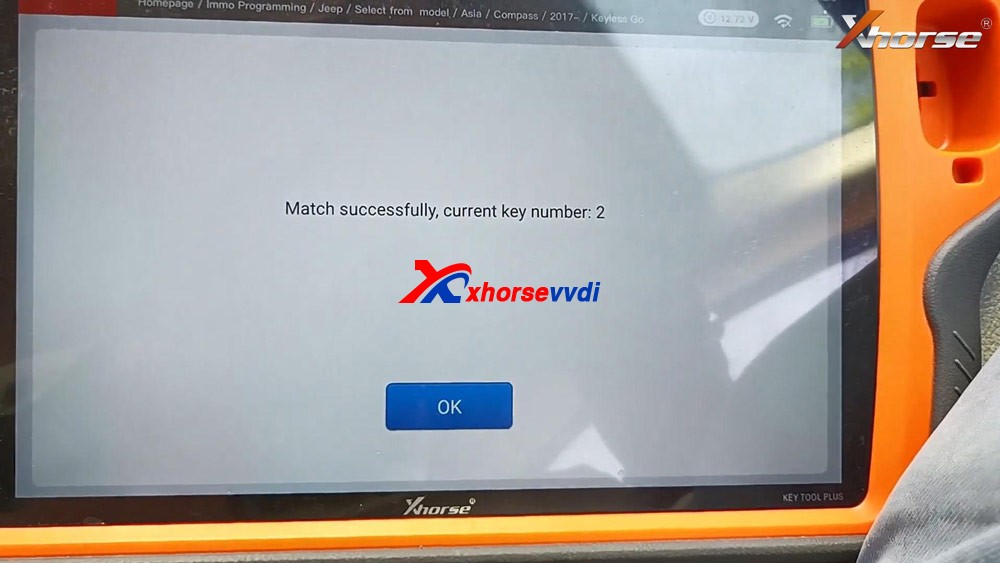
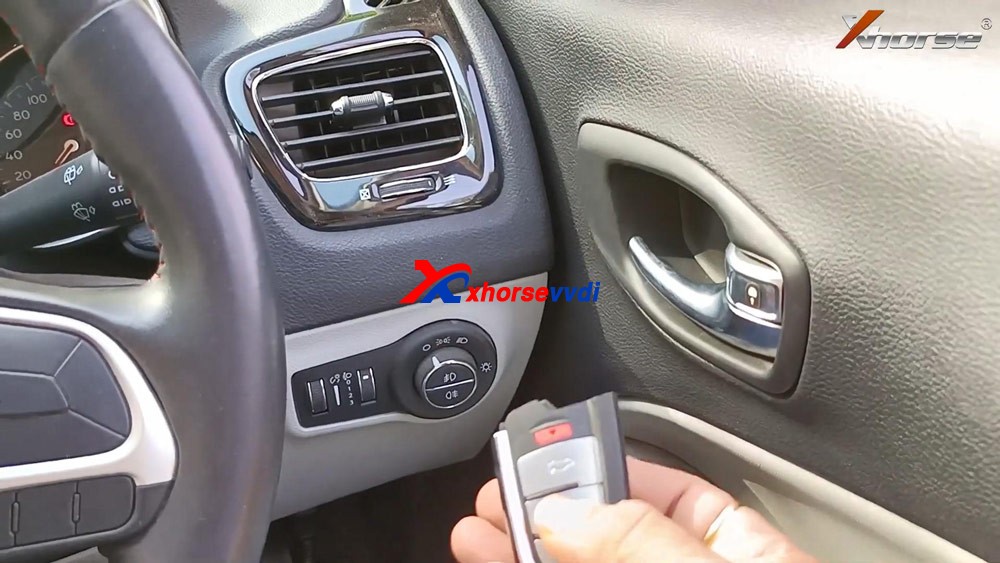
Test if the new key can start the car.
As you can see, the new Xhorse key is programmed successfully.

Job is done.
This is how to use VVDI Key Tool Plus to add one new smart key for Jeep Compass ID4A, please keep in mind, you will need 12+8 adapter, xhorse is not available with this adapter, you can try Autel 12+8 adapter for Jeep.
Posted by: xhorsevvdi at
10:07 AM
| No Comments
| Add Comment
Post contains 294 words, total size 5 kb.
May 24, 2021
I just boughtXhorse VVDIKey Tool Max, the problem is I didn’t know how to clone ID48 (96bit) keys, every time it showsâ€Function not activatedâ€, does it have to have the bonus points to make it work? How to get the bonus points?
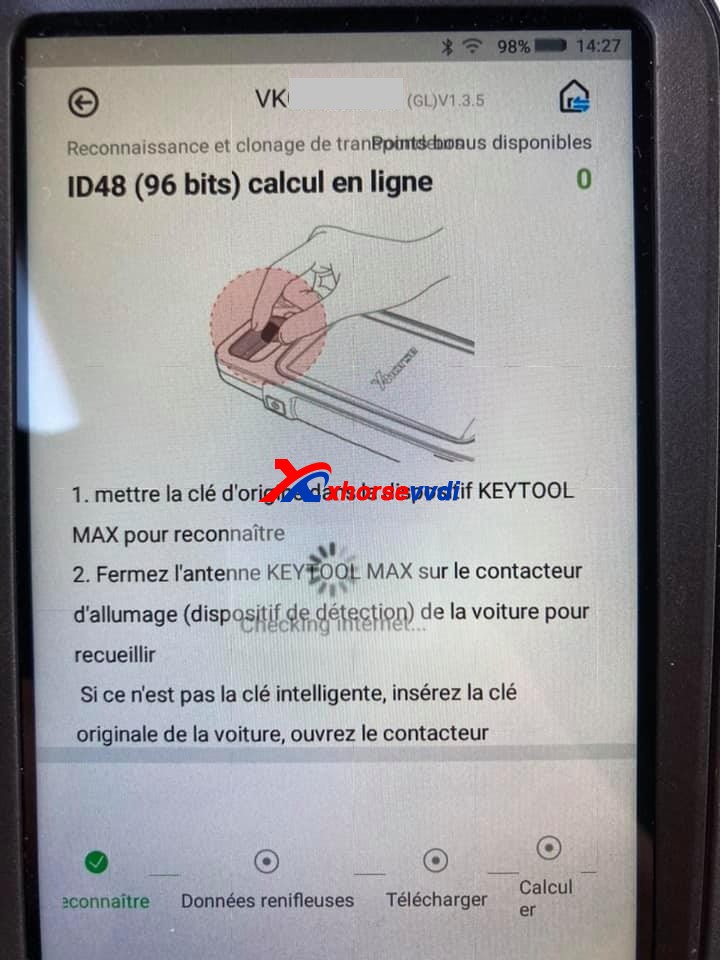
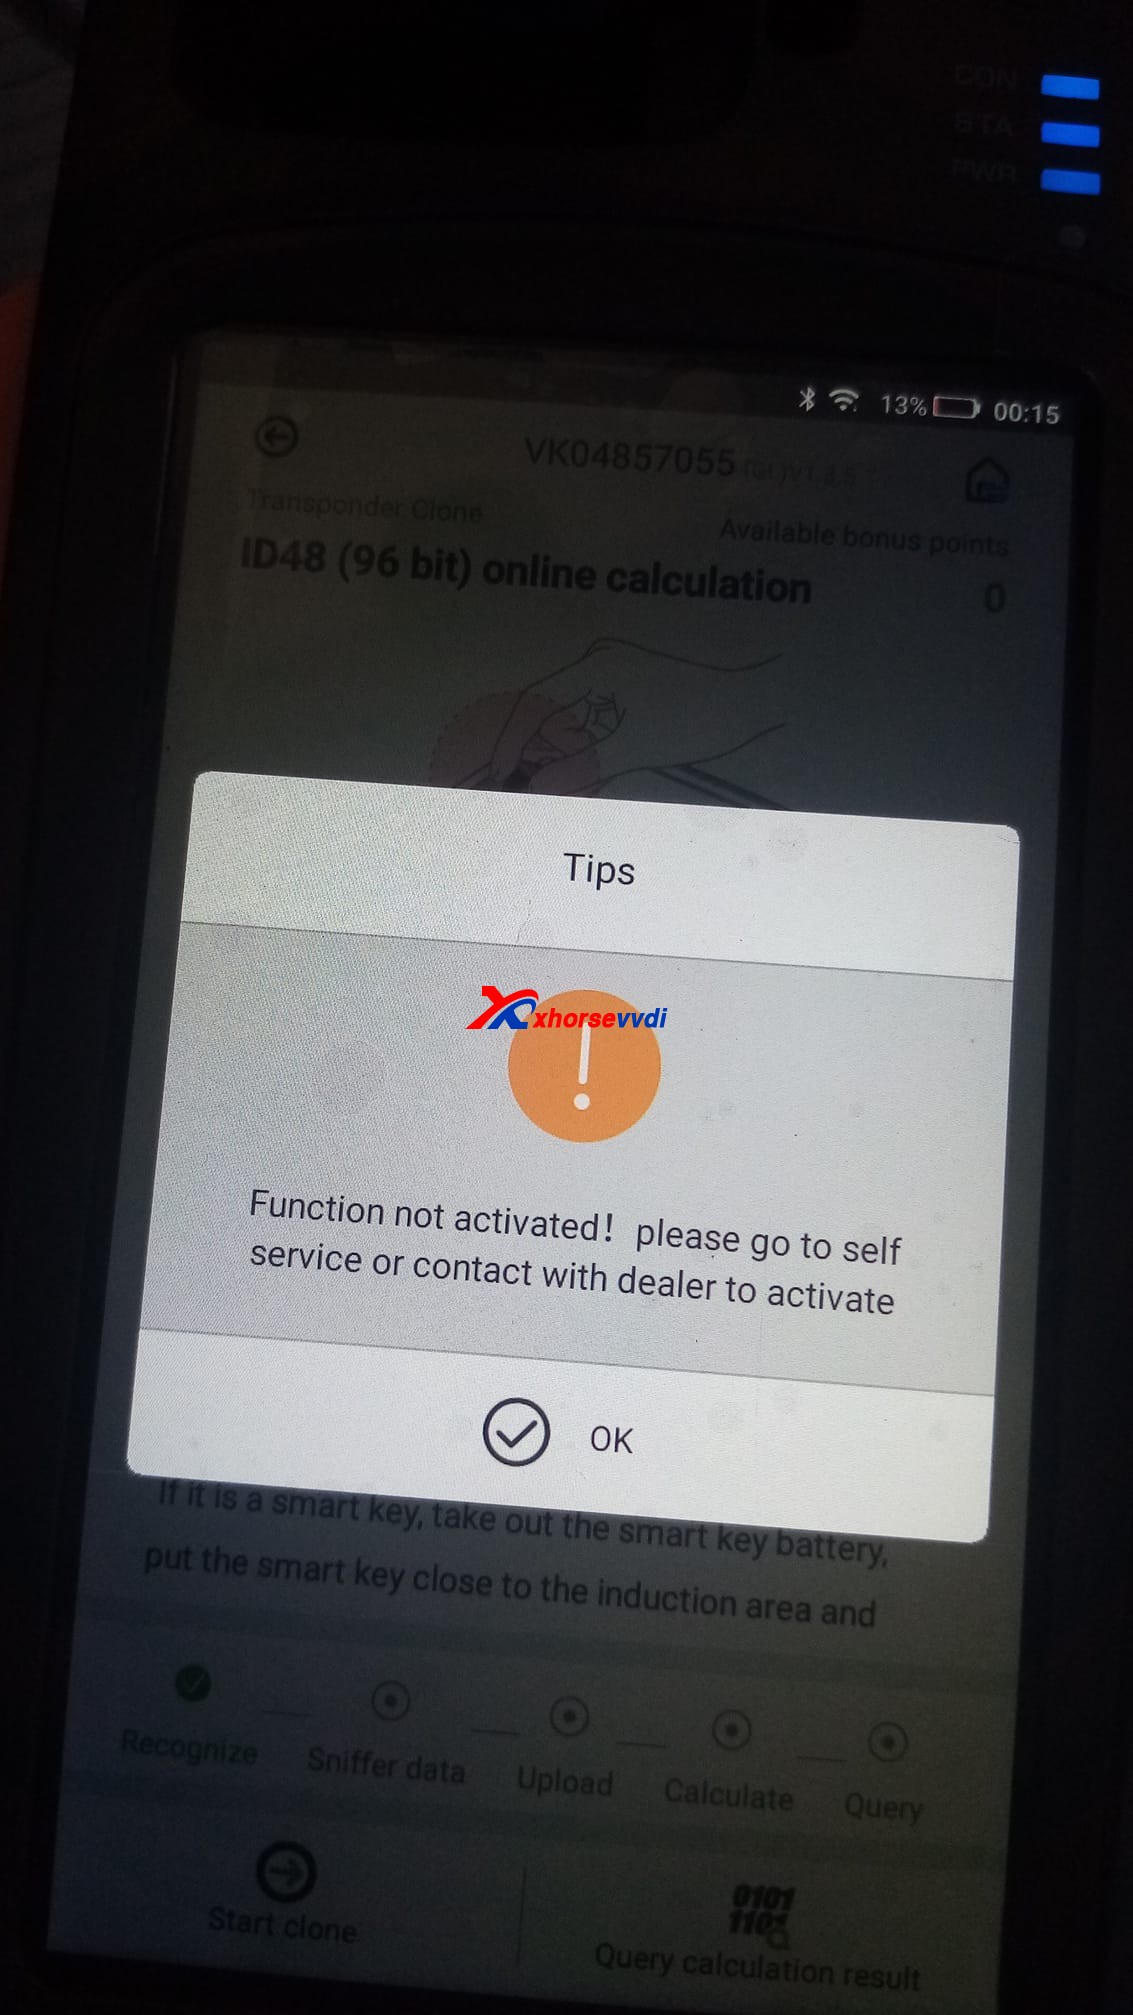
How to Activate Xhorse ID48 (96 Bits) Authorization:
Cheapest option:
The chips 48 are not free. You’ll generate 10 different remote controls(You need to generate keys not clone chips). But no matter what do you generate. This must be programmed 10 of them to collect bonus points and unlock the activation.
You need 10 different keys new from xhorse (Wire,Wireless,Super, Smart Remotes). Generate 10 and then you get this function activated. After that you can use the keys to get them programmed in cars.
Thenthe function automatically activate.
This .pdf file tells how to activate 96bit 48 clone by collecting points:
https://www.xhorsevvdi.com/upload/pro/20052015899636884072.pdf
What type of VVDIremoteshould be generated and how many points to collect:
Wire remote = 25 points
Wireless remote =40 points
Super remote = 40 points
Smart key remote = 60 points
Another option:
Or youbuy ID48 96bit Transponder Copy Authorization Service ($250).
Source of ID48 96bit Transponder Copy Authorization Service ($250):
https://www.xhorsevvdi.com/wholesale/vvdi2-copy-48-transponder-96-bit-authorization.html(It’s the same authorization that is shared with all your combined devices)
Tokens for 48 Cloning = $8
https://www.xhorsevvdi.com/wholesale/1-Token-for-VVDI2-VVDI-Key-Tool-96-bit-ID48-Copy.html
Generate the same for different car brands, 48 chip per token. Everything else is free!
Hope it helps!
Posted by: xhorsevvdi at
06:40 AM
| No Comments
| Add Comment
Post contains 249 words, total size 4 kb.
May 19, 2021
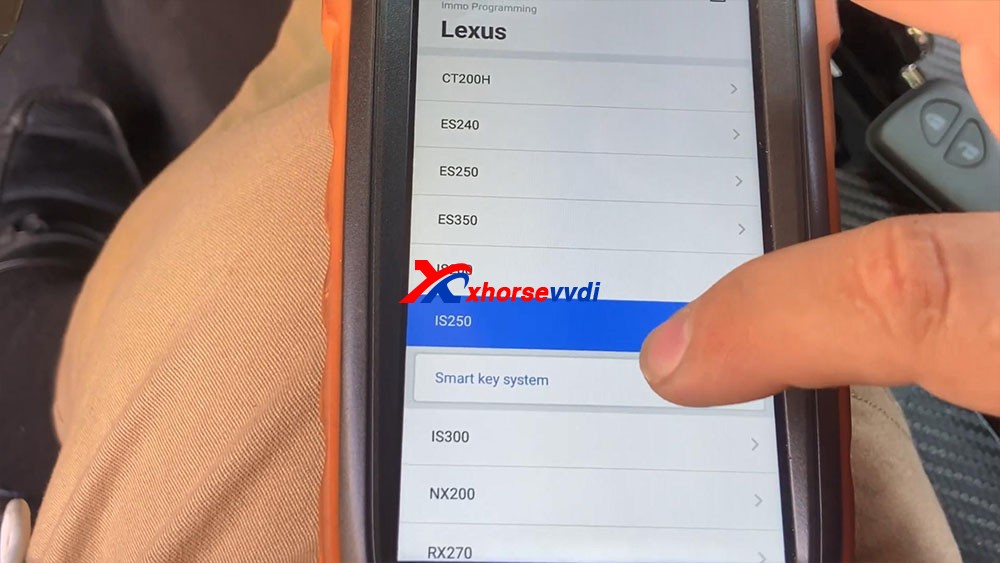
Tutorial on how to add smart key/add key lost for Lexus IS250 2009 - 2013 by using Xhorse VVDI KEY TOOL MAX and MINI OBD TOOL
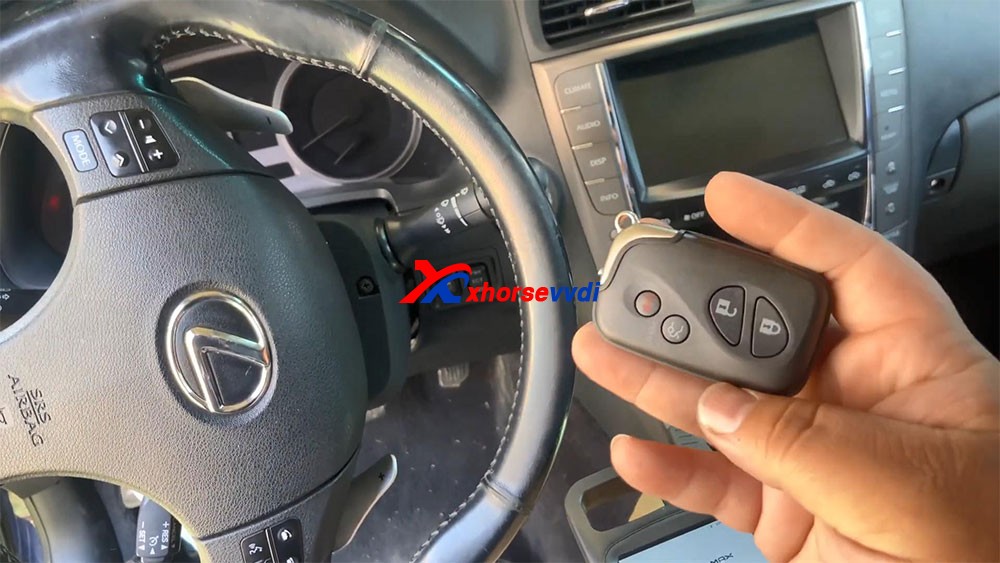
Here you are:
I'm kind of low on battery, so I hooked up the cable to provide for me.
Let's continue guys let's go ahead and program this key that's all smart keys lost.
Okay, so the first thing we're gonna do: agree to enter.
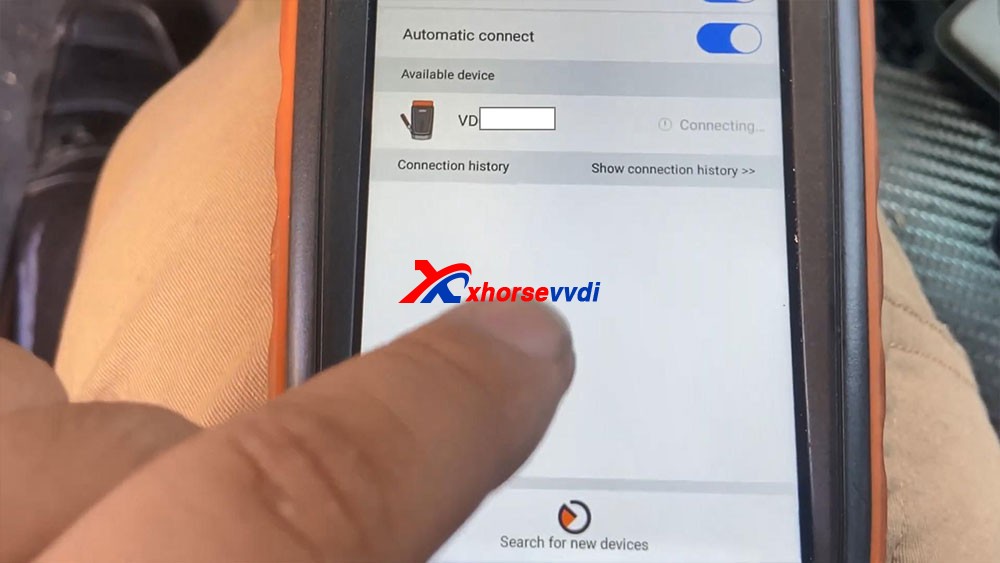
We're gonna go ahead and connect Bluetooth.
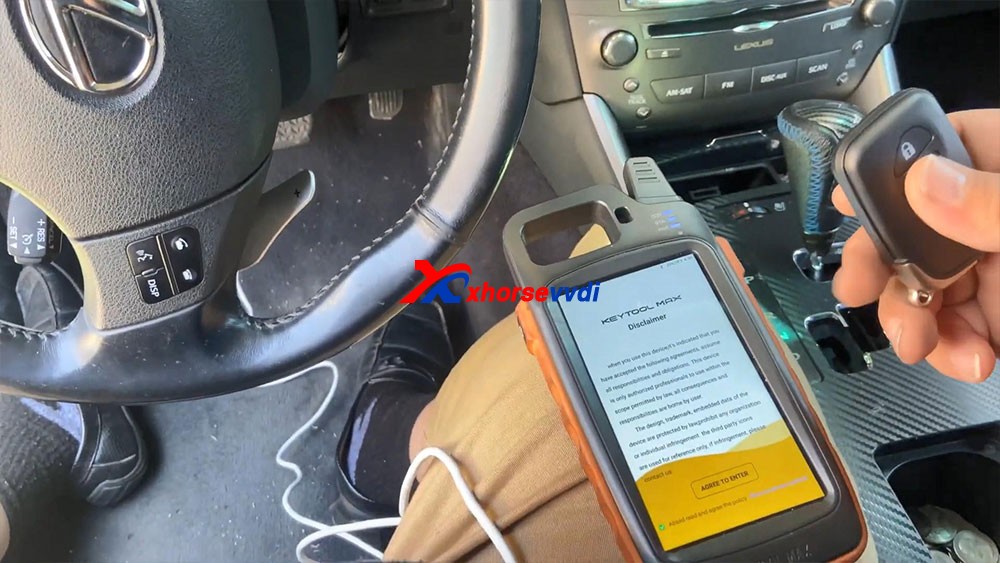
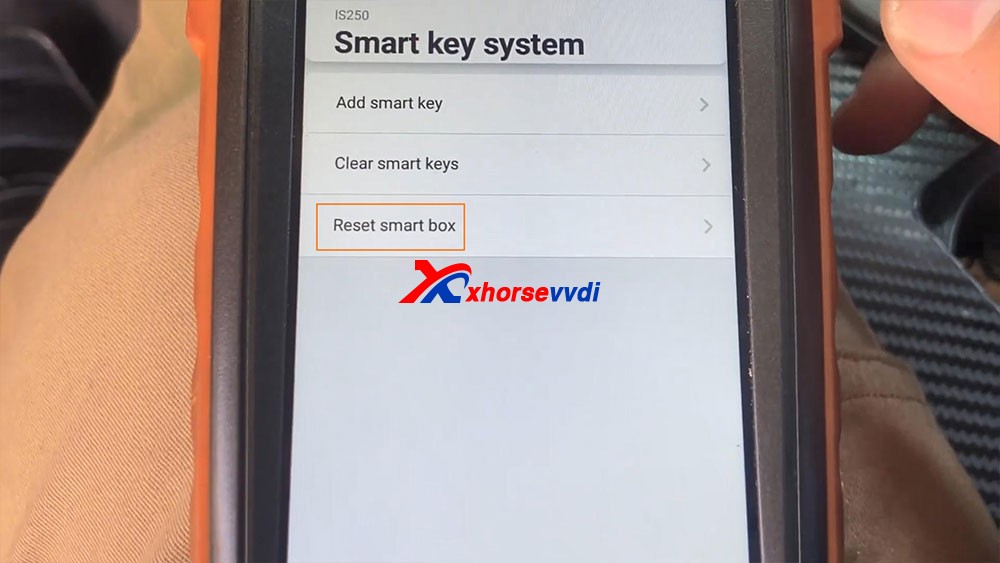
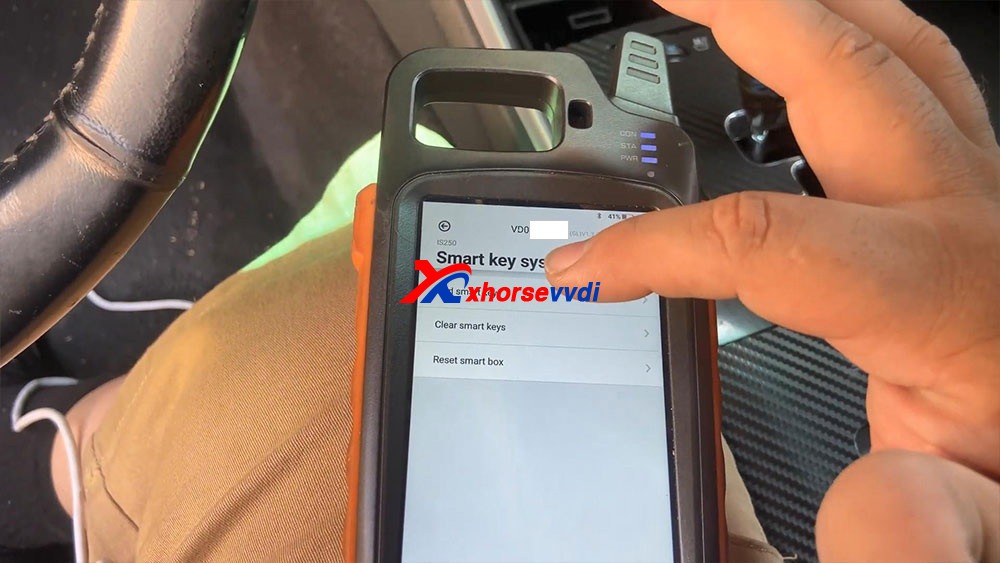
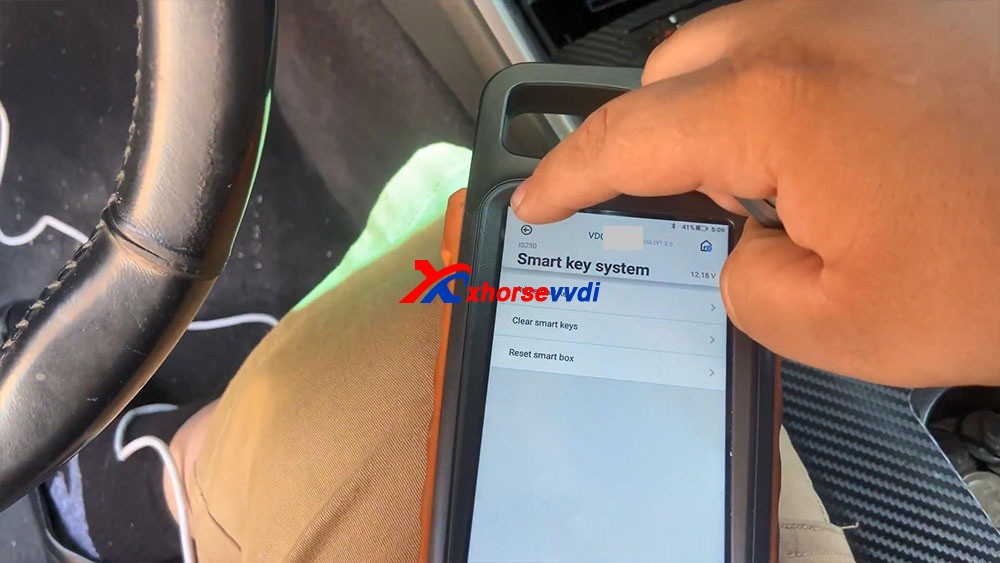
So I just go "Immo programming" -> "Lexus" -> model IS250 -> smart key system -> Start execution.
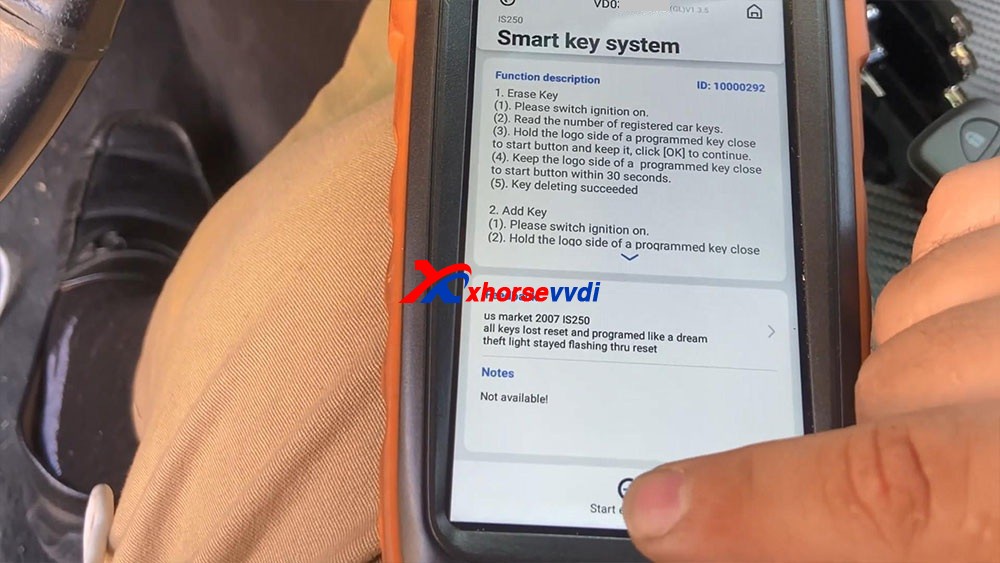
Have tips : The device disconnected, please connect device, just click on"connect", let's connect first, we select the device serial number and it shows connecting and let's try to turn on the ignition, so let's go ahead to select "Start execution".

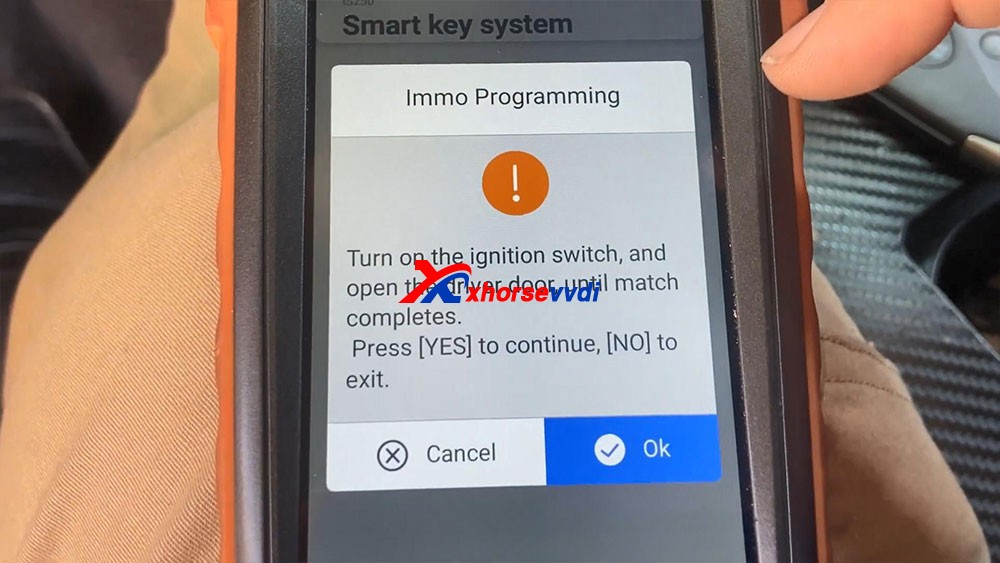
We select"Reset Smart Box"and it says"Turn on the ignition switch, and open the driver door, until match complete",okay, click on "OK".
- Connecting system...
- Secure access...
- Communicating...
- Connecting system...
- Communicating, please wait for about 16 minutes, the IMMO light (Security) will change from off to flashing. (the buzzer will beep at the same time for some vehicles.)
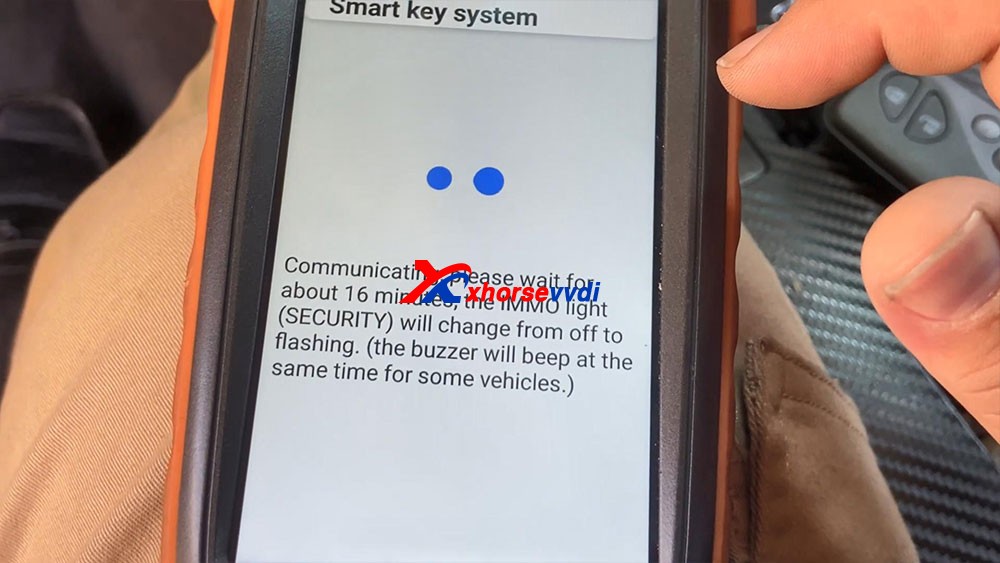
You guys remember waiting for this light to start flashing and last but not least body ad.
Okay so you guys can see the 16 minutes are up and the light and secure light begins to flash.

Reset successfully! Please turn to main menu to perform<Add Smart Keys>to program smart keys.
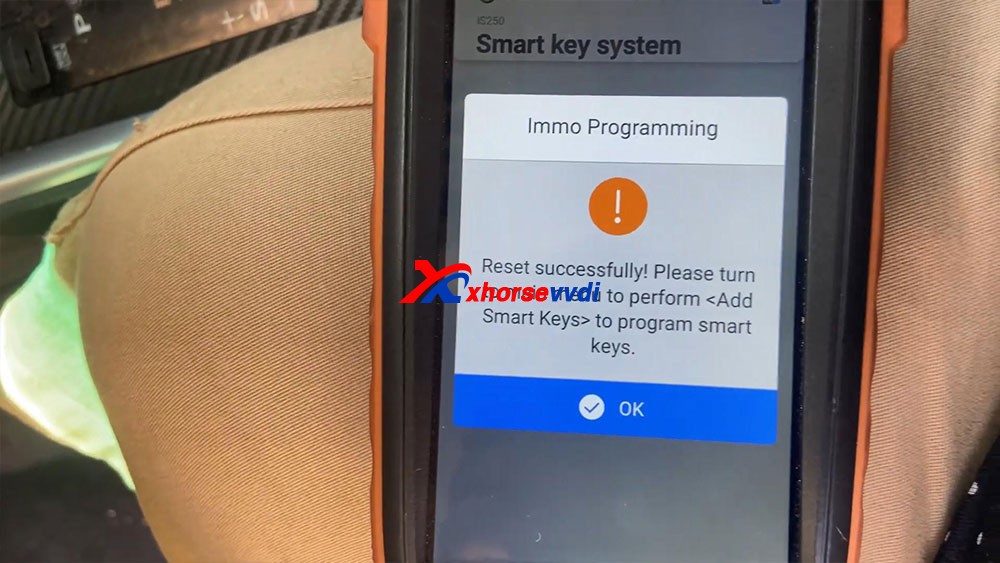
Okay, we're gonna go back to a key.
It says "Turn on the ignition switch", to open the switch
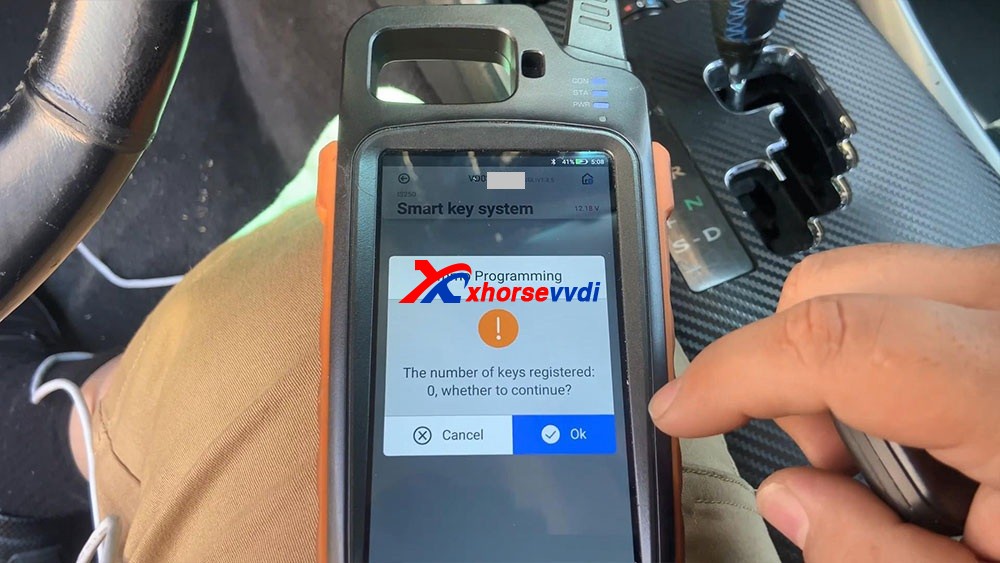
It says "The number of keys registered 0" click on "OK" to continue, yes it tells us there's no keys registered.
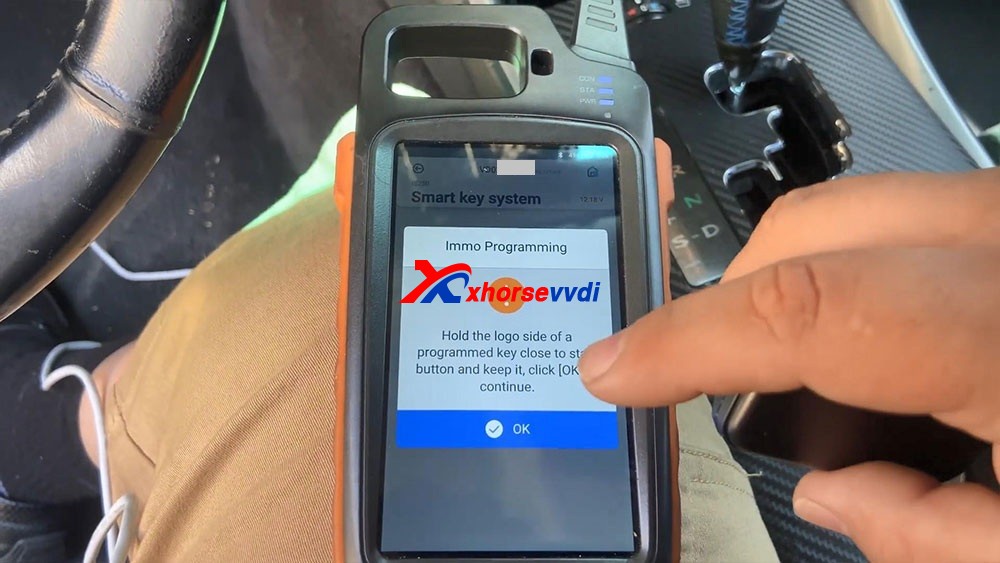
Hold
he logo side of a programmed key close to start button and keep it,
click [OK] to continue. And you will hear beeps after putting the key
close to the start button.
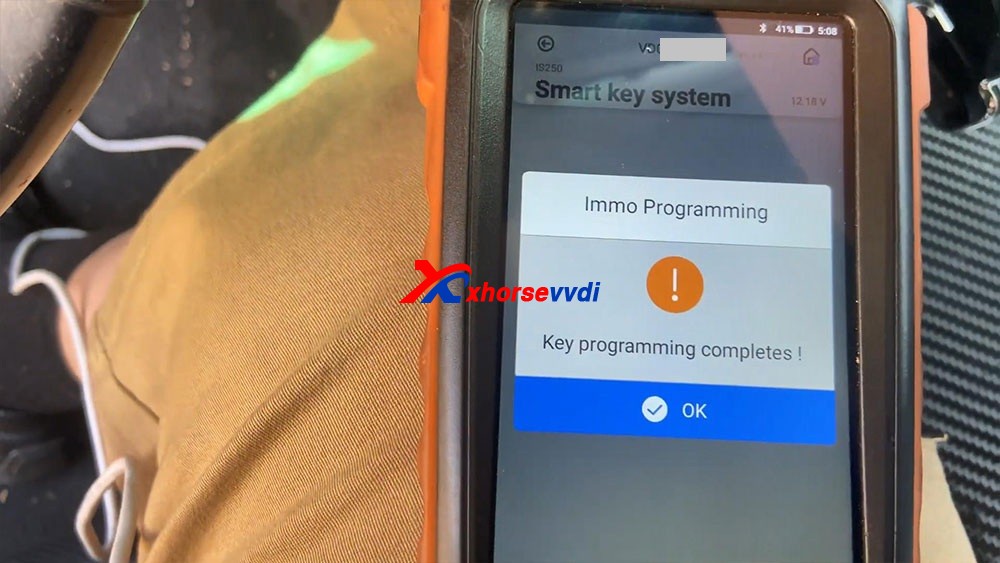
What you see as key programming complete, so we press okay a few times until it actually got the key, and then we press OK.
So
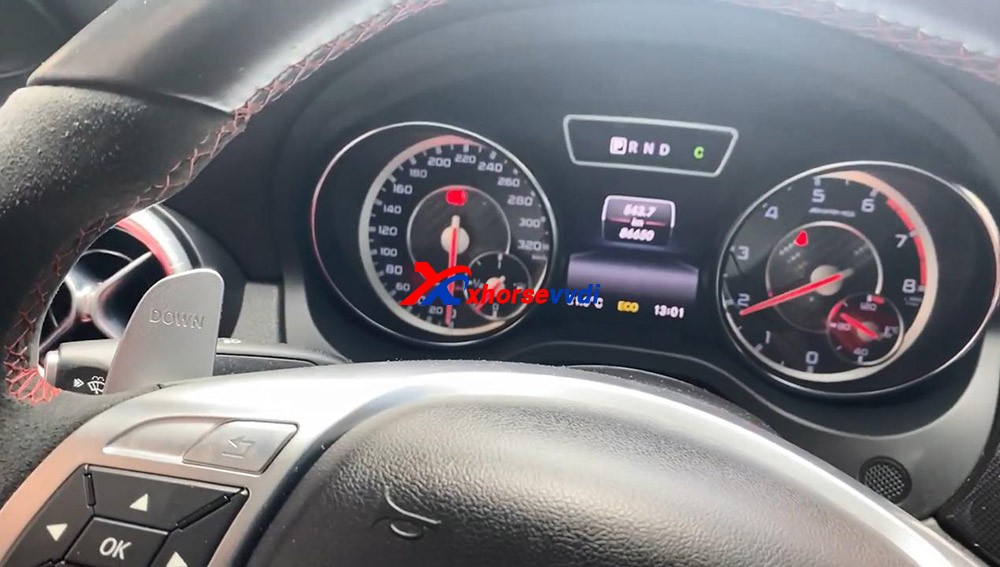
let's go ahead and try to test our key, let's disconnect all this stuff
right here, turn off the ignition , we're gonna close the upper left
icon, then it says "Don't forget your Mini OBD Tool".
Let's go ahead and try the key. Are you guys going to see thatthe key successfully turned on the vehicle.
Let's go ahead andtry a remote, it shows that works really good, perfect.
Okay, so that's how we program a key with Xhorse Key Tool Max and Mini OBD Tool programmer.
Posted by: xhorsevvdi at
05:57 AM
| No Comments
| Add Comment
Post contains 461 words, total size 6 kb.
May 18, 2021
Hello guys, I have here 2013 535 F10 with 6wb cluster to do mileage correction. I couldn't modify mileage in dumps, I already wrote the modified in CAS, but I couldn't write the dump 160d0wt in IC, thought VVDI prog cannot do this service. I have VVDI PROG and VVDI BIMTOOL
Update:
VVDI PROG can ERASE the first 2 lines, I do use adapter SOP16.

Tips:
35160D0WT EEPROMis not erasable and has page-id which locks this memory to its own dashboard-micro. you CANNOT erase or substitute original memory with recovered/bought one. You have to emulate the original memory with an emulator and then edit the data. This requires special tooling and emulatoretc.

Hope it helps!
Source:http://blog.xhorsevvdi.com/535i-f10-6wb-cluster-mileage-correction-with-xhorse-vvdi-prog/
Posted by: xhorsevvdi at
01:40 AM
| No Comments
| Add Comment
Post contains 126 words, total size 2 kb.
May 14, 2021
Welcome to another article aboutXhorse VVDI Mini Prog Programmer, this has arrived and we don’t get anything for any of these tools that we review for free, we actually buy them, the reason we bought Mini Prog is because we have the other Xhorse key tool and it pairs up with it and it’s worthwhile to see if this tool will do what it’s meant to do, in the states they had a number of devices like this even going back for some time now, but they were really only suitable for American cars, they only came with the American software, now Xhorse has brought this one out here which is very interesting,it runs off Bluetooth it talks to the key programmer, it has different heads on it.

And this is a pick chip or soic chip, this little tiny chip right here on the board so that last little one right up there on the end there, alright, that’s what that is.

And what that is inside immobilizers speedoes, they’re in all sorts of electronics these days where memories being stored and for us locksmiths, we need to read that chip and actually take the code out of it and put it back into a transponder chip which the car can read, so this is like the brain that holds the code and the car transponder chip is the actual bit that has to have the right code to match with this, in short term.

so I thought I’d just give you a quick little unboxing on this one here we’ve got the instructions here.

Capacity 200 and 2550 milliamps normal work time, five hours standby time, five days recharge current 1.5 amp, we’ve look at that in the sec, main functions: eeprom data read write, module read and write, data edit mcu, data read write, data storage, so, we’ve got a couple of different adapters here, type mini prog that’s this here, push type SOP8 one tester which I believe is on it, type 2 which would be a one of these ones, type 3 a DB15 cable which will probably be that one or this one eeprom adapter, which is this one right here and a usb and a needle set, we don’t have that and instructions okay, so this right here, dongle I don’t think that’s all that I think that is separate that’s a something else, I’ve just put it in there so it doesn’t get lost.
Alright flicking through now, we have the lead on the top, we have a light indicated tell is on we have it on and off button, a page turning button and a light button, so if this has a light on the front of it, that would be really cool, a start stop button, lithium battery button and a type c charging port on the side of the device, so obviously we would need to use it either with an APP we use it with our other xhorse tool, a key tool Max or Key Tool plus and that should be able to.
So let’s go through and have a look now.
so the design of it is it’s a series of gold pins behind almost like an acrylic front owner and on the back here we can see a row of pins so there’s definitely some sort of push function happening, if I just push this down here you can see that those pins actually come through, if you can see that.


okay that’s how that was working and we’ve got multiple sizes here.
So for my example here, if I was to check this against this,we would come up over the top and push on that and that’s quite a nice push.
Like I can see that that’s good one thing here is I’m not saying I’m not seeing any red spike on the identifying number one leg, on this chip I can clearly see here on the left-hand side but on this ,I can’t see I can only see number three on the front, so and on the back, so I can’t identify number one straight off the BAT which is a little bit unusual gonna push that over the top, so it does fit straight over the top real nice real snug and bang. You can read that chip

If you’ve got that why do you need this, and this is the question, I’ve been curious about why would you need this, so what you normally do here is you plug this into your computer and you bring up like a little soic program and you would solder on the chips onto here and then you could read it that way, perhaps that’s like a backup plan in case you can’t. You can’t get with this tool.

But I would have thought with this tool, you wouldn’t need that isn’t that the whole idea, now this thing does look like a big Ding Dong, but I think for us locksmiths might be a cool tool to have right there, it is there once again that’s for those larger chips that’s there let’s see how hard it is to swap the heads out slight twist and putting on the new head, now there is a center locating golden link in the middle there, so I’m going to push it on top.
Push it on top, push it down push it on top.
No okay push it on top and then twist it around, and now it’s secure, so the battery is located in here that’s fairly straightforward start button to push that on there, holding down the start button three two one nine okay so the start but needs to do the reading obviously.


Okay, now we got power on top looks a little LCD screen on there too, which has a QR code for the APP to download before you can start to use it, battery status on how much battery a wi-fi and Bluetooth indicator there as well.
Now it’s got manual here.

Mini prog version number V0.2.5

So we’ll probably know more about that later let’s try the light, but now I’ll look at that that’s cool I like that.

Let’s just try that on to a chip now, so that right there is if you can see it.
So the right way around.

You know that looks good have a look at it from this side that light is pretty cool

I’m impressed with the menu of the little LCD screen as well I’m impressed with the C connection is what most more modern phones are using now.
The weight of 300 grams, length of it like you know it’s good a 180 long and it’s probably about 40 mil wide all the way around so interesting tool.
So I would really like to see this out in the field and just basically hooking it up and putting it on a chip and seeing if I can get a key from it and I’m just going to turn it off now give it a good charge overnight, hold the switch button for 8 seconds.
There’s your cable on this side which is to fit this adapter, just like a comms port.

If you want to use this adapter, here you actually have to plug this in like this, twist this on so it’s connected.

Okay, and then we would have to plug this in like so.

Okay, then we would have to solder or use a clamp or one of these feelings or push the chip in there then we would actually have to push the button on the back and then hopefully that should send the information back to ourXhorse VVDI Smart Tool.

anyway, that’s Xhorse Mini Prog the quick look over it, so that’s just basically what’s in the box.
Video:
Source:http://blog.xhorsevvdi.com/xhorse-vvdi-mini-prog-programmer-soic-quick-overlook/
Posted by: xhorsevvdi at
10:03 AM
| No Comments
| Add Comment
Post contains 1321 words, total size 17 kb.
May 12, 2021
Yes!Add key 2014 w246withVVDI Key Tool PlusSuccessfully, the whole procedure was done by obd2.
It takes about8 minutes to calculate the password. It’s a great key programmer, I’m very happy with it.


Enjoy!
Posted by: xhorsevvdi at
06:23 AM
| No Comments
| Add Comment
Post contains 44 words, total size 4 kb.
May 07, 2021
Look at TOY.T Universal Smart Key :

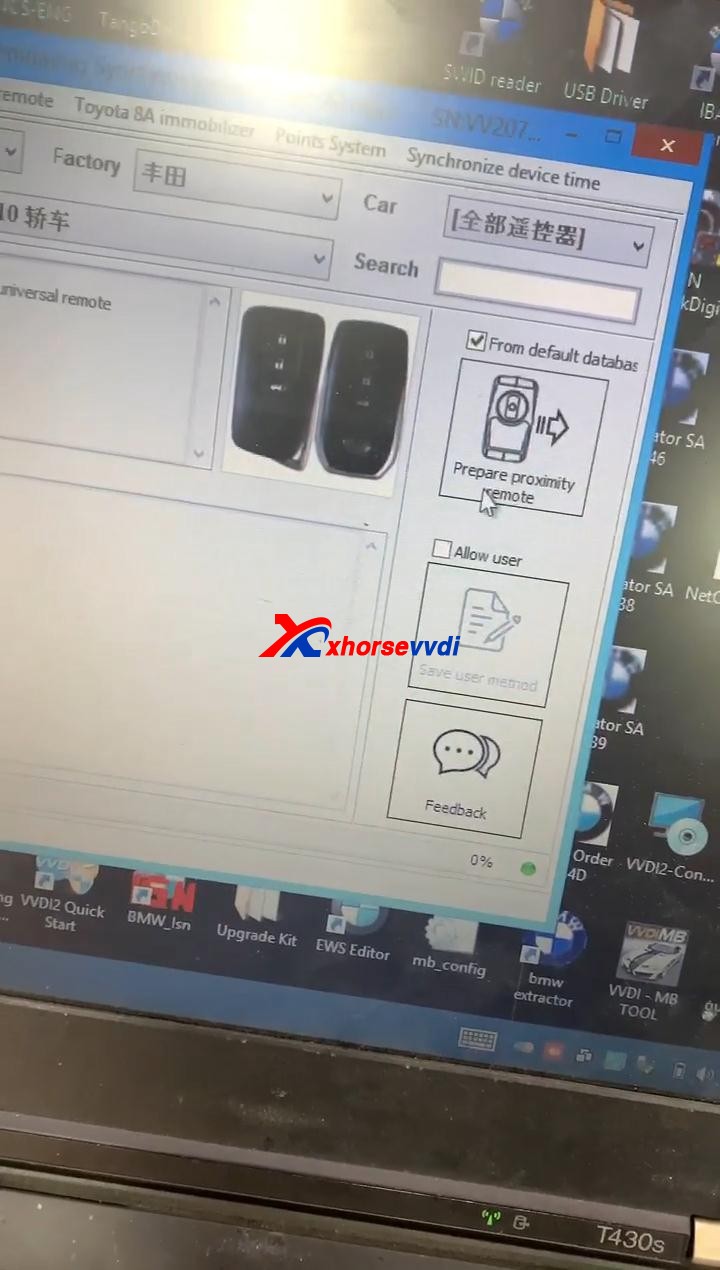
Open Xhorse VVDI2 software, click on "Prepare proximity remote".
Read the following attentions and follow it:
Attention 1: This type require special Xhorse XM Smart Key, the procedure require internet support.
Attention 2: it needs some bonus points for each XM Proximity remote first use.
Attention 3: Toyota Proximity remote (XM special) don't have bonus points.
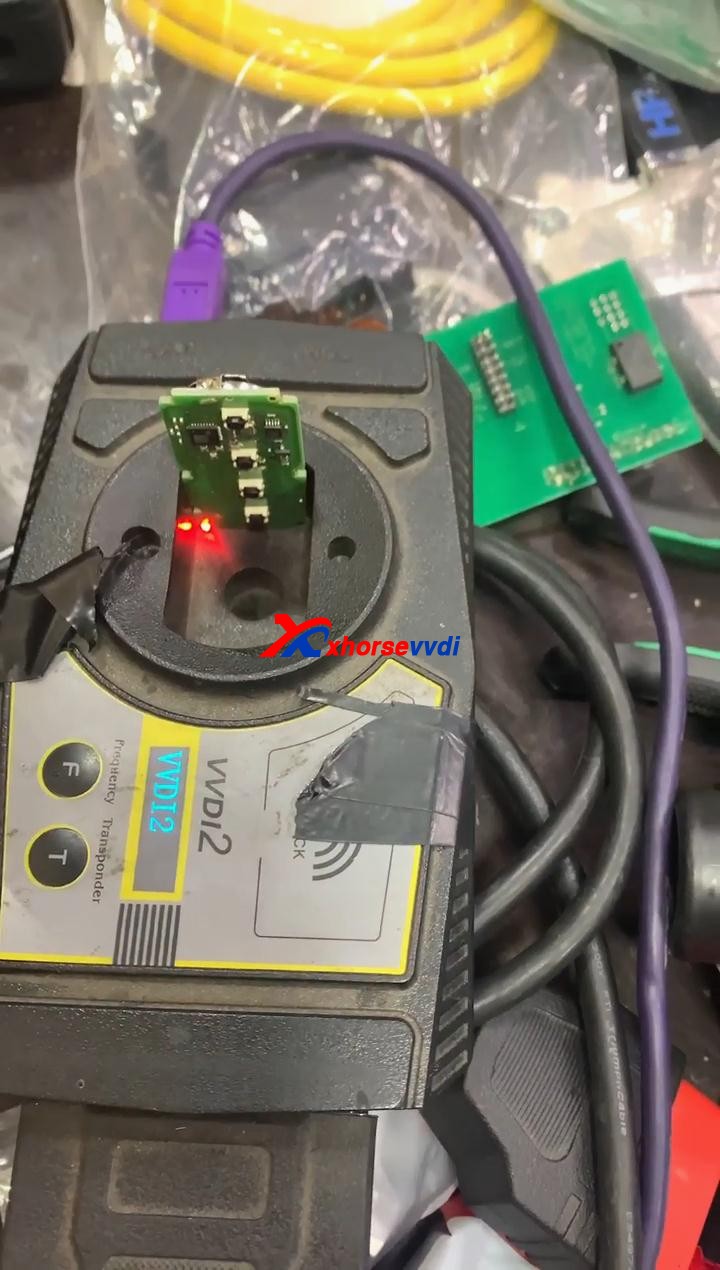
Input XM proximity remote to device coil before continue.
After reading the above attention, click on "Yes".


Synchronize with server.
Please wait...
Query result...
Calculating, require 5 seconds, query after 10 seconds... (Cannot be cancelled)
Prepare remote - XM proximity mode...5

Enjoy!
TOY.T Universal Smart Key is available here:
https://www.xhorsevvdi.com/wholesale/xhorse-smart-key-for-toyota.html


Source:http://blog.xhorsevvdi.com/how-to-generate-toyota-xm-remote-with-vvdi2-and-toyt/
Posted by: xhorsevvdi at
09:33 AM
| No Comments
| Add Comment
Post contains 138 words, total size 6 kb.
32 queries taking 0.0542 seconds, 105 records returned.
Powered by Minx 1.1.6c-pink.

