


October 11, 2023
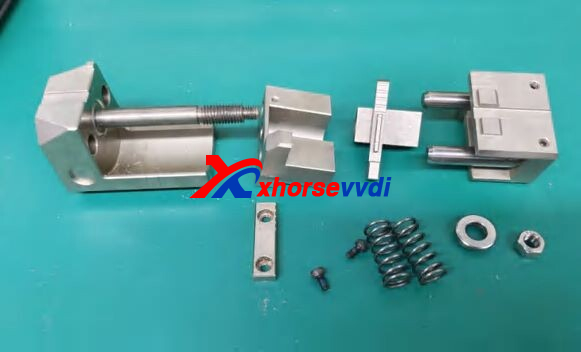
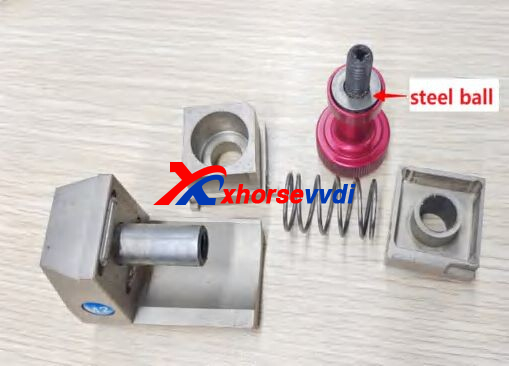
One customer gave feedback about his Xhorse M5 Clamp. This part not move to the center and stay all time in this position . In official video this part move to the center position.
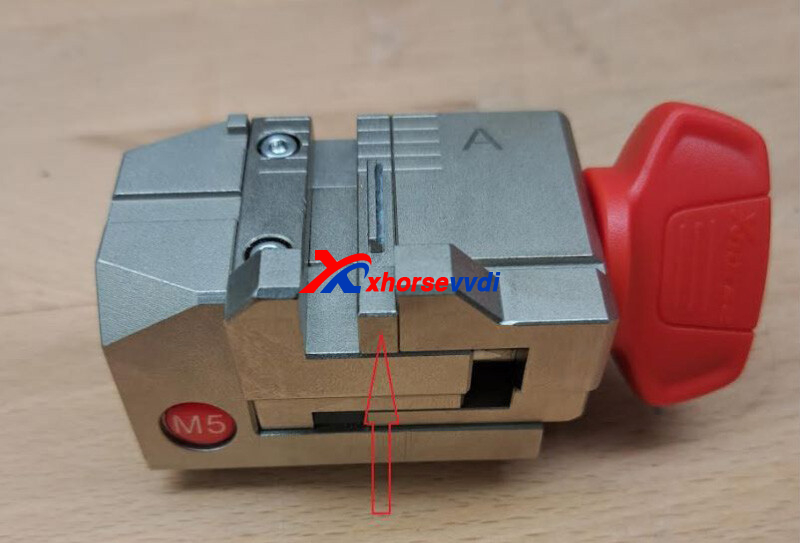
Here is the Solution:
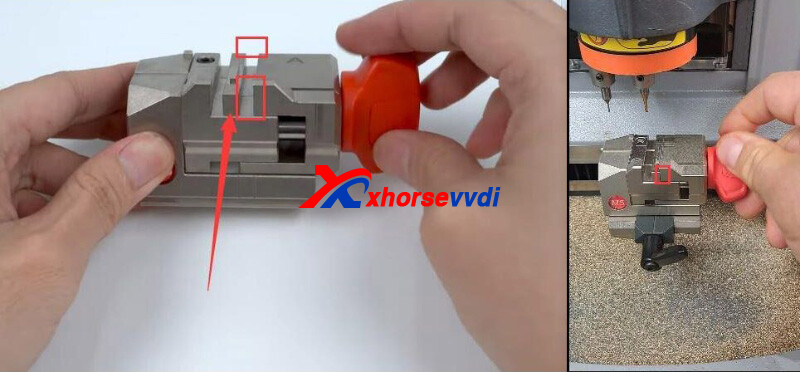
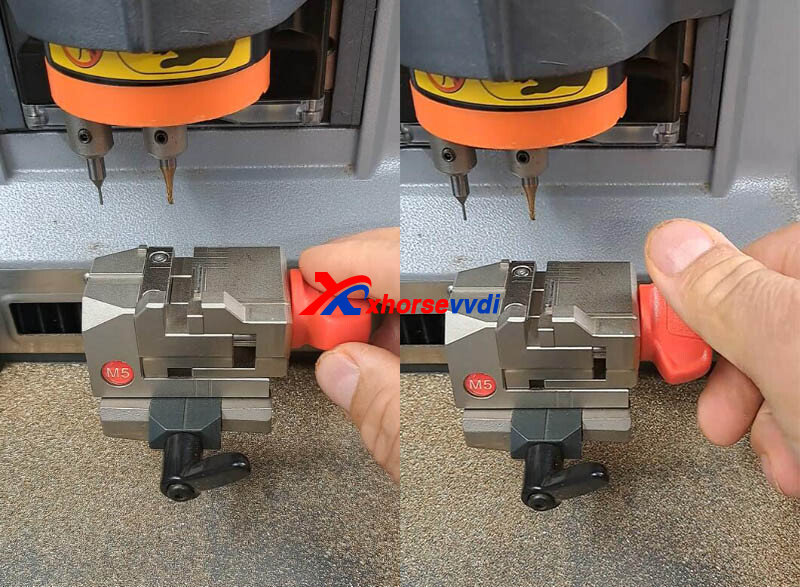
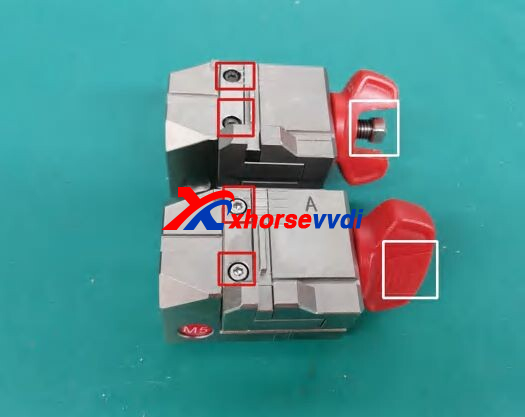
Re-assemble the clamp
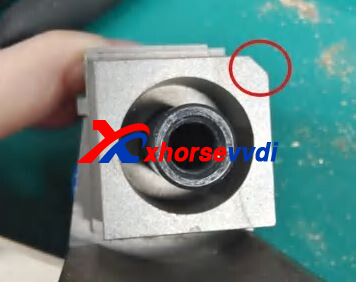
1)Remove the nut in the white frame
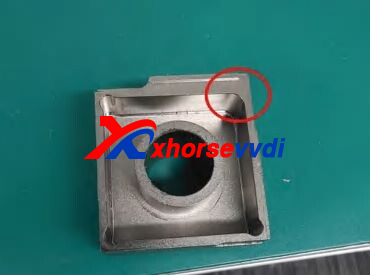
2)Remove the screws in the red frame below
3)Rotate the knob outward, then it can be disassembled
4)Re-assemble M5 Clamp and install it on Condor Mini Plus Machine
For more details, please check Maintenance Manual.
http://blog.xhorsevvdi.com/how-to-fix-xhorse-m5-clamp-center-part-stuck-on-right-position/
Posted by: xhorsevvdi at
07:34 AM
| No Comments
| Add Comment
Post contains 96 words, total size 2 kb.
Here we are going to share you Xhorse Dolphin XP005L maintenance manual. Hope it would help you replace broken parts like battery, screen, main board...
*This manual applies to models with serial number KM10, KM11 of DolphinⅡModel.
Free Download:
Dolphin XP005L Maintenance Manual
Dolphin XP005L Screws:
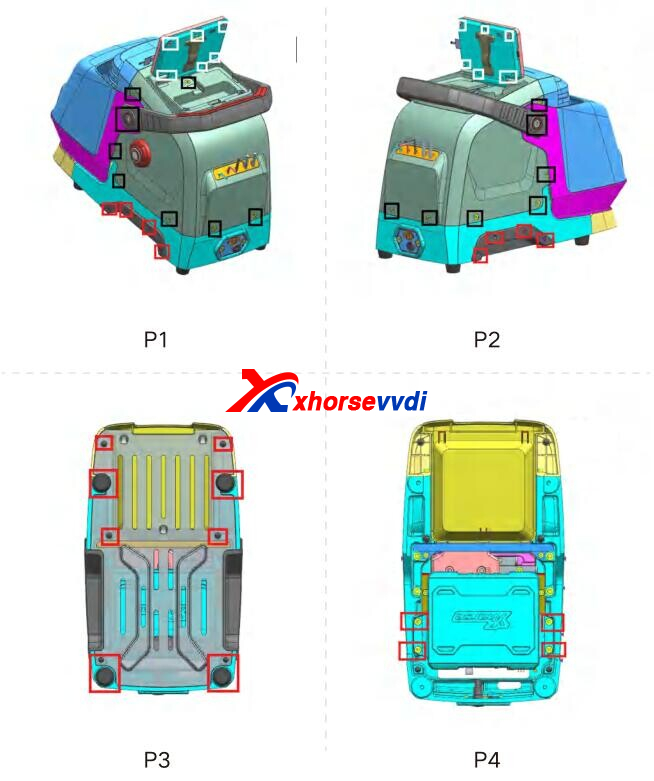
How to Replace Screen?
Please refer to the disassembly pictures P1 and P2 in Chapter 1. Remove the screws in the black frame separately to remove the rear cover and screen, then remove the screws in the white frame, as shown in the following picture, remove the wires in the circle, then push out the bracket that fixes the screen, and finally remove the plastic pins from the screen harness, then you can separate the screen from the back rover.
How to Replace M2 Clamps?
Rotate the knob outward on the left picture, then it can be disassembled.
Replace the corresponding parts according to the picture on the right.
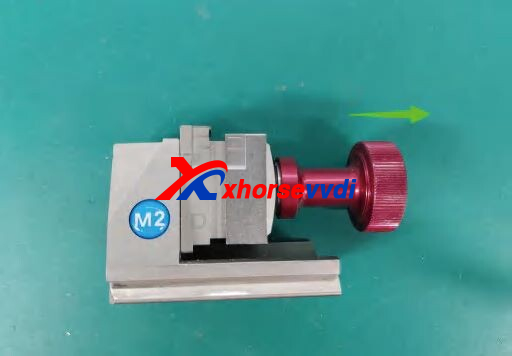
*M2 clamp needs to pay attention to the gaps in the fright figure, align it before tightening, Otherwise, it may get stuck.
More details, please check maintenance manual.
http://blog.xhorsevvdi.com/free-download-xhorse-dolphin-xp005l-maintenance-manual/
Posted by: xhorsevvdi at
07:33 AM
| No Comments
| Add Comment
Post contains 191 words, total size 3 kb.
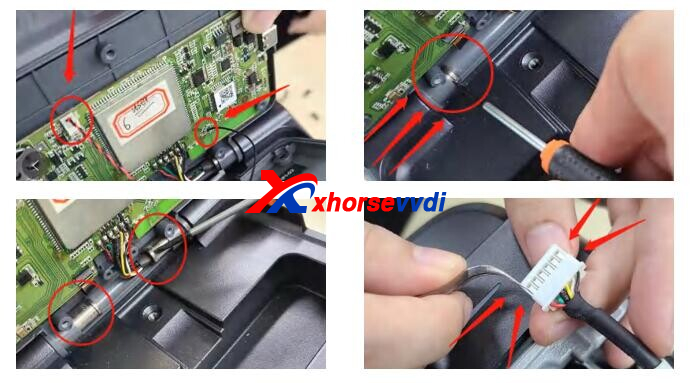
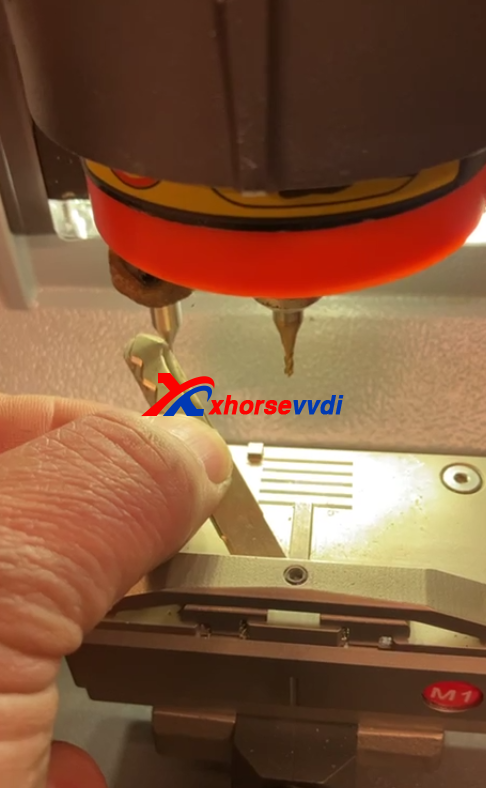
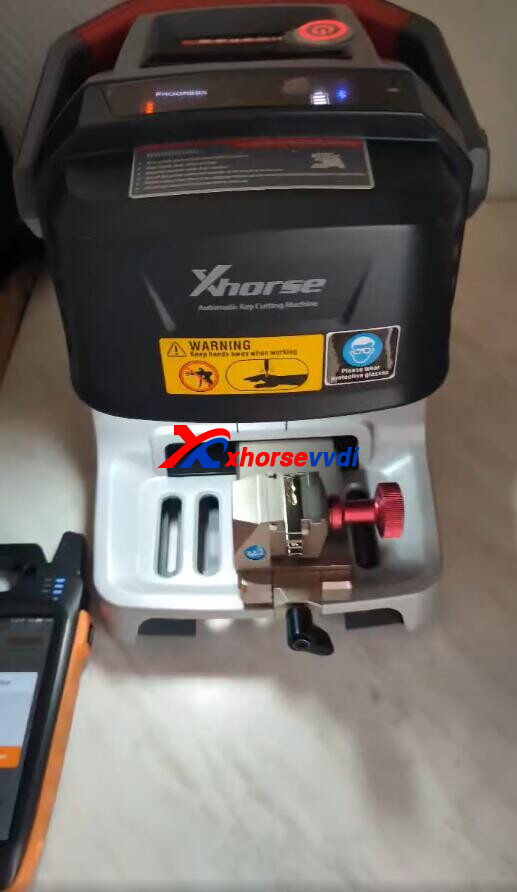
Xhorse condor xc-mini plus 2 is the most powerful key cutting machine from Xhorse, can support motorcycle keys, dimples keys with dimple cutter. And this blog we will share one review from customer about the plus 2 can't calibrate height error
hi i have condor xc mini plus 2 cutting machine problem
updated machine latest version
and cant calibrate height
gets error cant see probe
when really needs to see cutter
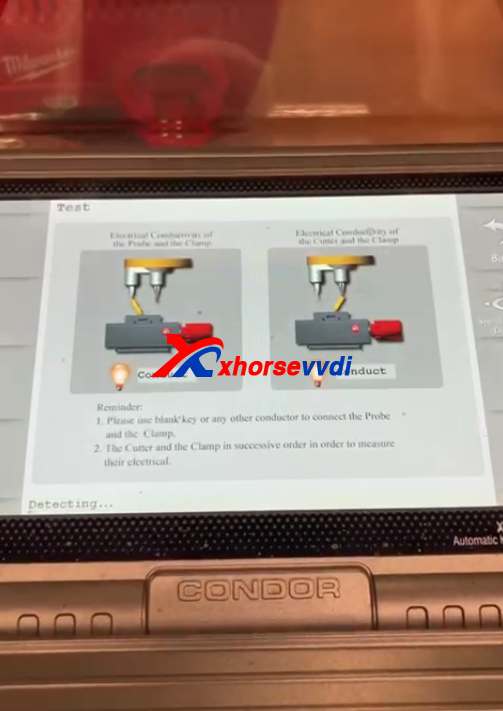
just done a coneectivity test
when touchse probe to clamp with a key blade both probe and cutter light up
Please do like the guide:
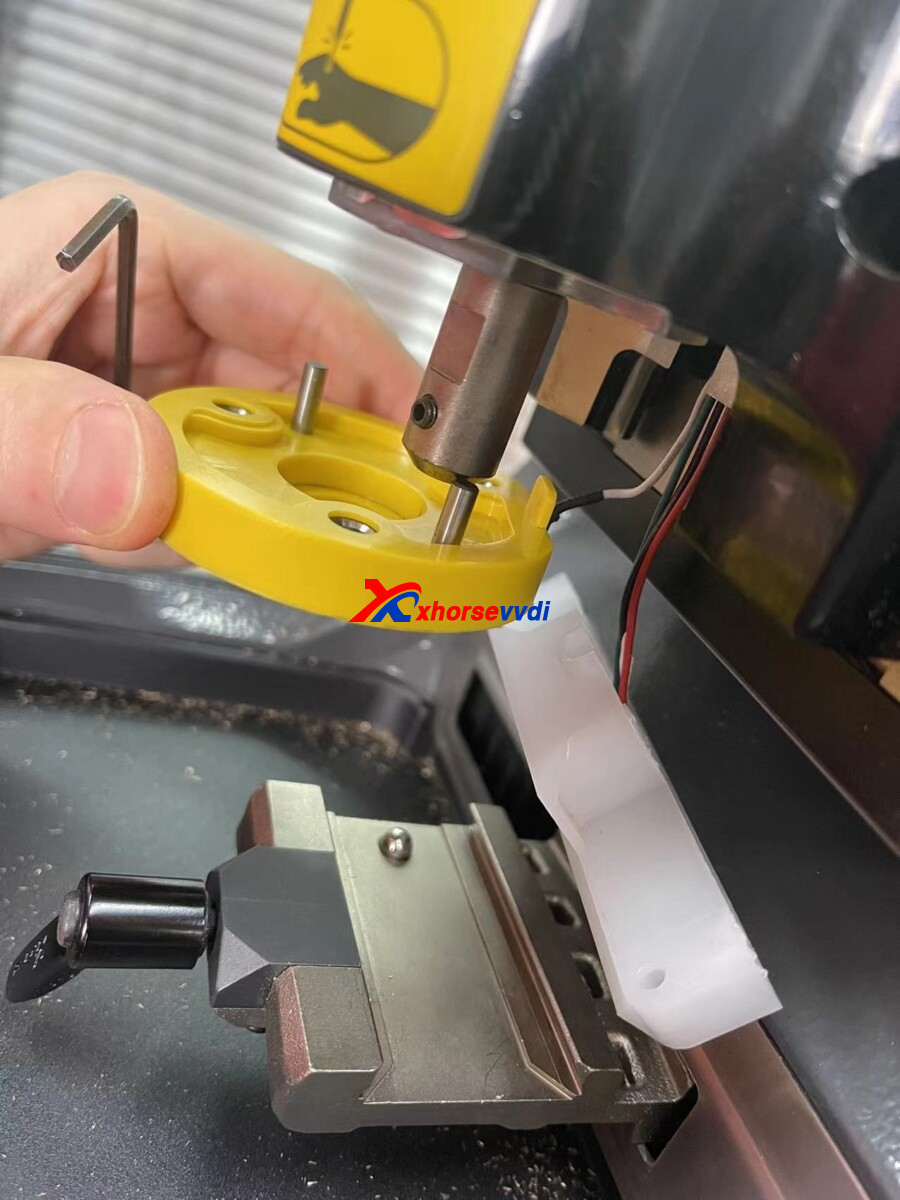
1 , Remove those those screws for take off machine screen
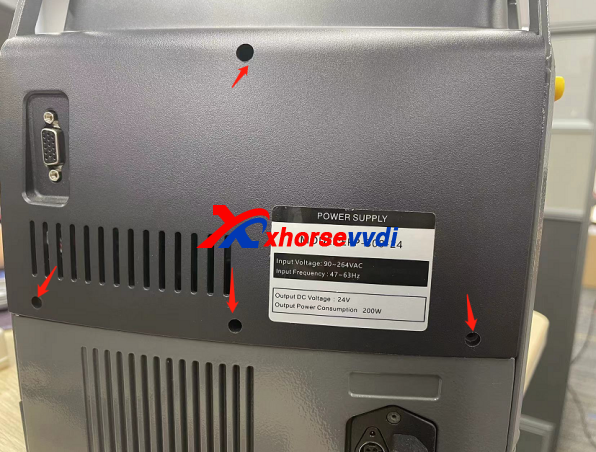
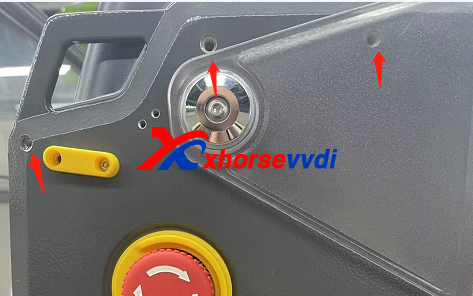
2, Pull out the whole motor to expose the whole motor case and remove those screws to take off motor case
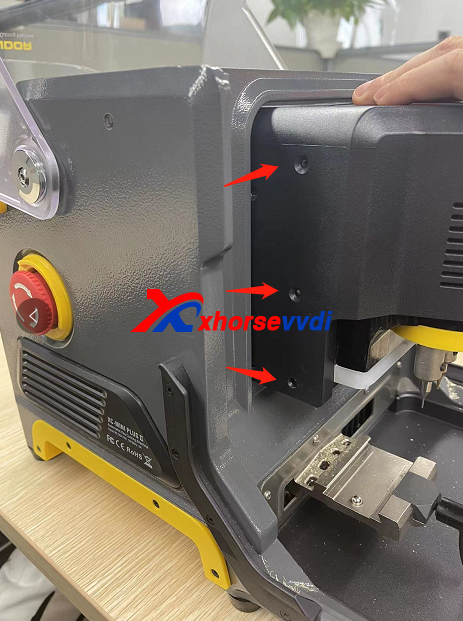
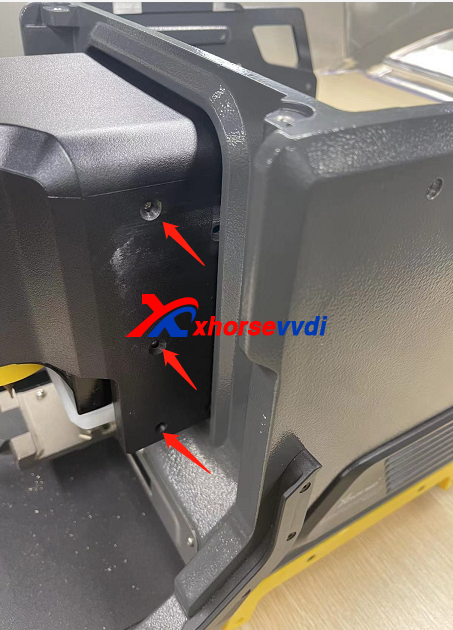
3 , After remove the motor case , the cable which related conductivity it will expose , please check if that cable has any damaged
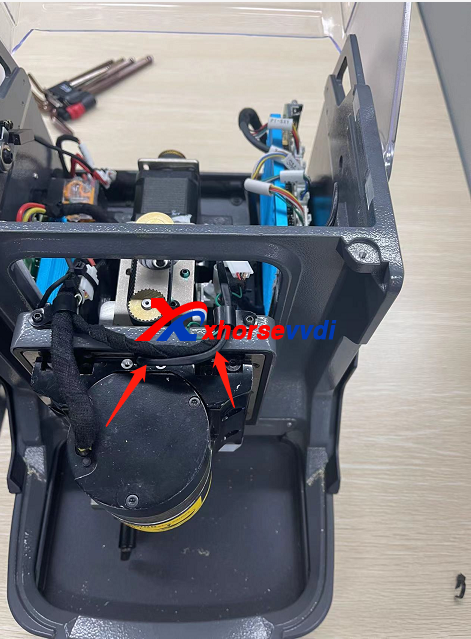
4.This cable go though whole mian motor, one side connect with led bar and one side connect with probe base ,for remove that cable it need to remove the cable socket and then pull it out from bottom led bar side
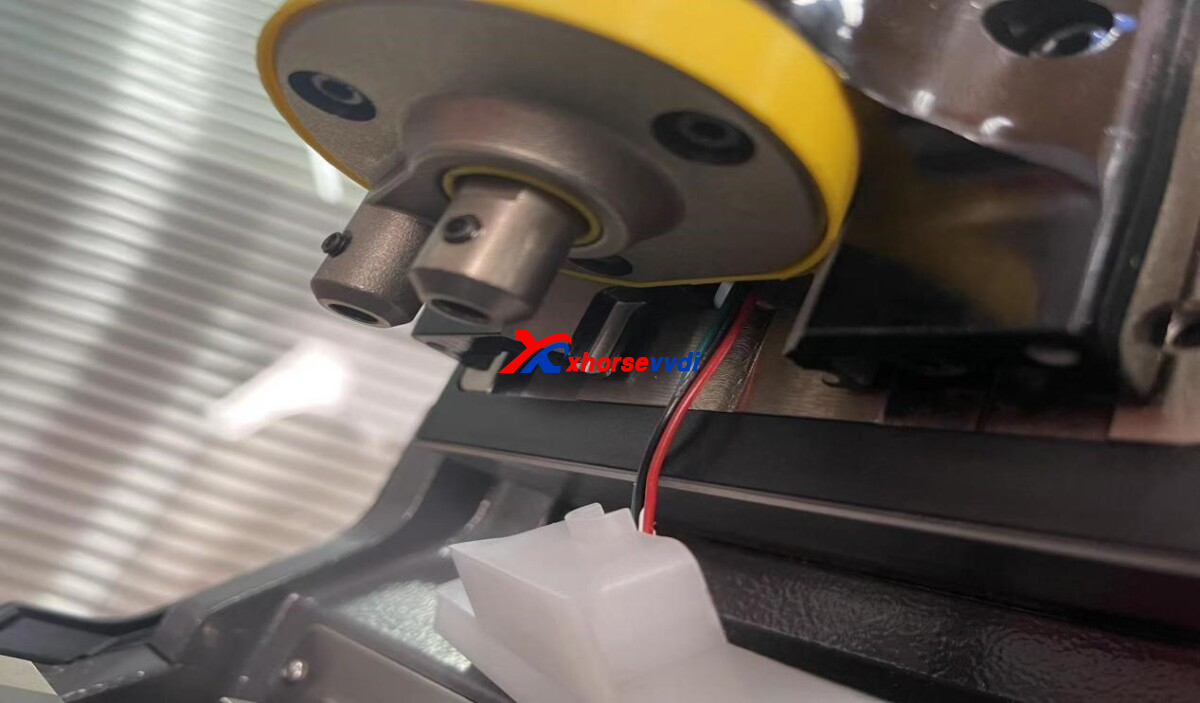
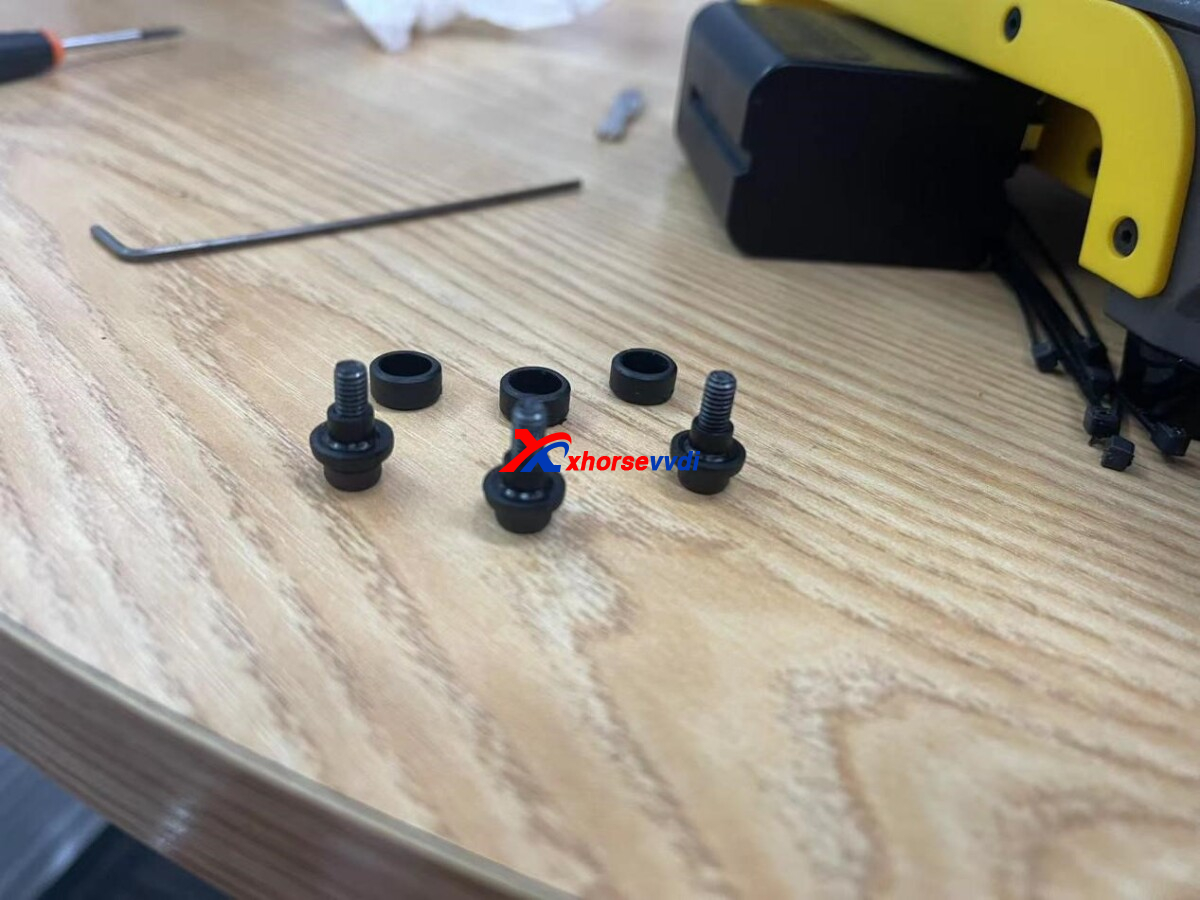
5.Loosen the fixing screw of the conductive wire as shown above and remove the LED lamp cover.
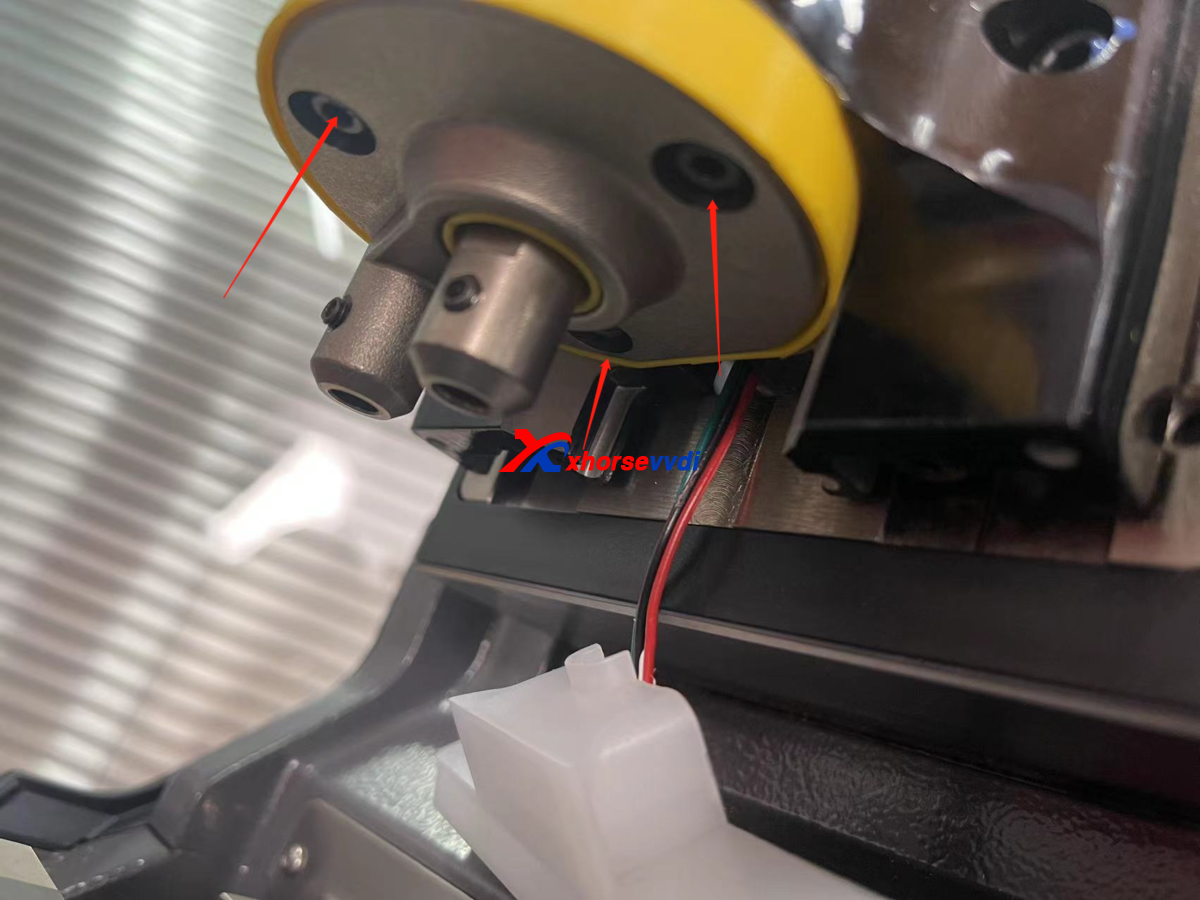
6.Remove the three fixing screws, note that there are three black plastic parts on the screws, do not lose them.
7.Check if the four wires are broken or if the screws are tightened.

Posted by: xhorsevvdi at
07:33 AM
| No Comments
| Add Comment
Post contains 254 words, total size 4 kb.
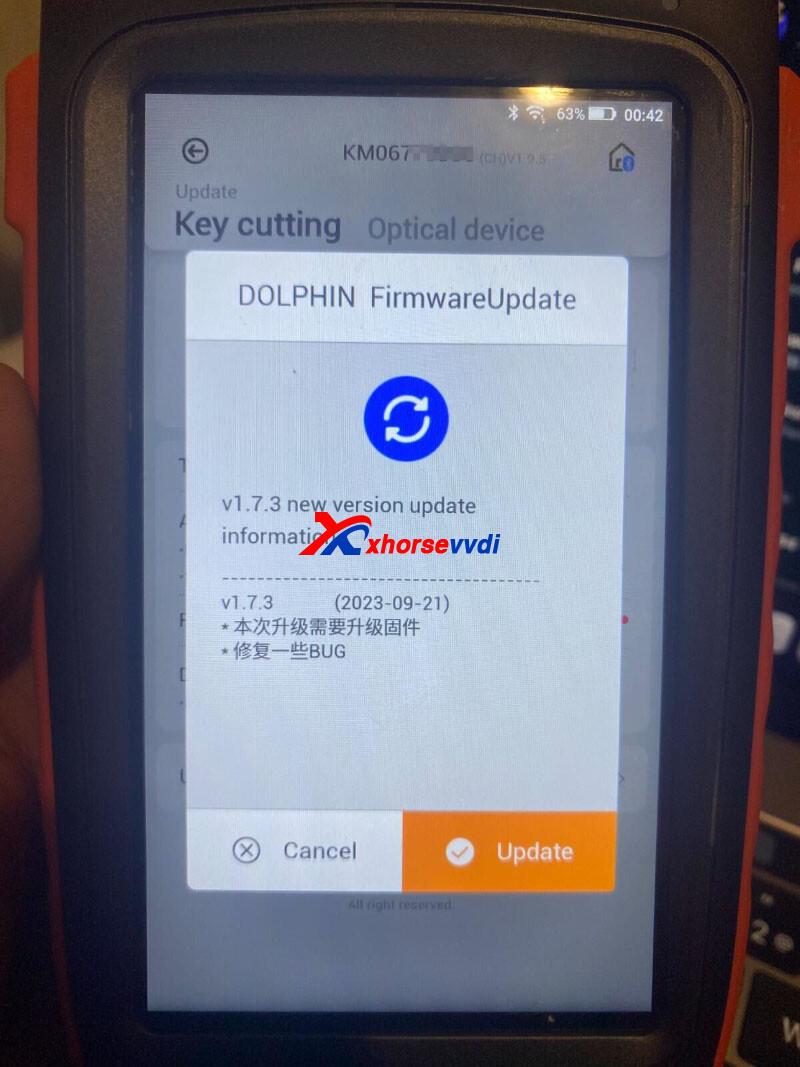
For Xhorse dolohin xp-005l key cutting machine, we received feedback that The cut of va6 is no good!
There is big problem with dolphin with the last update we can cut correctly va6!!!!!!
Please do not worry, newer update will fix the error.
http://blog.xhorsevvdi.com/xhorse-dolphin-xp-005l-next-update-will-fix-va6/
Posted by: xhorsevvdi at
07:32 AM
| No Comments
| Add Comment
Post contains 52 words, total size 1 kb.
Question:
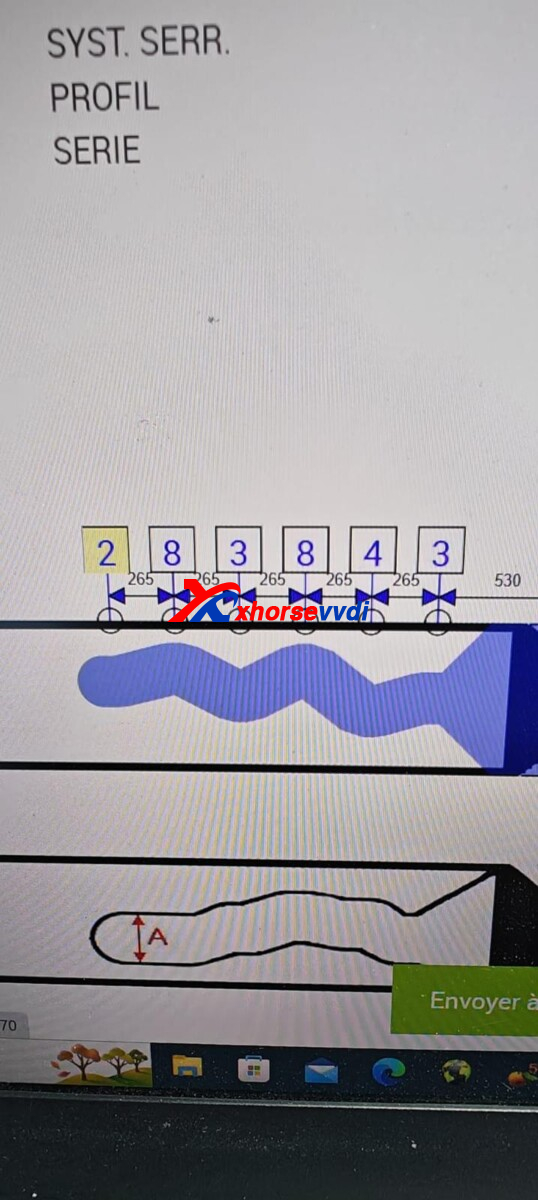
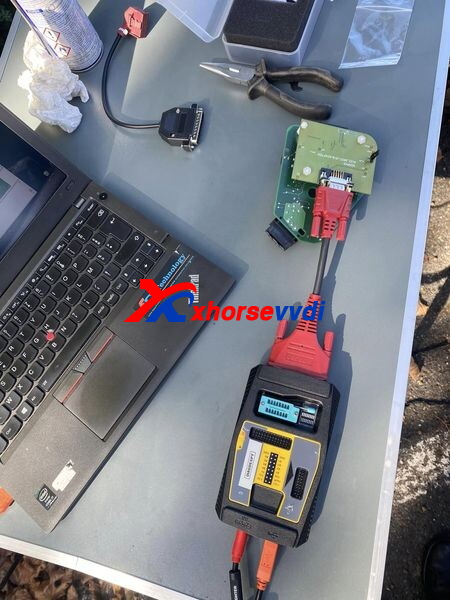
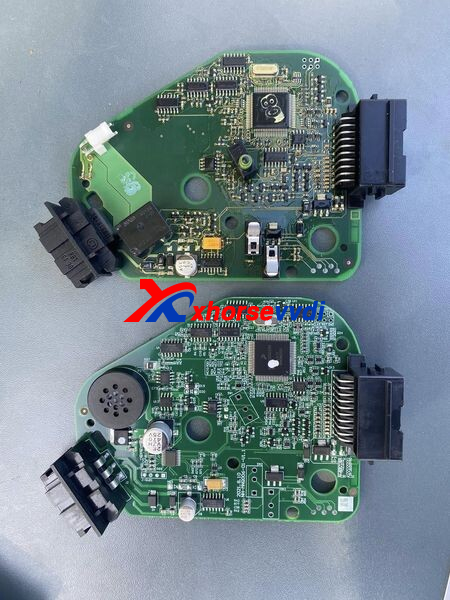
Audi A6 C6, no ignition, steering locked.
Changed J518 module by J518 emulator.
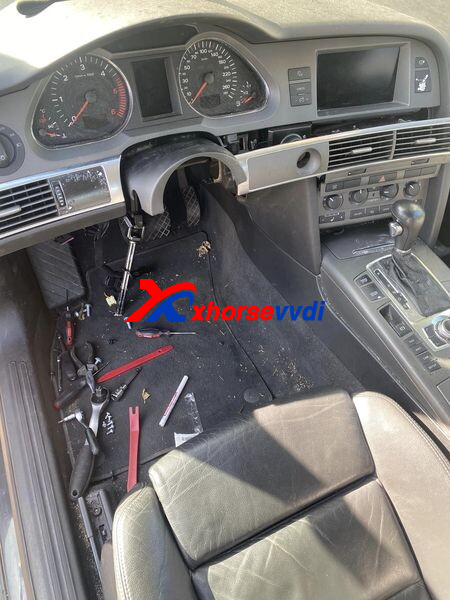
Reading eeprom and flash from original and writing on VVDI PROG J518 Emulator.
Job done with VVDI PROG and J518 solder free.
Also with Soldering method and cable v1 directly on PCB…
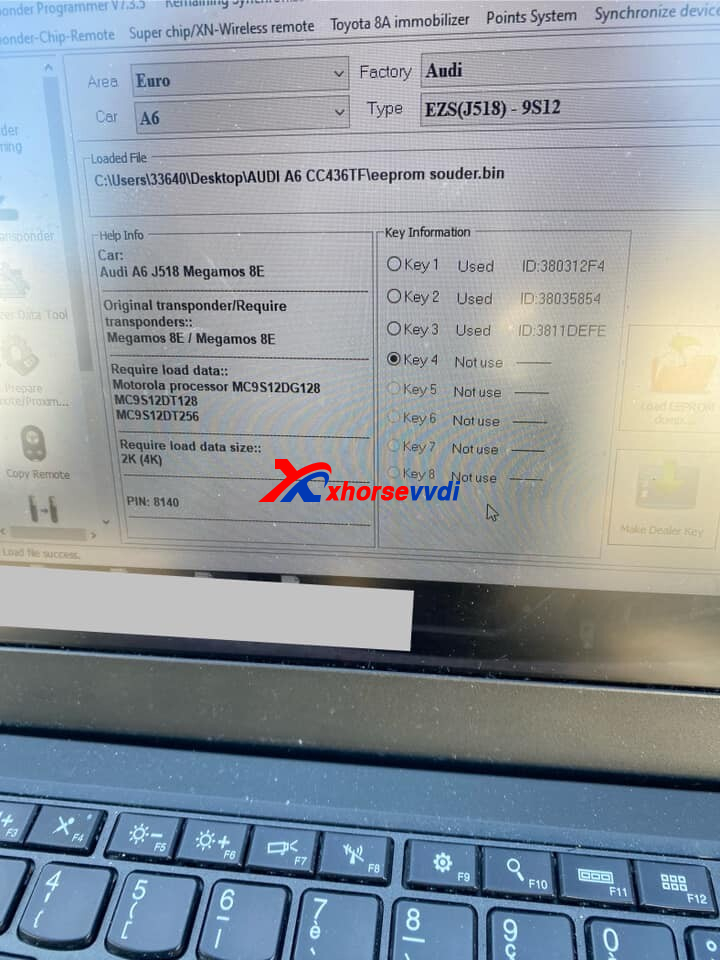
Possible Solutions:
1)Sometimes all you need to do is delete the fault code and ignition will be on again. Or just unlock steering when is off the rack and switch ignition on. After disable ignition lock and that's it. 80% of that problem works.
2)Scan car. Hold brake pedal down or with light switch and you will get communications.
3)In J518 you can find two types of mcu. Some have 9s12d_128 and some have 9s12d_256 mcu. In emulator you have 9s12d_256 so it need 4Kb file. If your ELV have 2Kb eeprom, just with hex editor open some 4Kb file, in first half put all FF and in the second half copy-paste eeprom from original ELV. Flash leave the original from emulator. But you have to find why you do not have communication with ELV. Because you have to erase DTC and from emulator. Once I had water damage in can gateway on A6 4F and no communication with the vehicle at all.
Feedback:
The car run now.
Done! Hope this could help!
http://blog.xhorsevvdi.com/audi-a6-c6-replace-by-vvdi-j518-emulator-elv-locked-solution/
Posted by: xhorsevvdi at
07:32 AM
| No Comments
| Add Comment
Post contains 231 words, total size 3 kb.
One customer asked how to install this case in the Xhorse Remote.
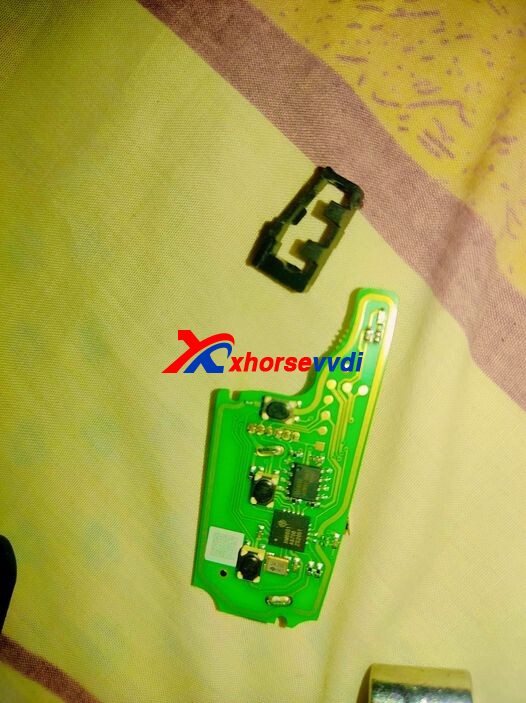
What is the case?
The case that fixes chip on Xhorse Key PCB instead of glowing it.
Here is the way:
Install it on the top, and the pointy head is up.
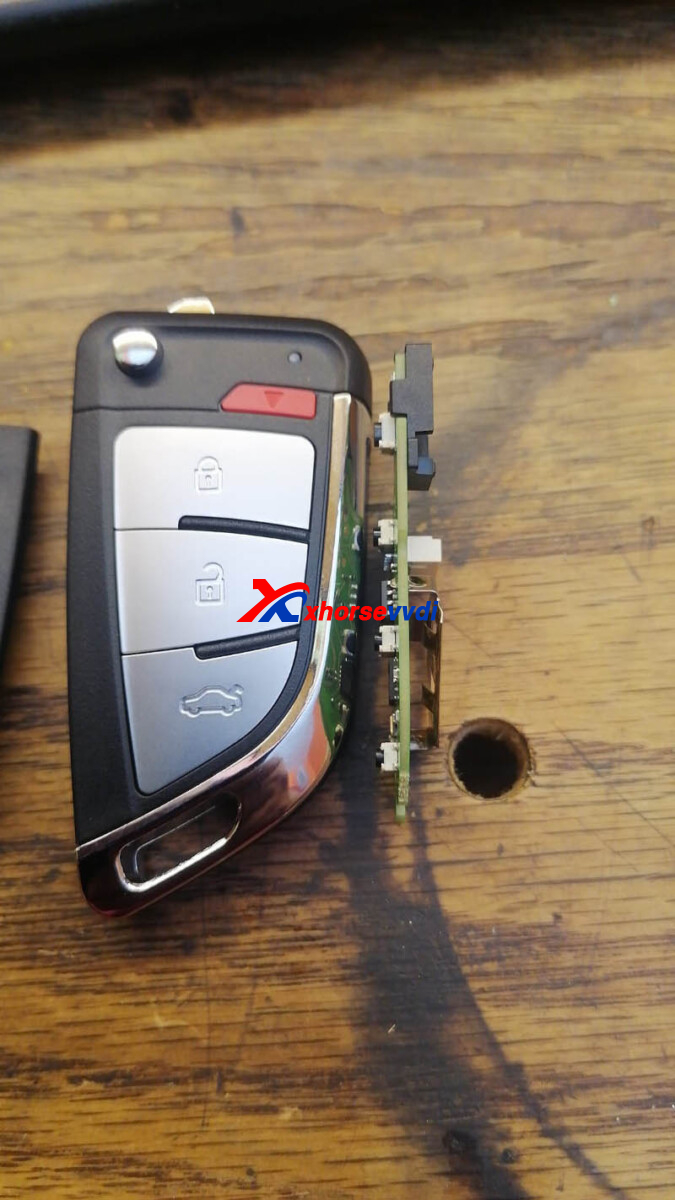
With/ without chip, make sure the red button works well after installation.
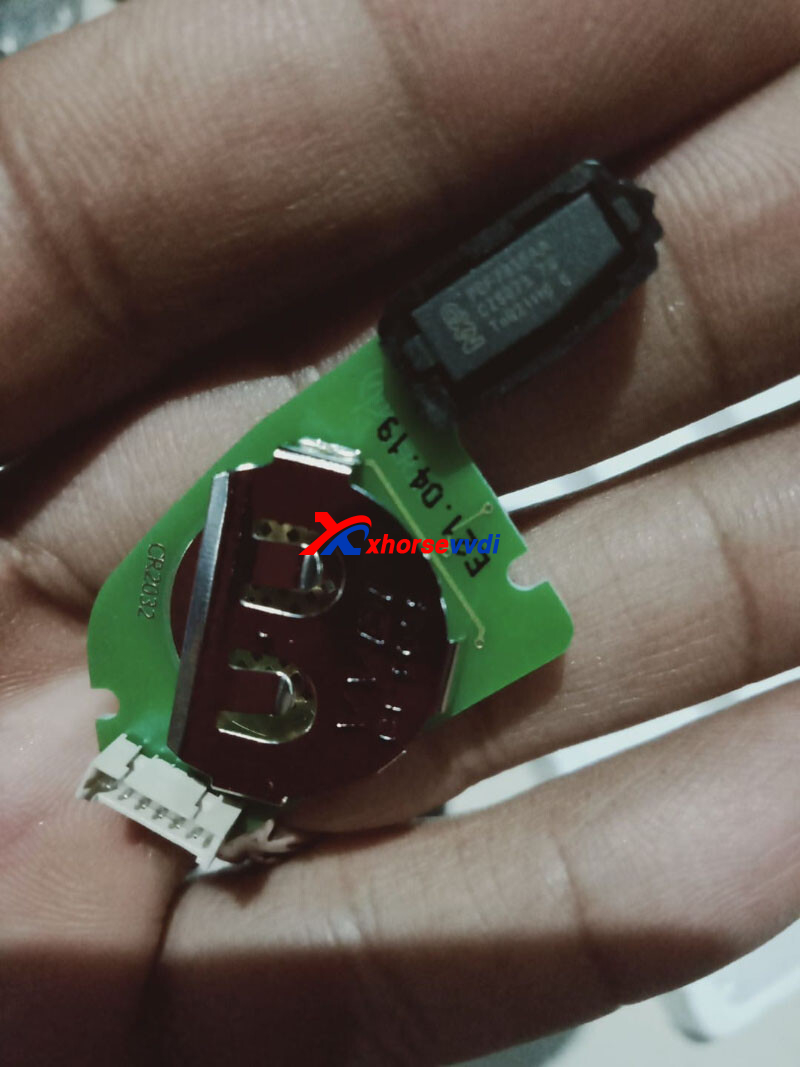
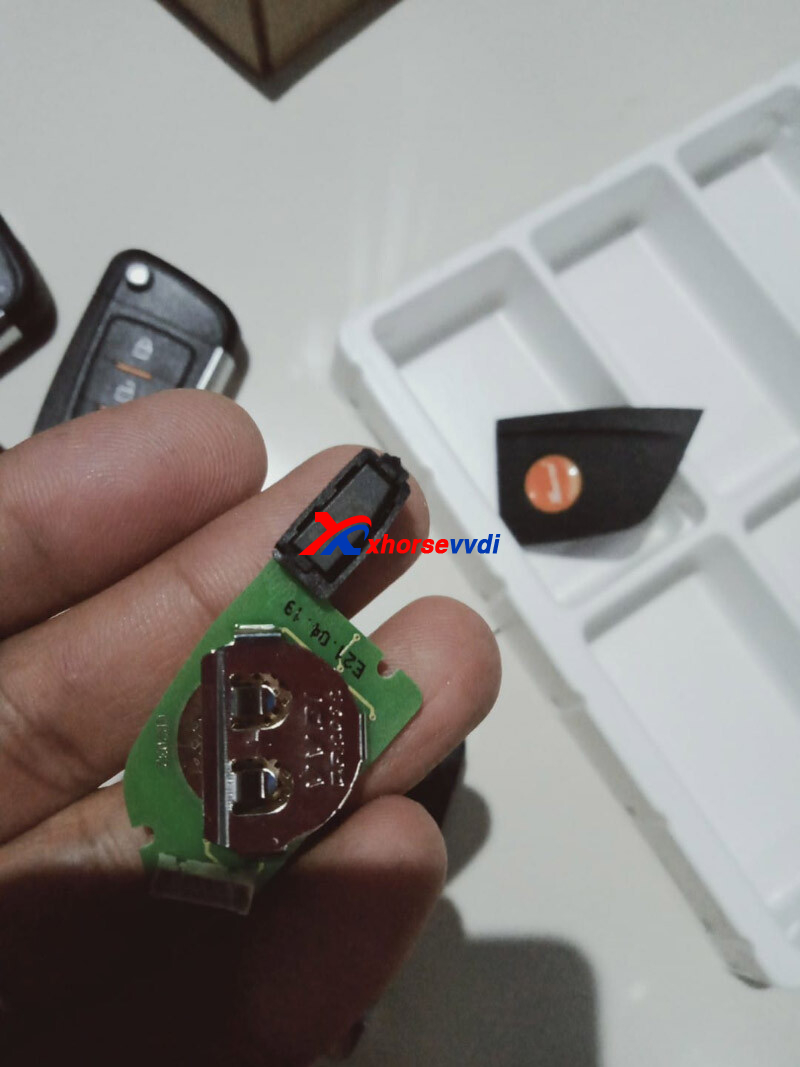
Done! Nice and Simple!
http://blog.xhorsevvdi.com/how-to-install-chip-case-in-xhorse-universal-remotes/
Posted by: xhorsevvdi at
07:31 AM
| No Comments
| Add Comment
Post contains 70 words, total size 2 kb.
One customer gave feedback that he cannot use his Xhorse VVDI MB. It shows " Failed! ERROR: 3 - Product status is incorrect, please contact the dealer!"
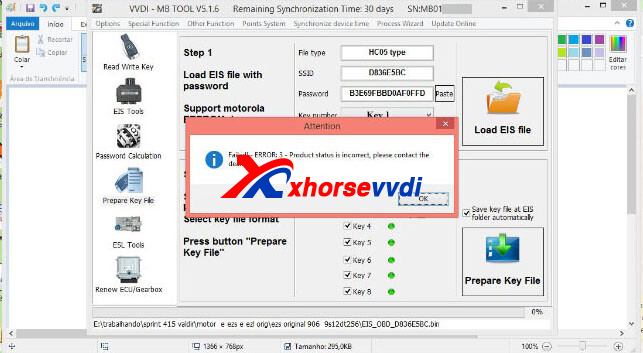
Here is the Solution:
Contact your seller and pay by bonus points to unlock this VVDI MB.
or try to contact Xhorse Official:

Posted by: xhorsevvdi at
07:31 AM
| No Comments
| Add Comment
Post contains 60 words, total size 1 kb.
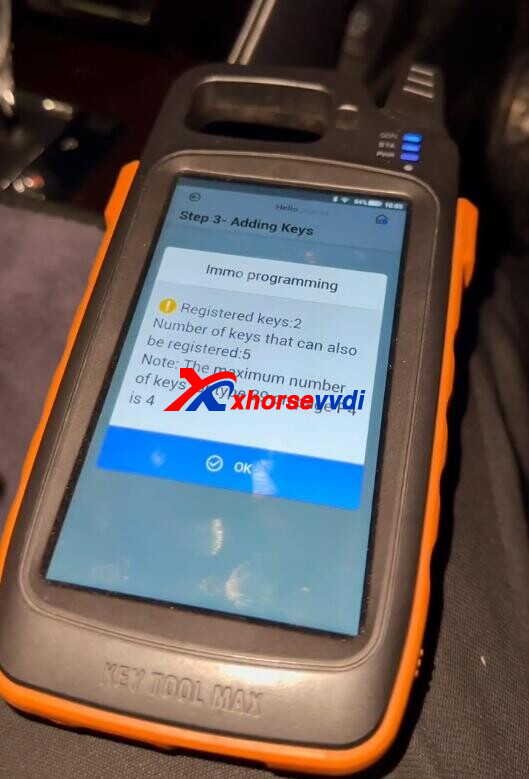
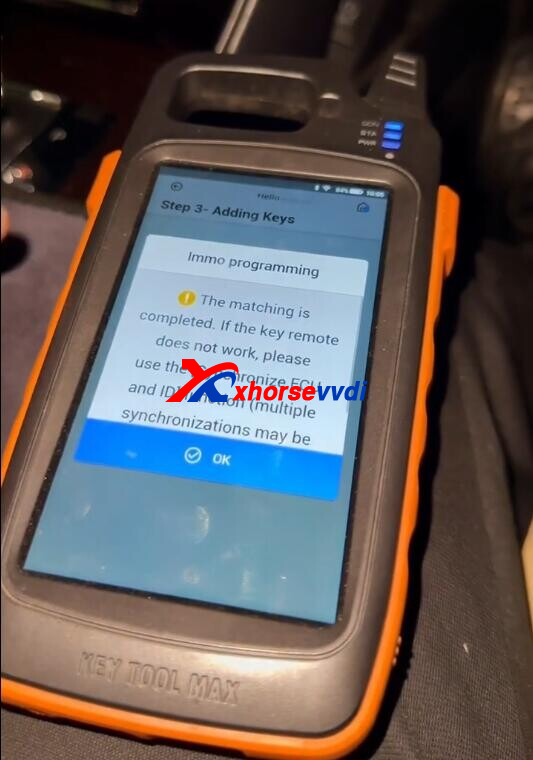
One customer gave feedback that his Key Tool Max Pro Key Programmer cannot detect XM38 Remotes. Other 7 are detected ok in the same menu.
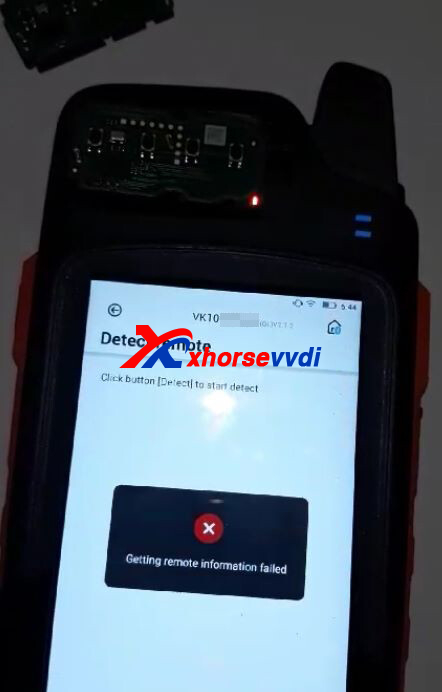
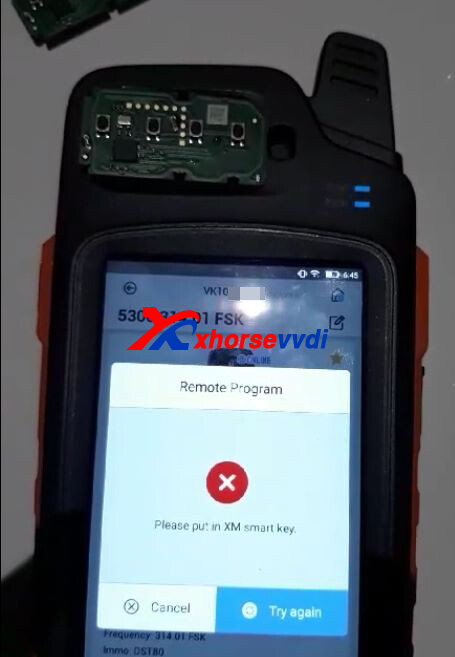
Here is the Solution:
1.Remove battery
2.Hold on lock button for 5 seconds
3.Insert battery before releasing lock button
4.Try to generate remote if indicators shine normally
*If methods still fail, send keys back to factory
http://blog.xhorsevvdi.com/how-to-solve-key-tool-max-pro-cannot-detect-xm38-remote/
Posted by: xhorsevvdi at
07:30 AM
| No Comments
| Add Comment
Post contains 73 words, total size 1 kb.
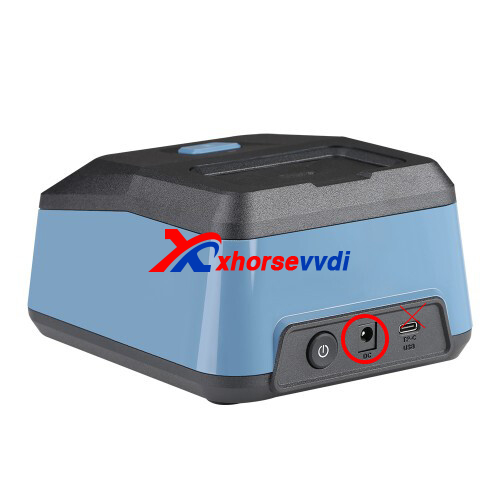
One customer asked if he could use Xhorse Key Reader in his van.
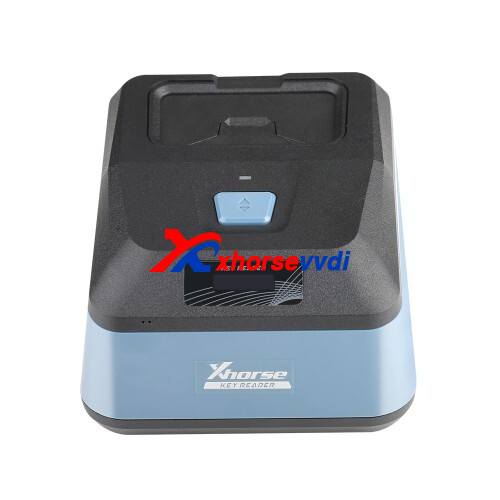
Here is the Answer:
Yes, use a portable charger.
*Supply power via DC port and Type-C port will not work
Posted by: xhorsevvdi at
07:30 AM
| No Comments
| Add Comment
Post contains 44 words, total size 1 kb.
Question:
BMW 2014 750i - I was hoping newest VVDI2 Update would allow OBD add key…now I see version not supported. I’ve programmed to the only other software version that is available, and same results. What solution do I have?
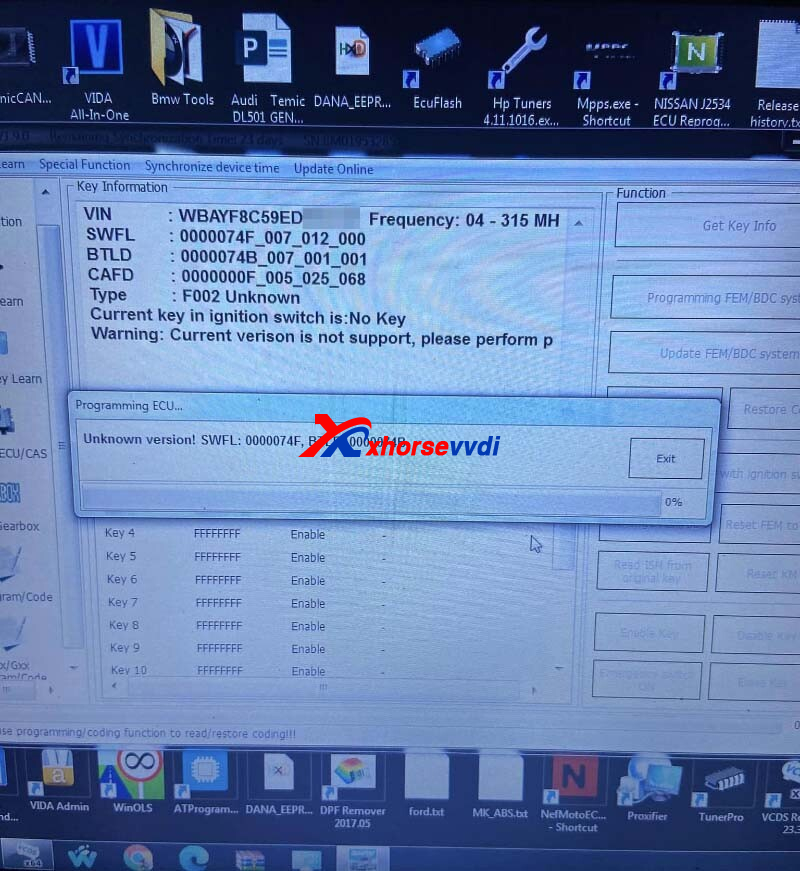
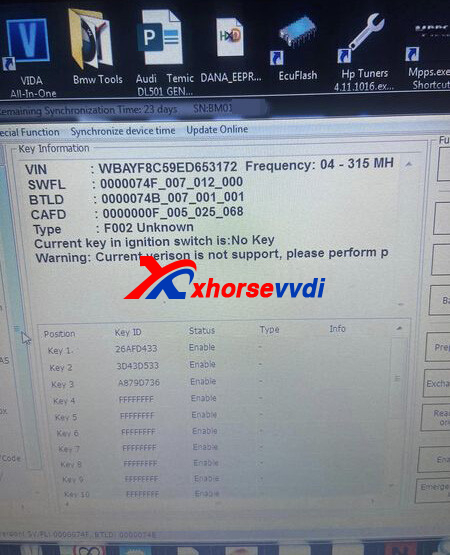
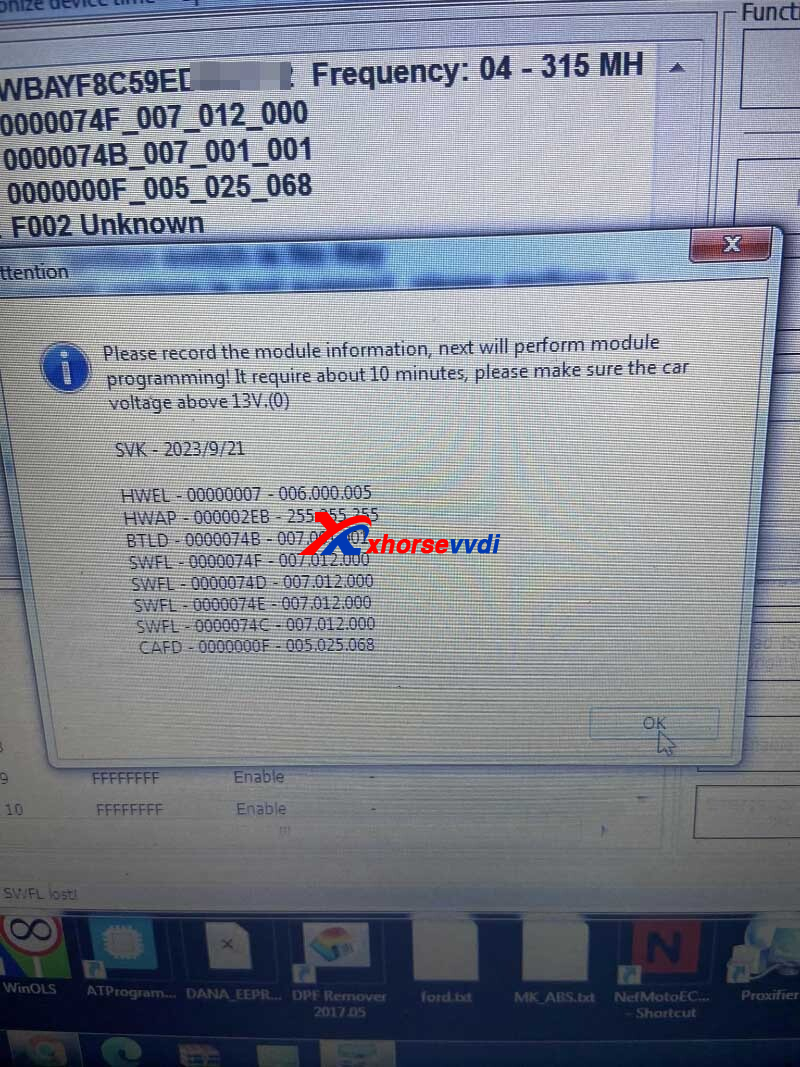
Here is the Reason:
Wrong menu selected.
It's a CAS4 not BDC, from 2016 up 7 series have BDC2...
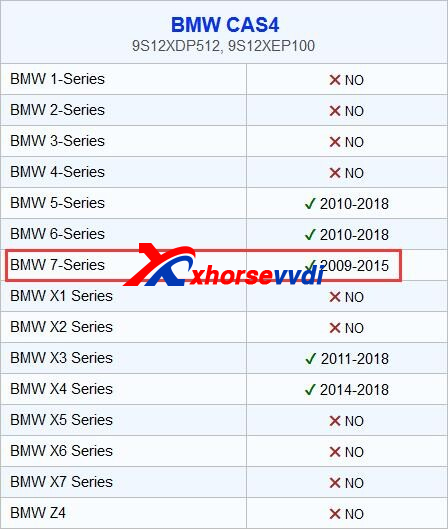
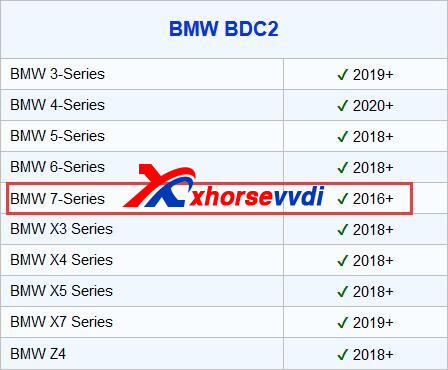
Solution:
Pull CAS and VVDI2 Programmer will do it on bench.
Feedback:
Made keys no problem. CAS4+.
http://blog.xhorsevvdi.com/fixed-vvdi2-obd-add-key-for-bmw-750i-2014-unknown-version/
Posted by: xhorsevvdi at
07:29 AM
| No Comments
| Add Comment
Post contains 88 words, total size 2 kb.
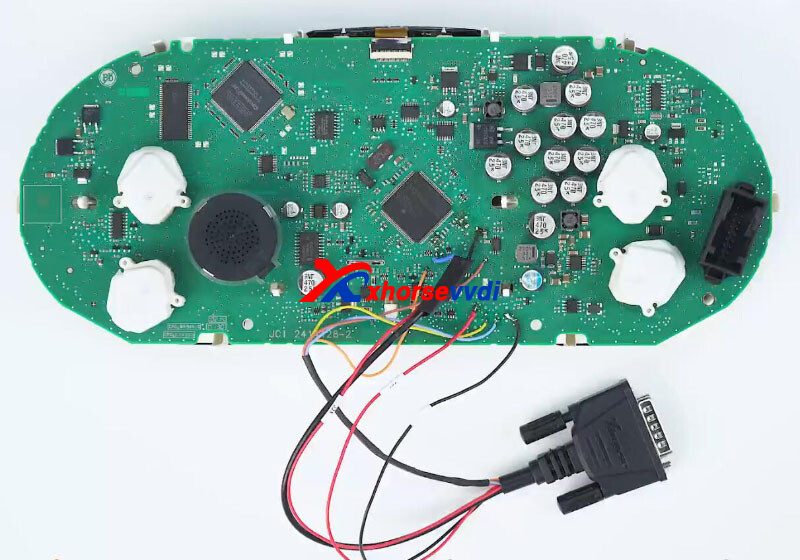
Xhorse RH850 Cable is designed to read VW MQB48 dashboard data without cutting/ lifting any pins. This cable is only compatible with Xhorse Key Tool Plus Tablet. Here we will show you how to use it.
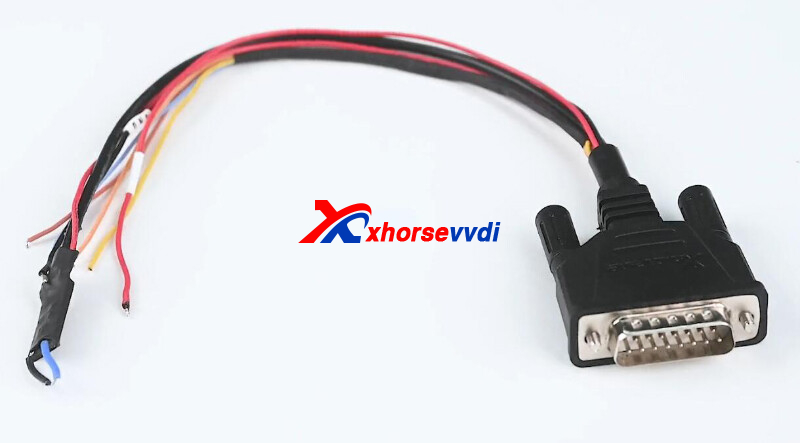
Support List:
MQB-RH850 (R7F)
MQB 34XX
IMMO4 JCI 34XX
How to Use Xhorse RH850 Cable?
1.R7F701401
Select
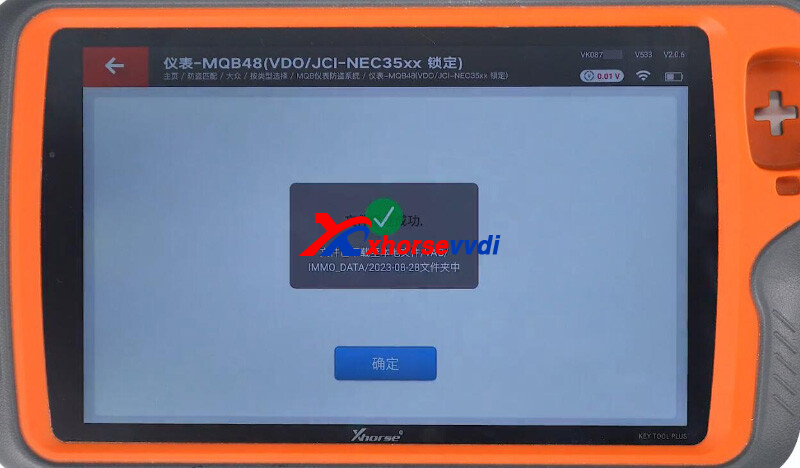
Immo Programming>>VW>>Select by Type>>MQB Immo System>>Dashboard-MQB48 (VDO/JCI-NEC35XX Locked)
Select
Programmer reads files>>Read NEC35XX Chip>>Soldering>>R7F701401
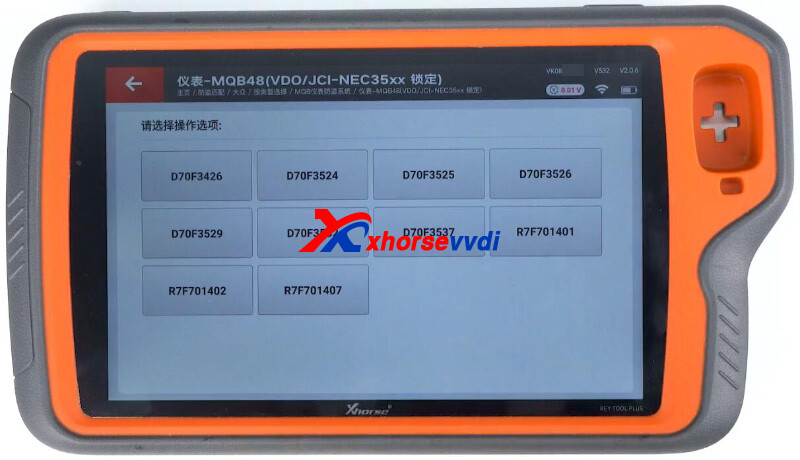
Connect tablet to dashboard using RH850 cable by diagrams.
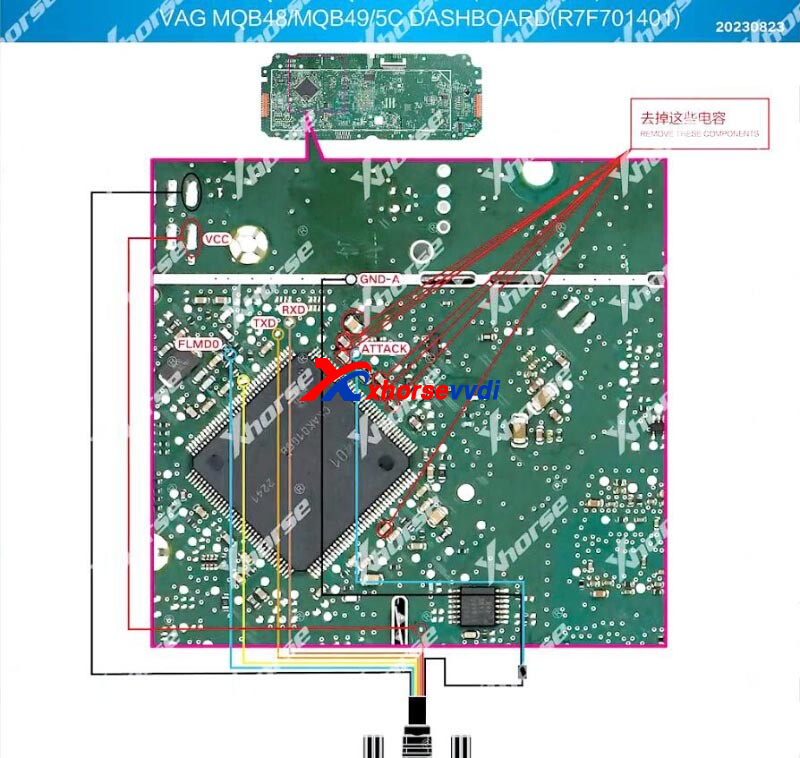
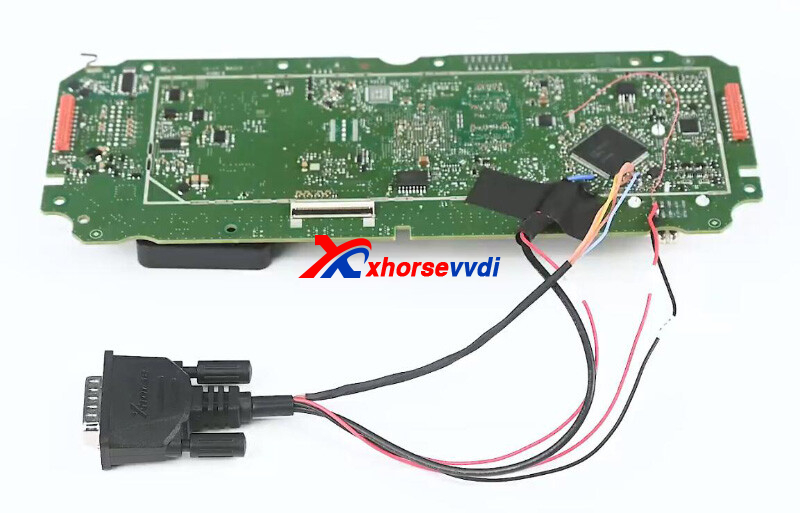
Read dashboard data.
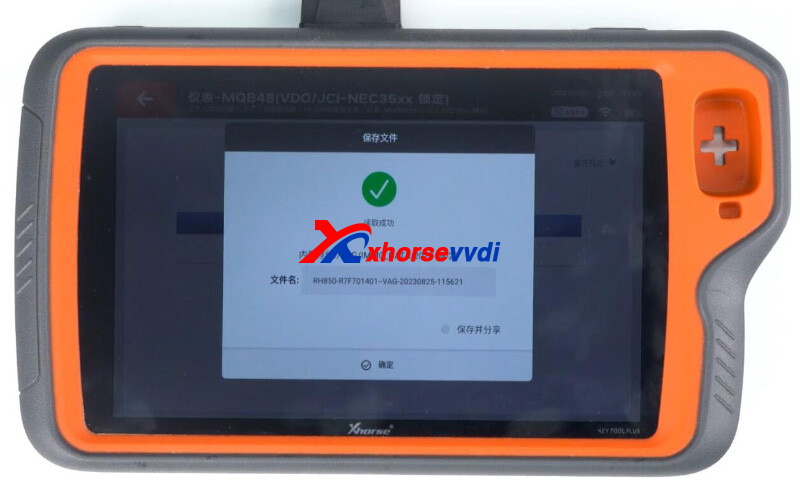
Select "Obtaining immo data" and load dashboard file.
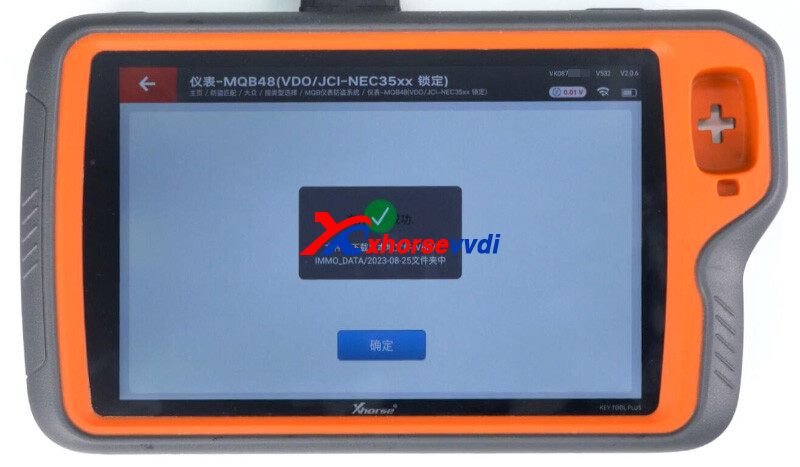
Then we can prepare dealer key and learn it.
2.D70F3426
Enter the same MQB menu.
Select "D70F3426".
1)Dashboard Chip Data
Connect tablet to dashboard using RH850 cable by diagrams.
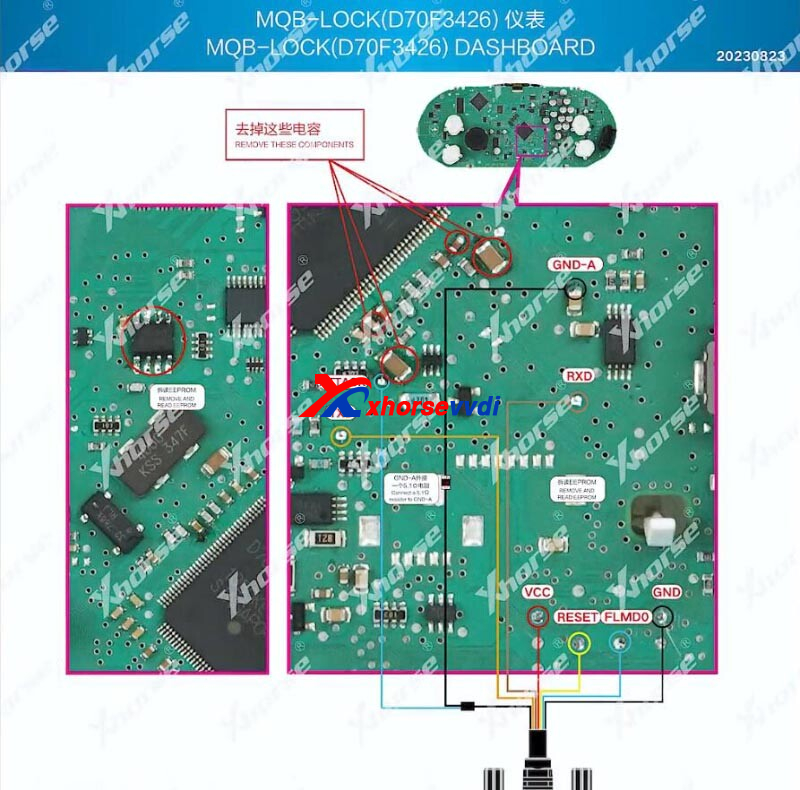
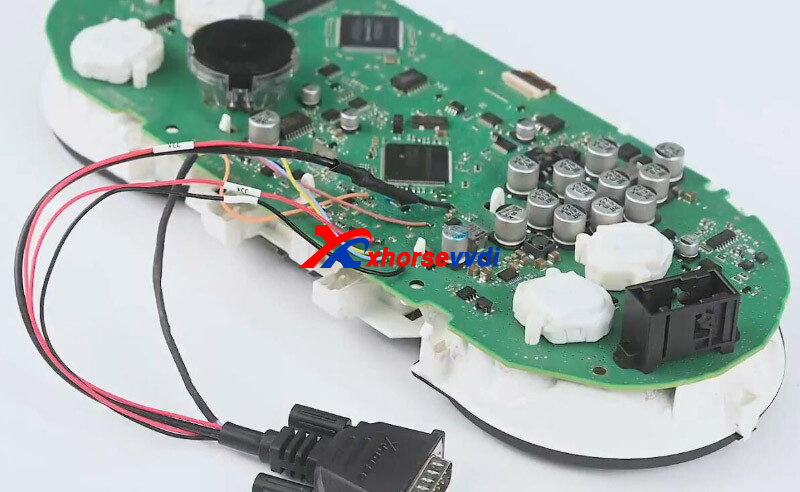
Read data
2)EEPROM Data
Remove cable and restore components.
Remove 95128WT chip.
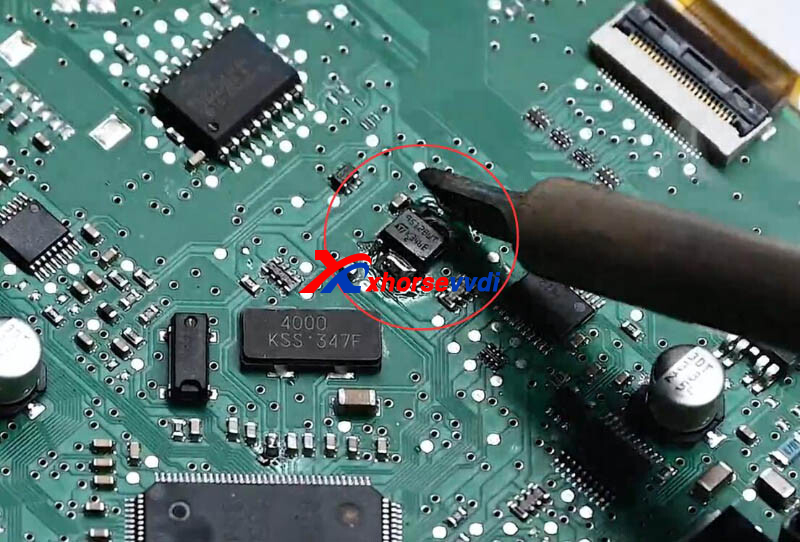
Put chip into EEPROM adapter.
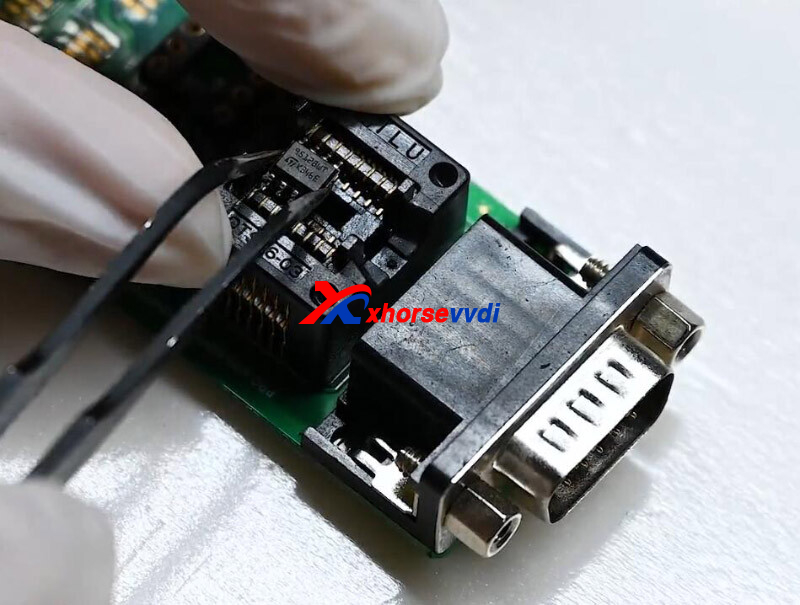
Select
Programmer reads files>>Read 95128 EEPROM
Read data.
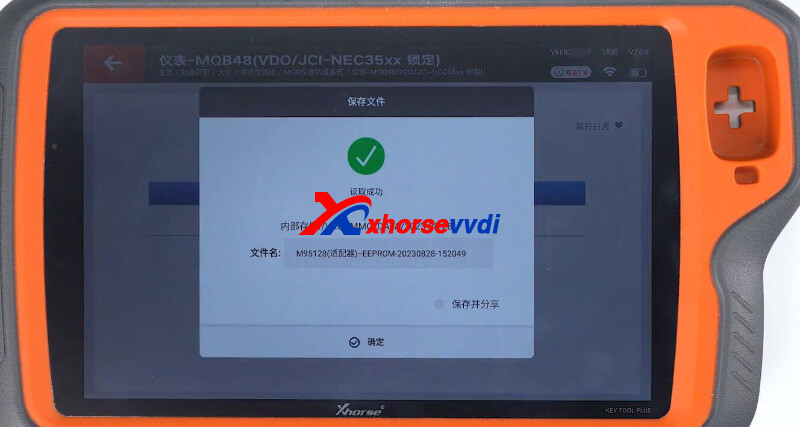
Select "Obtaining immo data" and load both files.
Then we can prepare dealer key and learn it.
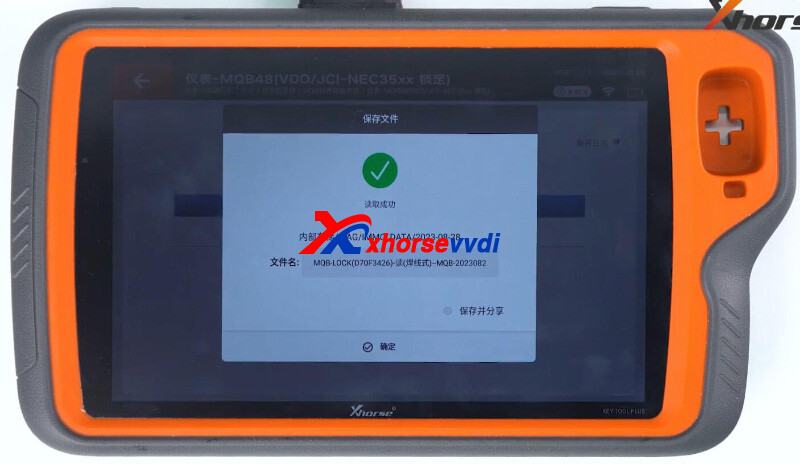
Done!
MQB Solder-free Adapters are coming!
http://blog.xhorsevvdi.com/how-to-read-mqb48-nec35xx-dashboard-using-xhorse-rh850-cable/
Posted by: xhorsevvdi at
07:29 AM
| No Comments
| Add Comment
Post contains 175 words, total size 5 kb.
V5.3.1 VVDI Prog software is released now, get free download link V5.3.1 VVDI Prog software from XhorseVVDI.com.
1.Free Download V5.3.1 VVDI Prog Software
Password: m3pn
2.V5.3.1 VVDI Prog Update Info
*ThisversionDON'tneedupdate firmware
+AddM68HC805P18(H44H), M68HC805P18(K05Y), MC68HC05P18(1F52W), MC68HC805P18(0G64R), MC68HC805P18(G64R), XC68HC805P18(G04R) optionsin<2-MCU>-
<MOTOROLA-MC68HC(![]() 05>
05>
+AddRENEGADEBCM(2017)(R7F701034), RENEGADEBCM(R7F701056)optionsin<4-IMMOBILIZER>-><JEEP>
+AddBeetile(D70F3524)-READ(WELD), Beetile(D70F3524)-WRITE(WELD) optionsin <5-DASHBOARD>-><VOLKSWAGEN>
+AddVIAGGIOSMARTBOX optionin<8-OTHER>-><FIAT>
+AddHA_MAS7 optionin<8-OTHER>-><FAW>
http://blog.xhorsevvdi.com/free-download-v5-3-1-vvdi-prog-software-beetile-dashboard-added/
Posted by: xhorsevvdi at
07:29 AM
| No Comments
| Add Comment
Post contains 63 words, total size 2 kb.
Question:
Ford focus 2015 USA, I want to generate an Xhorse Key using Xhorse VVDI MINI, am I doing it right?
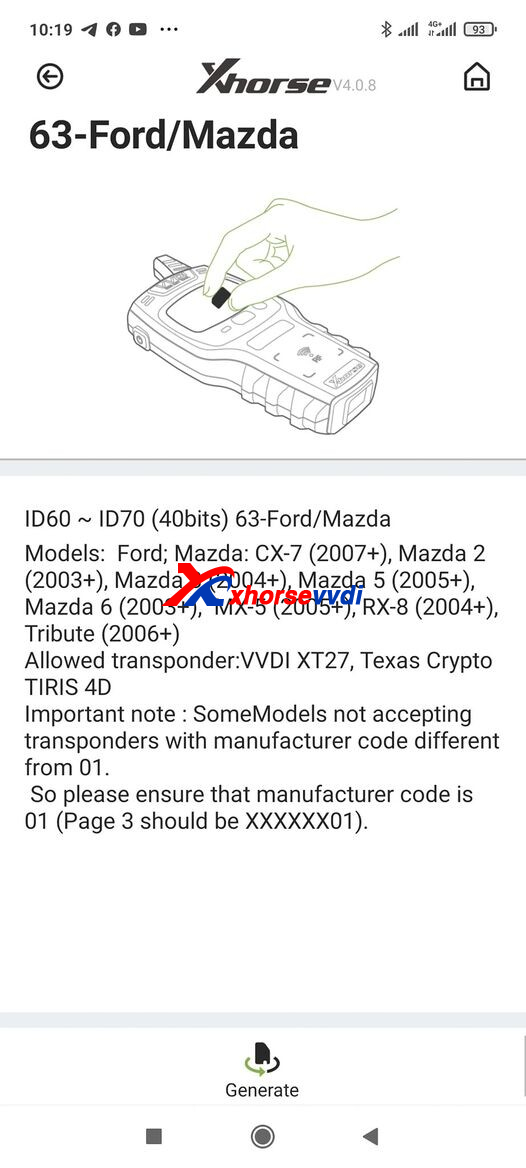
Answer:
Yes, here are Reviews of generating VVDI Super Chip:
1)Did one for a 2015 fiesta and this key worked
2)This one is good. I did one today 14 focus
If it doesn't work with Ford 4D 63, try 4D 83.
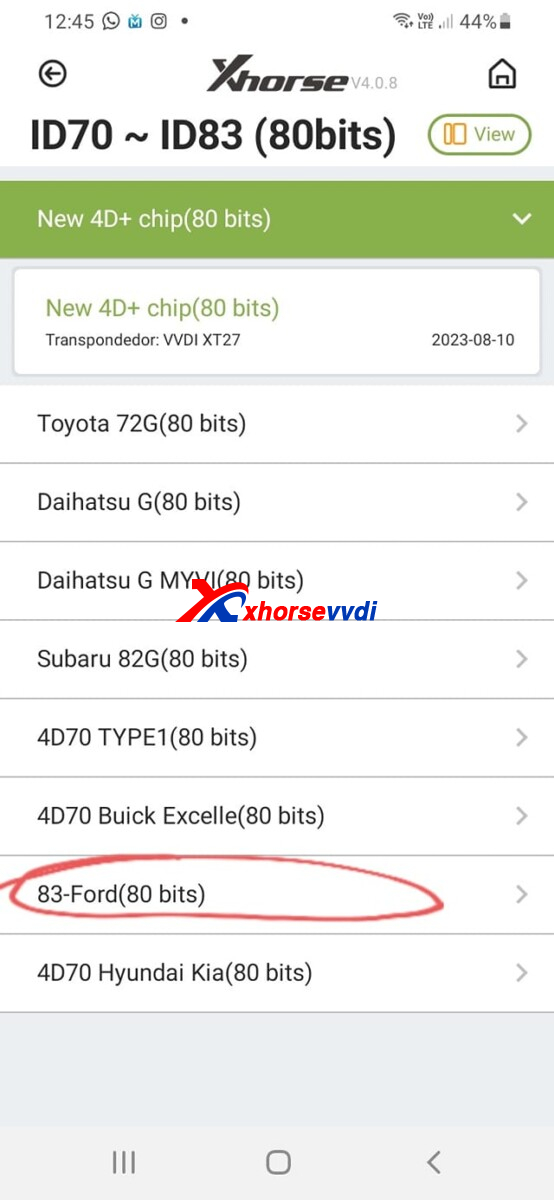
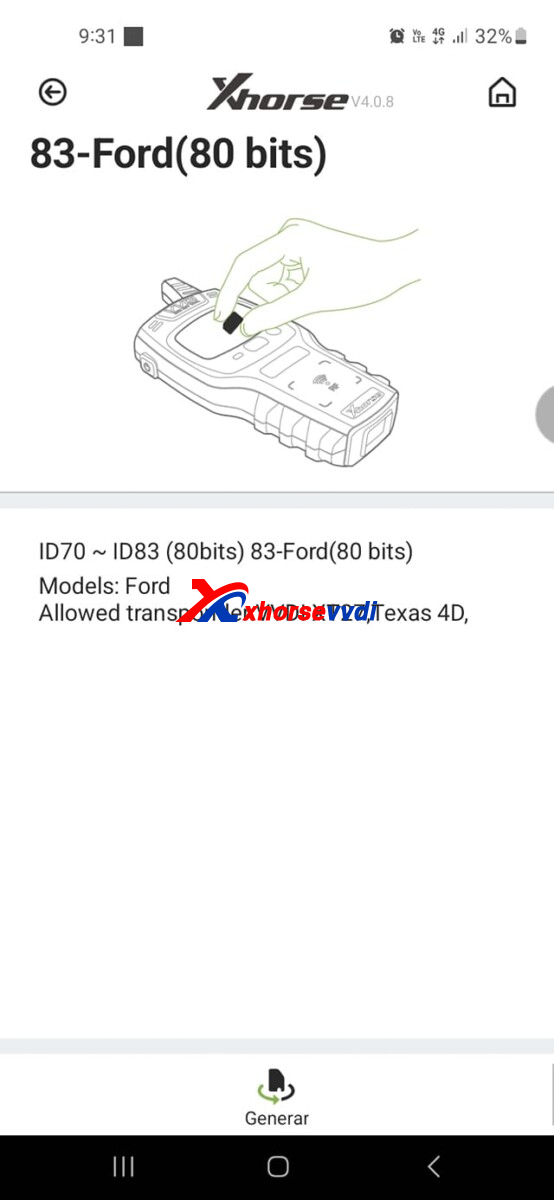
Path: ID70 ~ ID83 (80bits)>>83-Ford(80 bits)
Good to know:
You will always need to generate two chip with different ID, so when I need a chip I take a key and clone it. Seems to work ten times better then generating chips for some.
http://blog.xhorsevvdi.com/can-we-generate-xhorse-key-for-ford-focus-2015-usa/
Posted by: xhorsevvdi at
07:28 AM
| No Comments
| Add Comment
Post contains 117 words, total size 2 kb.
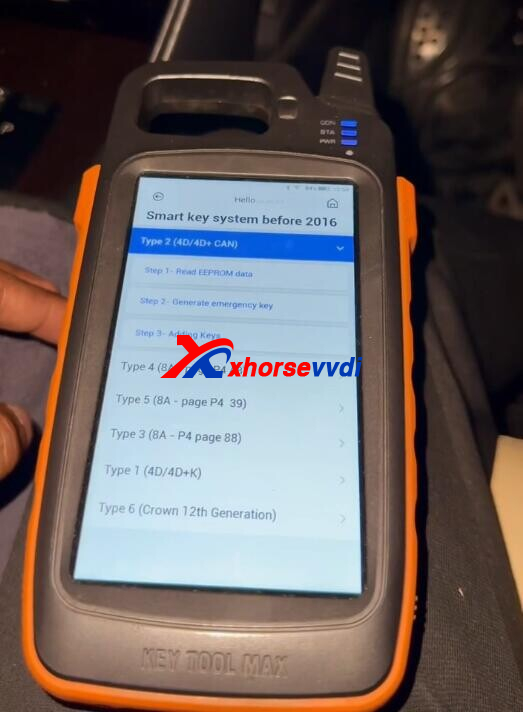
This article is about the instructions on how to add Toyota/ Lexus keys using Xhorse FT-OBD Tool.
Procedure:
Plug in FT-OBD Tool.

Select
Smart key system before 2016>>Type 2 (4D/ 4D+ CAN)>>Adding Keys>>Add smart keys
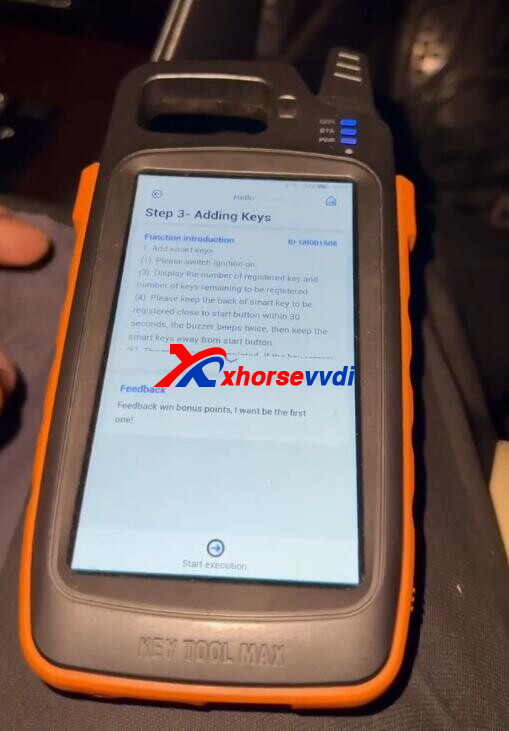
Start the car.
Automatically read key info.

Put original key close to start button.
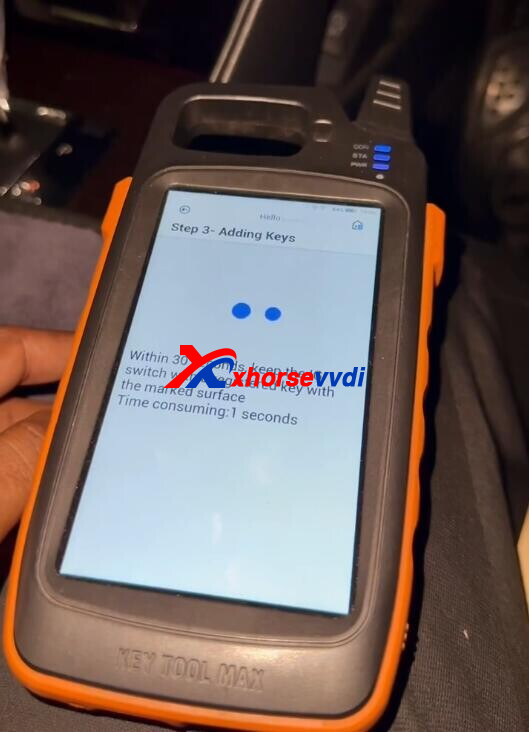
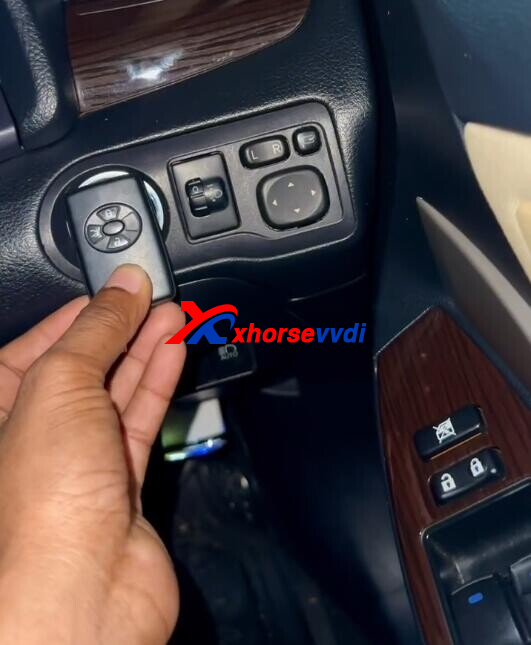
Put new key close to start button.
Programming complete.
Remote test ok.
Done! That's how Xhorse FT-OBD Programmer add a key for Toyota before 2016.
http://blog.xhorsevvdi.com/xhorse-ft-obd-tool-add-key-for-toyota-before-2016-instructions/
Posted by: xhorsevvdi at
07:28 AM
| No Comments
| Add Comment
Post contains 85 words, total size 3 kb.
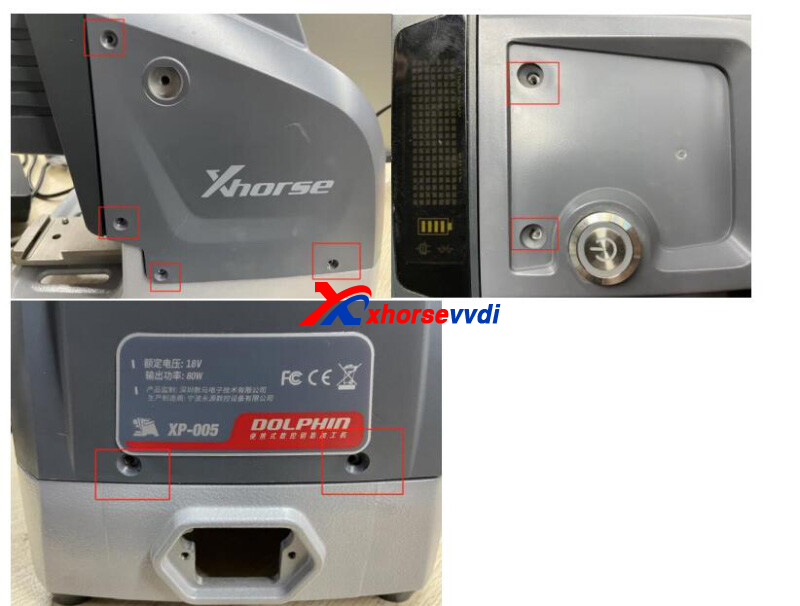
One customer gave feedback that his Xhorse Dolphin XP005 shows "73990" error after he replaced the main board. How to remove this note?
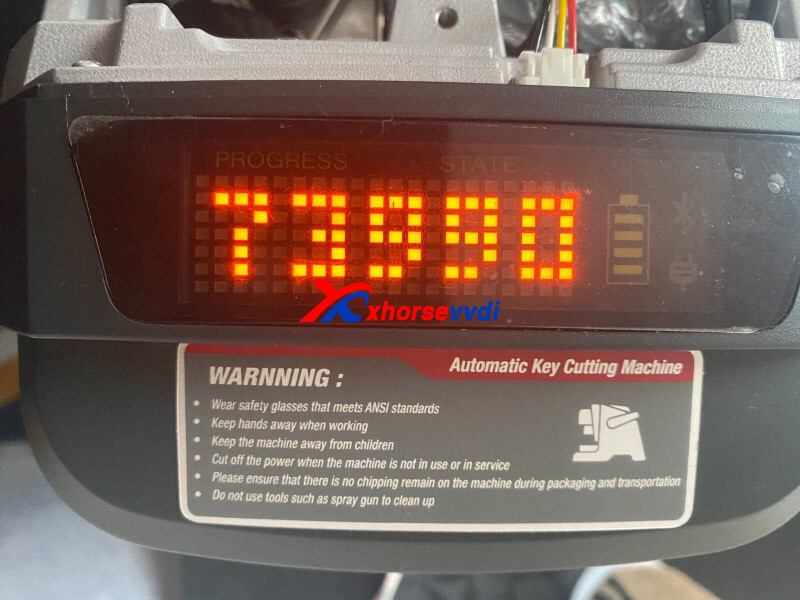
Here Xhorsevvdi shares the
Solution:
1.Ask your seller to send "xhorse_dolphin_set4.0.0_0804.apk" file to you
2.Install this apk file (uninstall original Xhorse app or use the other phone)
3.Run new app, select "Device Information", scroll down, and select "Turn off display"
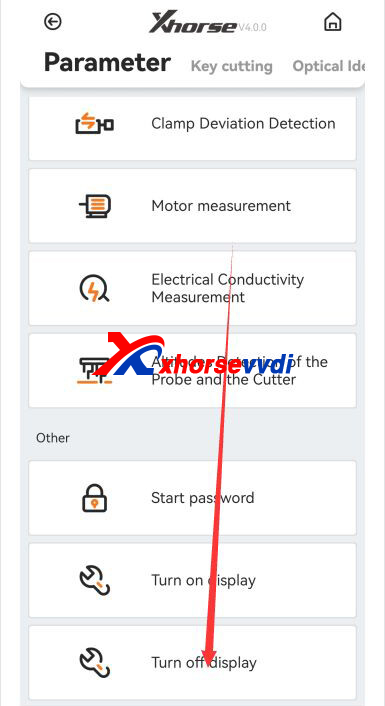
If database displays in Chinese, re-update database and firmware.
Posted by: xhorsevvdi at
07:27 AM
| No Comments
| Add Comment
Post contains 81 words, total size 2 kb.
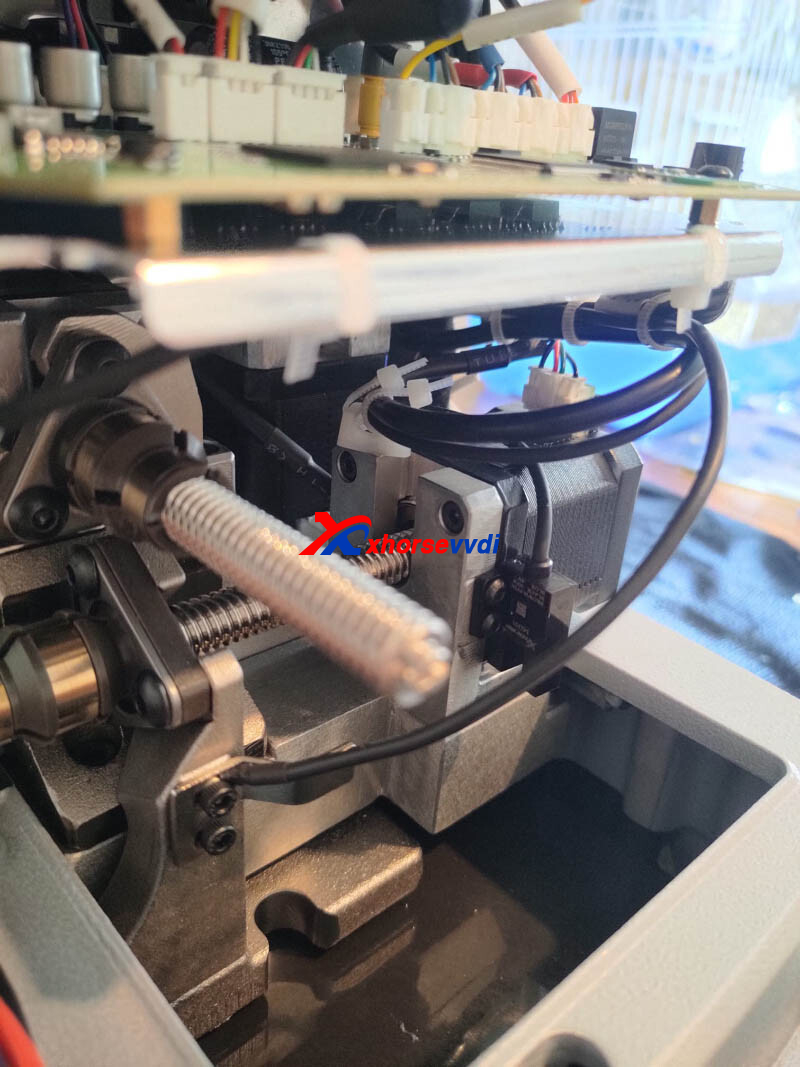
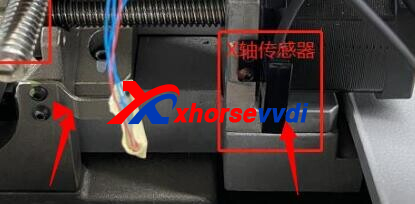
One customer asked how to solve the error code 2 on his Xhorse Dolphin XP005. And he wondered if probe is broken?
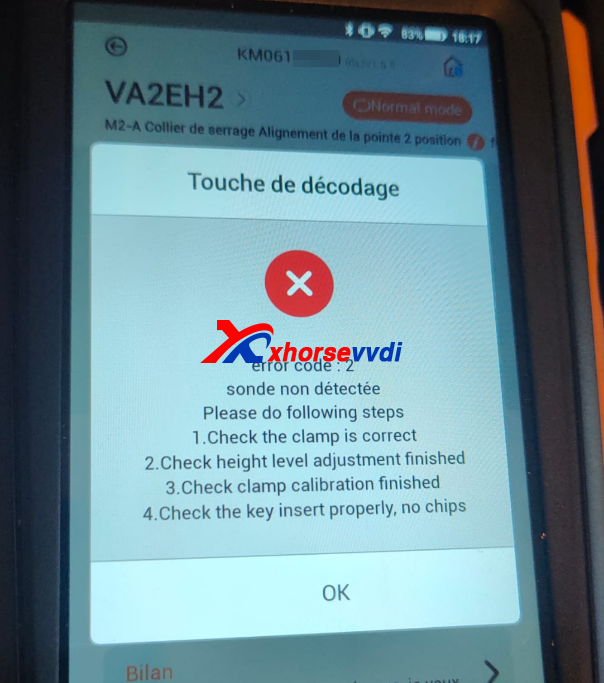
Here Xhorsevvdi tech shares
Solution:
1)Do X-Axis motor test, send video to your seller
2)Open machine and check metal plate and X-axis sensor if there are abnormal noises
Posted by: xhorsevvdi at
07:27 AM
| No Comments
| Add Comment
Post contains 60 words, total size 2 kb.
Question:
Condor 2 says use volume up down and power button to select and there is no any button to choose and make factory data reset.
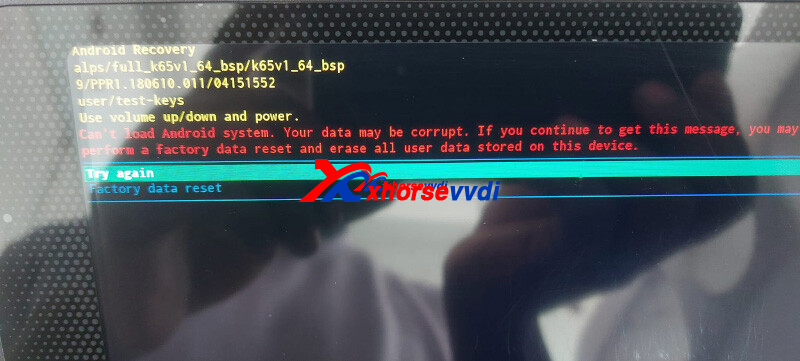
Here is how to control the option bar:
Swipe left = option bar goes up
Swipe right = option bar goes down
Swipe up = Confirm
Solution:
Select factory data reset and confirm
http://blog.xhorsevvdi.com/how-to-solve-xhorse-condor-mini-plus-ii-android-recovery-error/
Posted by: xhorsevvdi at
07:26 AM
| No Comments
| Add Comment
Post contains 71 words, total size 1 kb.
32 queries taking 0.0679 seconds, 125 records returned.
Powered by Minx 1.1.6c-pink.

