


December 28, 2022
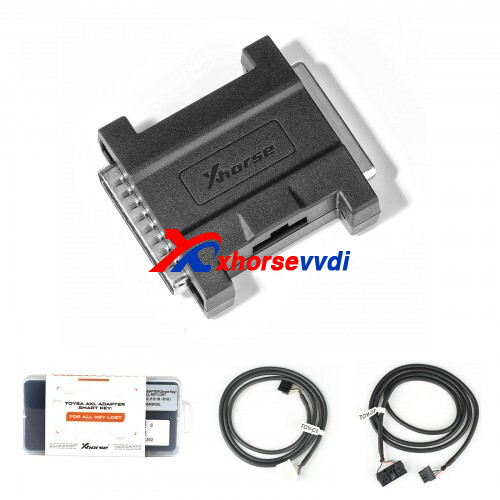
Toyota AKL Programming via OBD is updated on Xhorse VVDI Key Tool Plus!
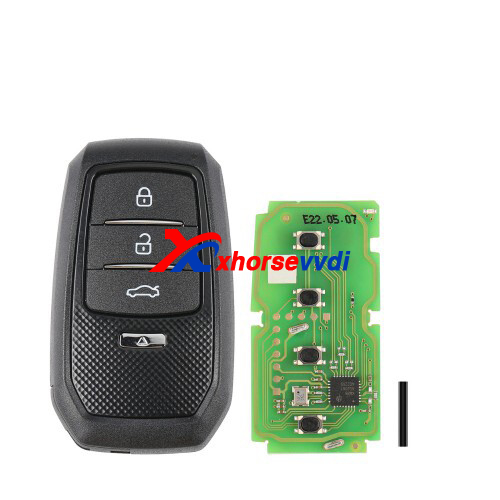
Part of newly-added models don't need Toyota Adapter.
More details:
1.For users with Toyota Smart Key Adapter, the license and calculations are free; For users without Toyota Smart Key Adapter, the license is free but every calculation costs 300 points
2.New OBD function supports part of Toyota models but cannot cover all on the list of Toyota Smart Key Adapter
Posted by: xhorsevvdi at
10:05 AM
| No Comments
| Add Comment
Post contains 84 words, total size 1 kb.
Question:
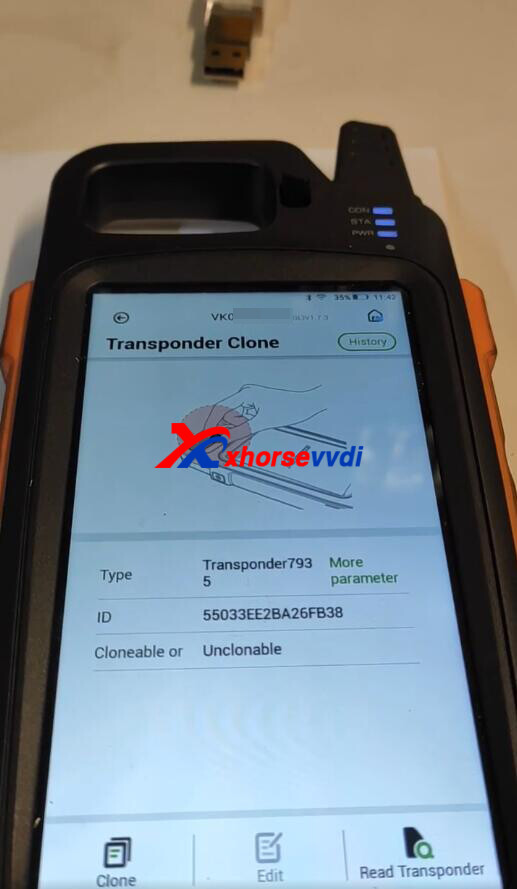
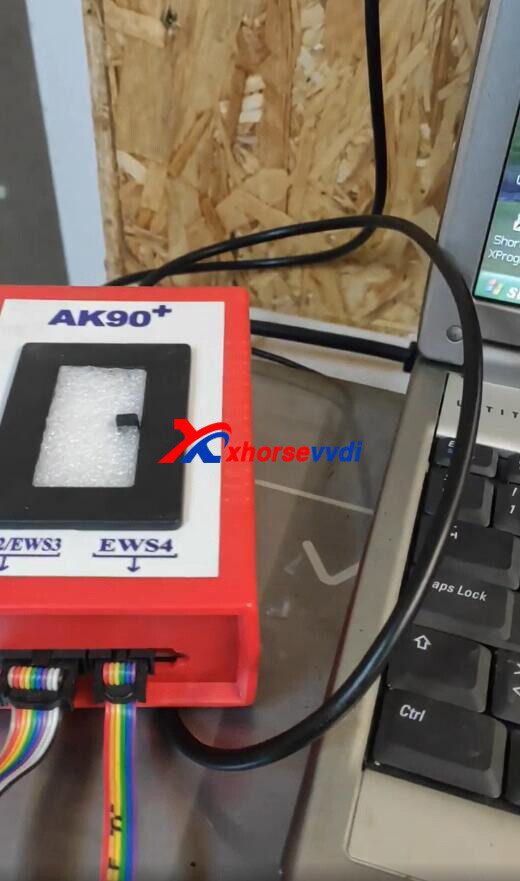
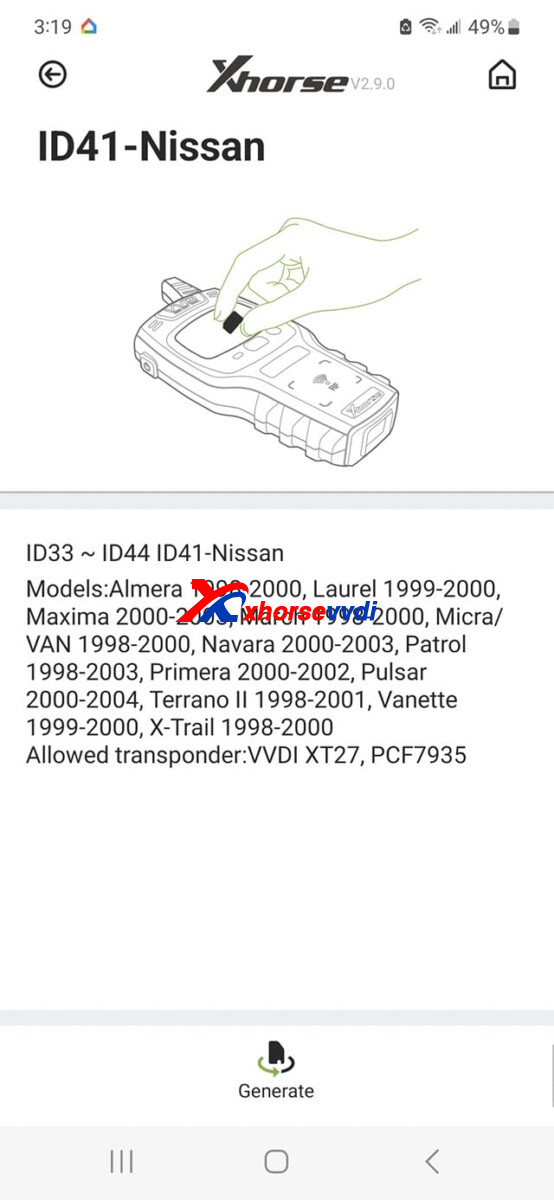
To add key for BMW EWS system, aftermarket or original? I programmed VVDI Chips but car cranked not start.
Here are some choices:
1.VVDI XT27A Chip (set as 7935/ ID33/ ID42)
Reviews:
BMW X3 ews4 make key chip from vvdi xt27 by AK90
Ak90 can only write on xt27a generated as 7935 id33 and id42
2.VVDI XT27A Chip (set as ID41 Nissan)
Review:
Xt27a is fine don't use vw 7935 use the Nissan version. It works every time for me. My service vehicle is a x3 with EWS 3 and I also have an x5 service vehicle.
3.New VVDI XT27B Chip
Review:
I use xt27b. The best for all
5.Original Chip
After few weeks all info from transponder use always pcf 7935
Hope this could help!
http://blog.xhorsevvdi.com/bmw-ews-add-key-vvdi-super-chip-or-original-chip/
Posted by: xhorsevvdi at
10:05 AM
| No Comments
| Add Comment
Post contains 142 words, total size 2 kb.
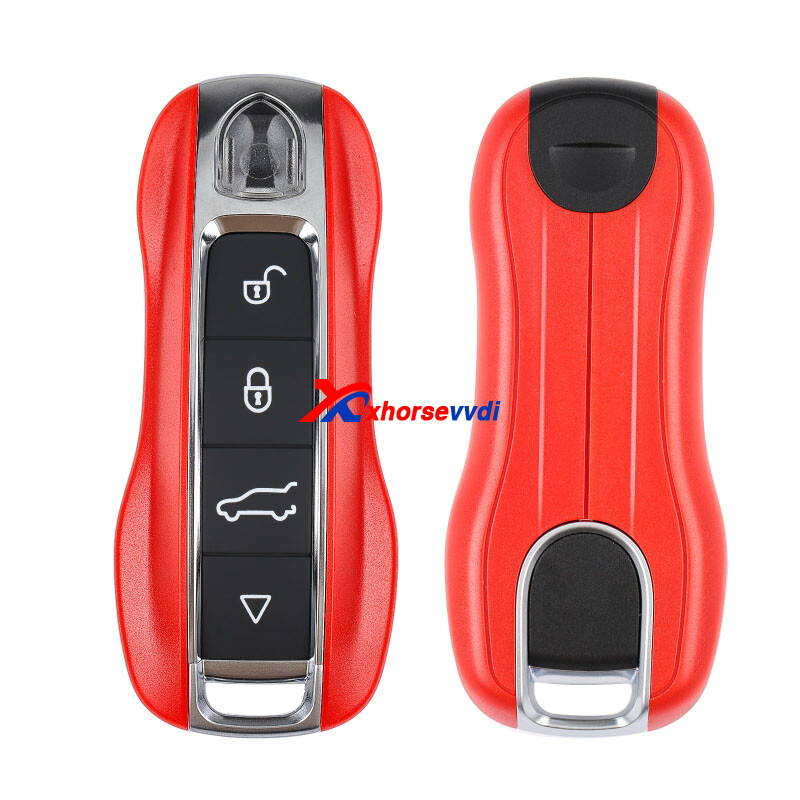
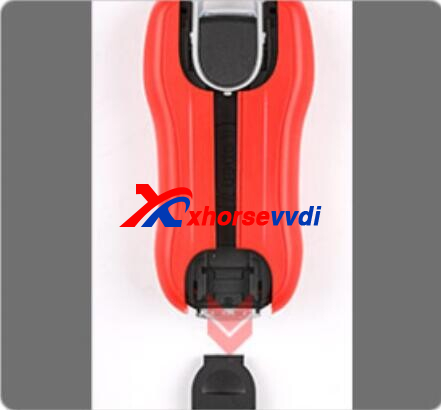
This article is going to show you how to (dis)assemble new Xhorse XM38 Smart Key - XSPS01EN Key Porsche Type.
How to Disassemble?
Step 1.Push to take out black plastic part
Step 2.Take out 2 side case and the other black part
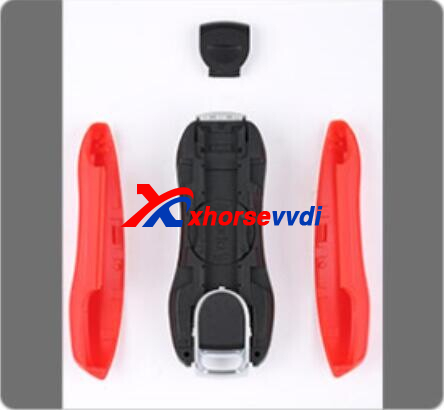
Step 3.Rotate battery cover to open it
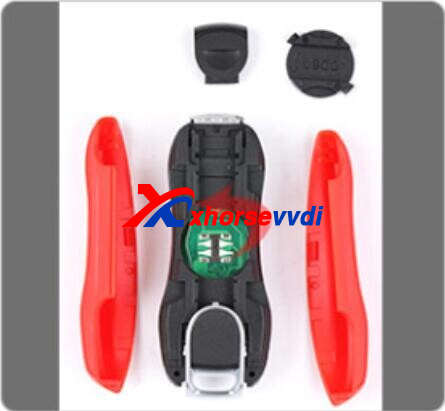
Step 4.Remove 2 screws
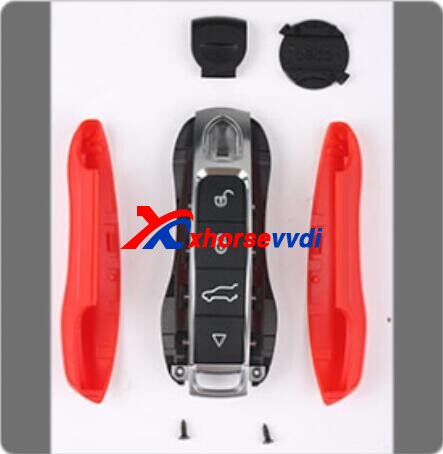
Step 5.Remove metal clip
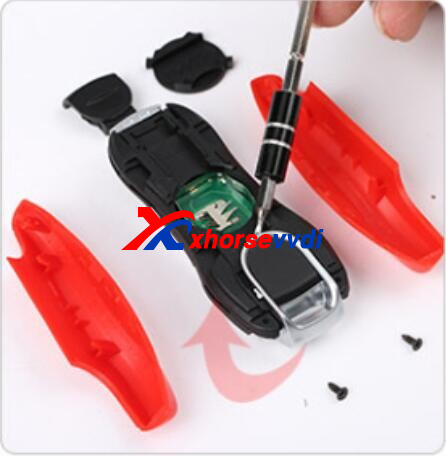
Step 6.All components
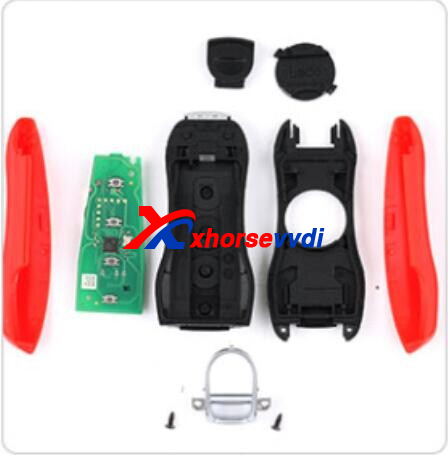
Good to know:
To Generate XM38 Key Porsche Style,
1.Install battery first
2.If generation fails, try again with PCB only
http://blog.xhorsevvdi.com/how-to-disassemble-xhorse-xsps01en-xm38-smart-key-porsche-type/
Posted by: xhorsevvdi at
10:04 AM
| No Comments
| Add Comment
Post contains 90 words, total size 3 kb.
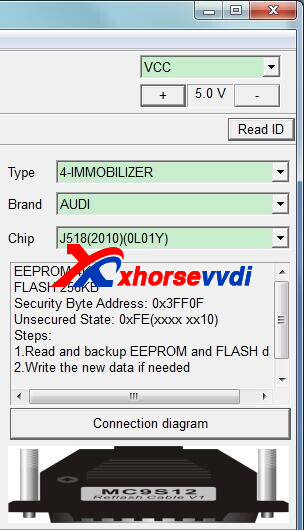
For some Audi J518 ELV, eeprom data file size is required to be converted before writing into J518 ELV emulator.
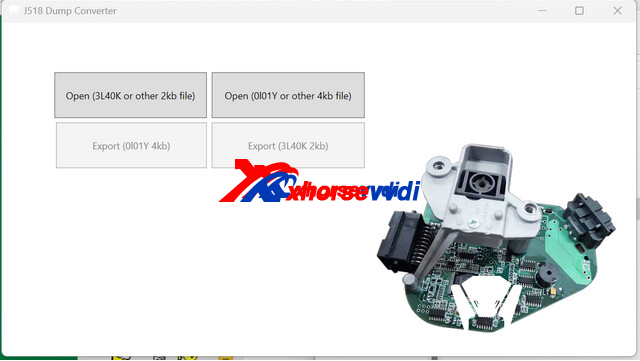
Here we share a simple tool that allows you to convert 2kb dump file to 4kb one. Also, other sizes are supported on new V1.1.
Free Download J518 ELV EEPROM Convertor:
(Unzip and run " J518_EEpromConverter.exe")
Before running software, .net core is required.
Download via
1.Accept auto prompt when running software
Then convert eeprom file, VVDI PROG writes it into Audi ELV Emulator, install back emulator, and you are good to go.
Review:
3L40K convert eeprom to ol01y all done
Full Instruction:
http://blog.xhorsevvdi.com/audi-j518-elv-emulator-program-128-256-ezs-instruction/
Posted by: xhorsevvdi at
10:04 AM
| No Comments
| Add Comment
Post contains 119 words, total size 3 kb.
Xhorse XKGHG1EN Masker Garage Remote is designed to clone original garage remotes, which supports Clone, Set Frequency, Clear Code, and data recovery.
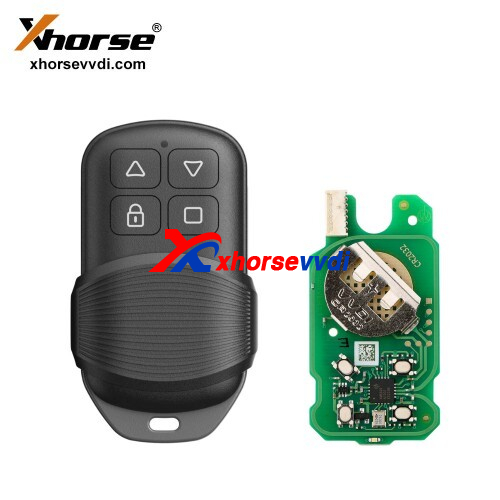
Here we will show you how to use it:
Tools:
Xhorse Masker Garage Remote (Garage Remote)*1
Original Garage Remote (Original Remote)*1
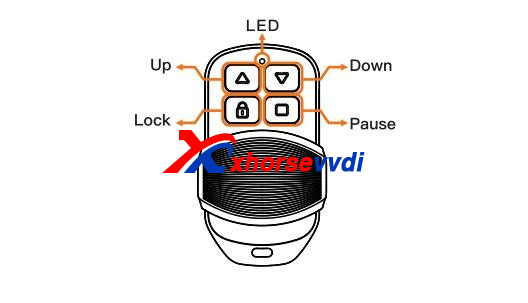
1.Clear Code
1)How to know if the remote code is cleared?
Hold down any buttons, the LED flash once and switches off, which means the code is already cleared.
2)How to clear code?
Step 1.Hold down "Up" and "Down" button.
When the LED switches on and off, release.
Step 2.Then Hold down "Pause" button.
When the LED switches on and off, release.
Complete.
2.Remote Clone
1)Before clone, make sure
*The remote code is cleared
*The garage remote frequency is the same to the original remote's
2)How to Clone?
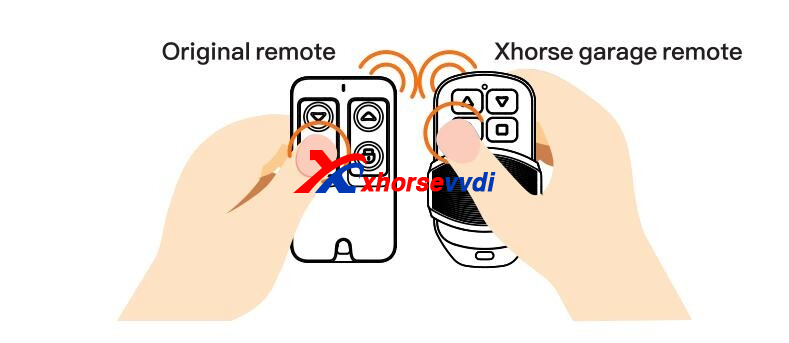
Step 1.Hold down one function button, garage remote will turn to clone mode.
Step 2.Put original remote close to garage remote, and hold down the same function button
Garage remote's LED switches, release, the function button is cloned
Step 3.Repeat above process to clone all buttons
3.Set Frequency
1)Set frequency
Step 1.Enter Frequency Switch Mode
Hold down "Lock" and "Pause" button, the LED switches on and off, release.
Step 2.Switch Frequency
Press "Up" button. Press once, the LED flashes once.
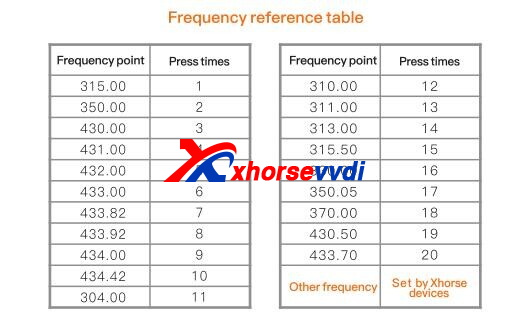
Switch frequency by pressing times as the table.
Step 3.Check Frequency
The correct frequency is set, release all buttons.
Wait 5 seconds, the LED flashes.
Flashing times depends on the frequency (check frequency table above)
Step 4.Exist Frequency Switch Mode
Once the LED switches off, hold down "Lock" and "Pause" button.
When the LED switches on and off, release.
2)Set other frequencies
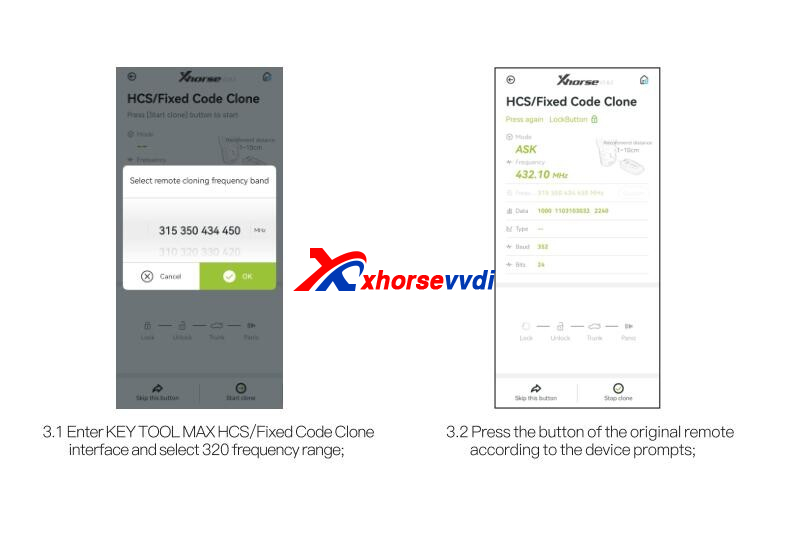
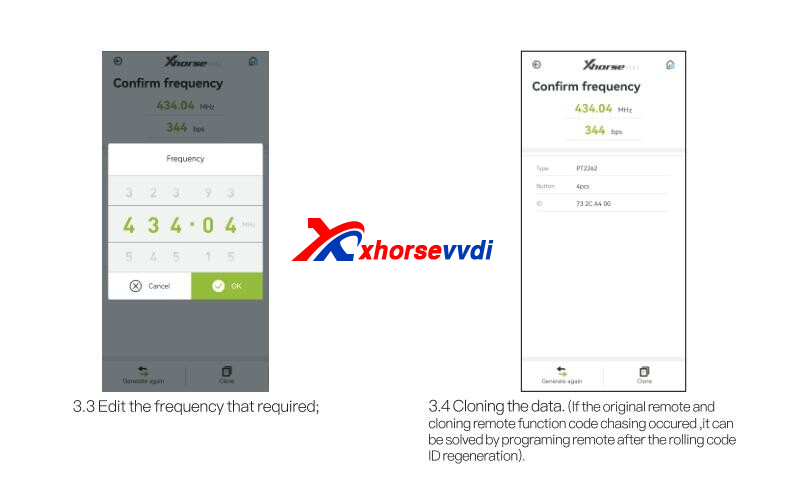
To set the frequencies that are not on the table above, we need VVDI Key Tools (VVDI Key Tool, VVDI Mini, Key Tool Max Pro, Key Tool Plus)
Clone original remote, modify frequency, and write data to garage remote.
e.g. Clone remote 320.5MHz using Key Tool Max Pro
Full Instruction: https://www.xhorsevvdi.com/upload/pro/22122116716749467452.pdf
http://blog.xhorsevvdi.com/how-to-use-xhorse-xkghg1en-masker-garage-remote/
Posted by: xhorsevvdi at
10:02 AM
| No Comments
| Add Comment
Post contains 331 words, total size 5 kb.
December 21, 2022
Question:
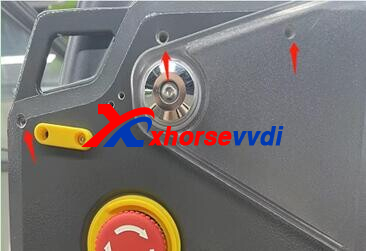
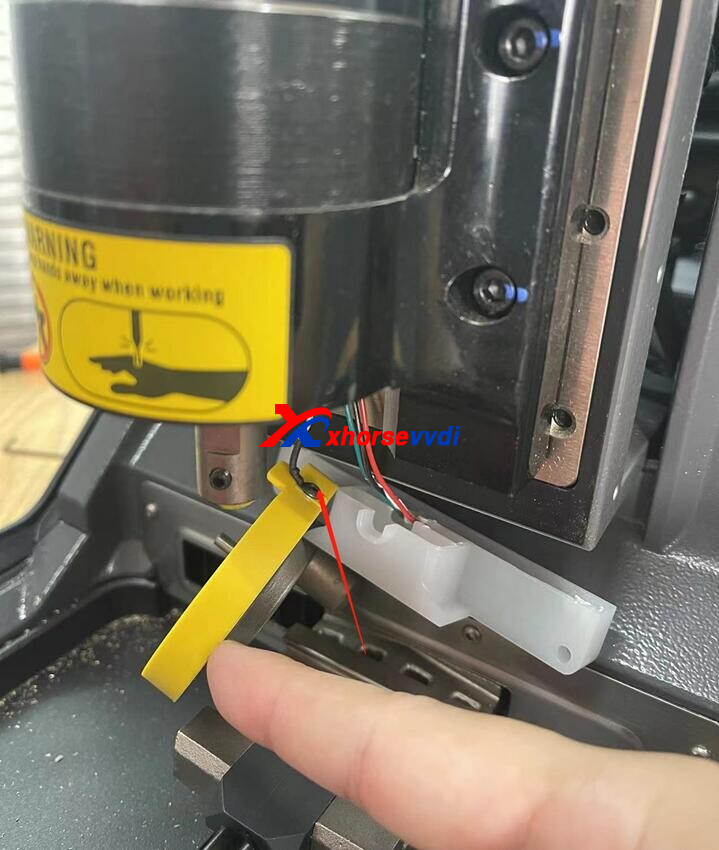
Xhorse Condor Mini Plus II gave error code 56, and it said "The cutter is short circuited, please check the cutter conductivity".
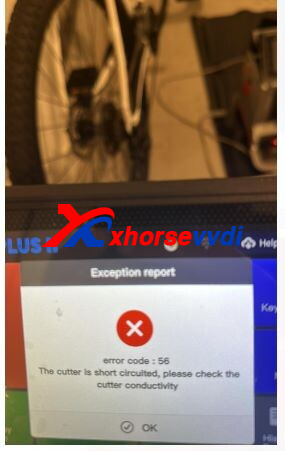
Here is the
Solution:
Disassemble Conodr II Machine and check wires.
How to Disassemble It?
Step 1
Remove all screws to remove the screen.

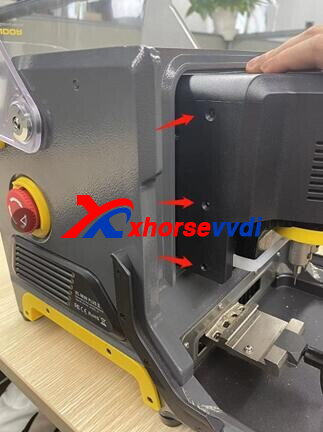
Step 2
Pull out the motor so we can see the screws on the motor case.
Remove screws to take the case down.
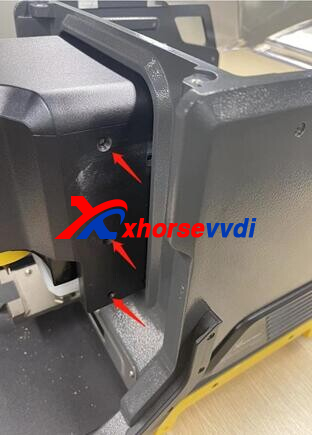
Step 3
Loosen the screw and check if the cable is damaged.
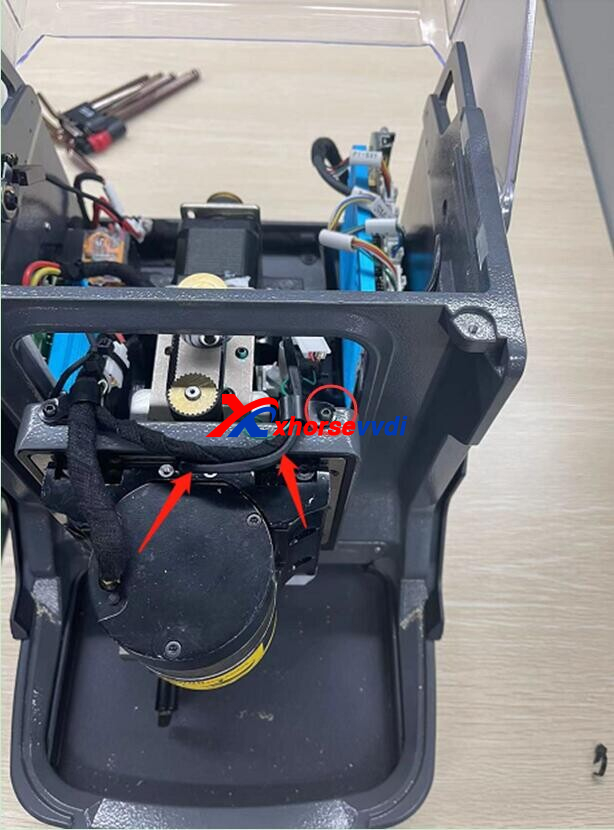
Step 4
To remove the cable going through main motor, we need to remove the cable socket first.
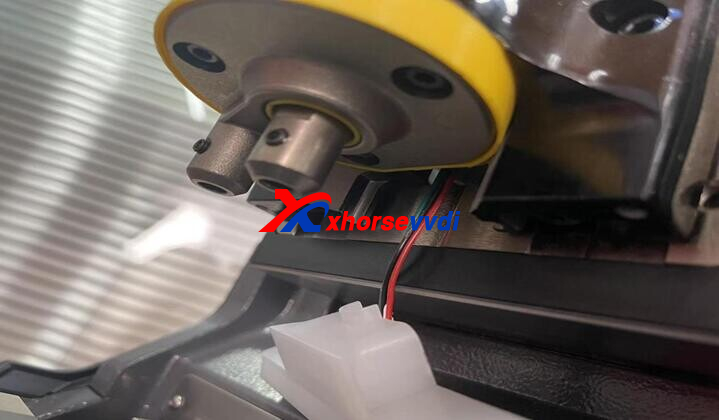
Step 5
Remove the three screws of wires, and take LED lamp down.

Step 6
There are three black plastic parts on the screws, Do Not remove them.
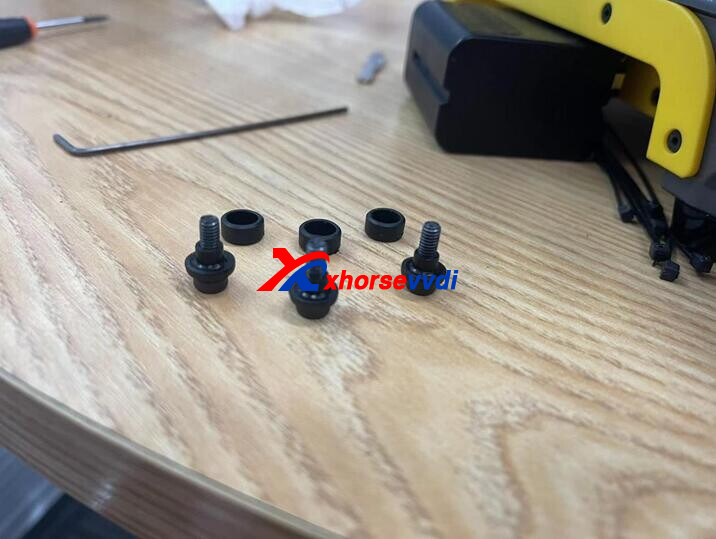

Step 7
Check if the four wires are damaged and the screws are loose.
http://blog.xhorsevvdi.com/how-to-solve-xhorse-conodr-mini-plus-ii-error-code-56/
Posted by: xhorsevvdi at
10:11 AM
| No Comments
| Add Comment
Post contains 152 words, total size 4 kb.
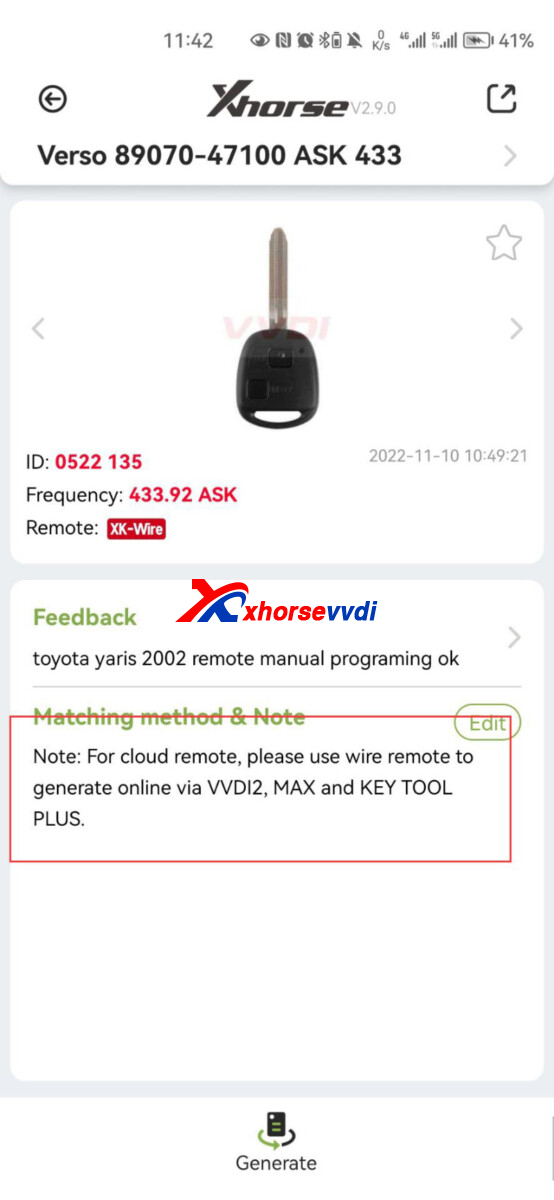
One customer asks what this "cloud" mean, so in this article we will tell you what exactly remote controls with "Cloud" icon are.
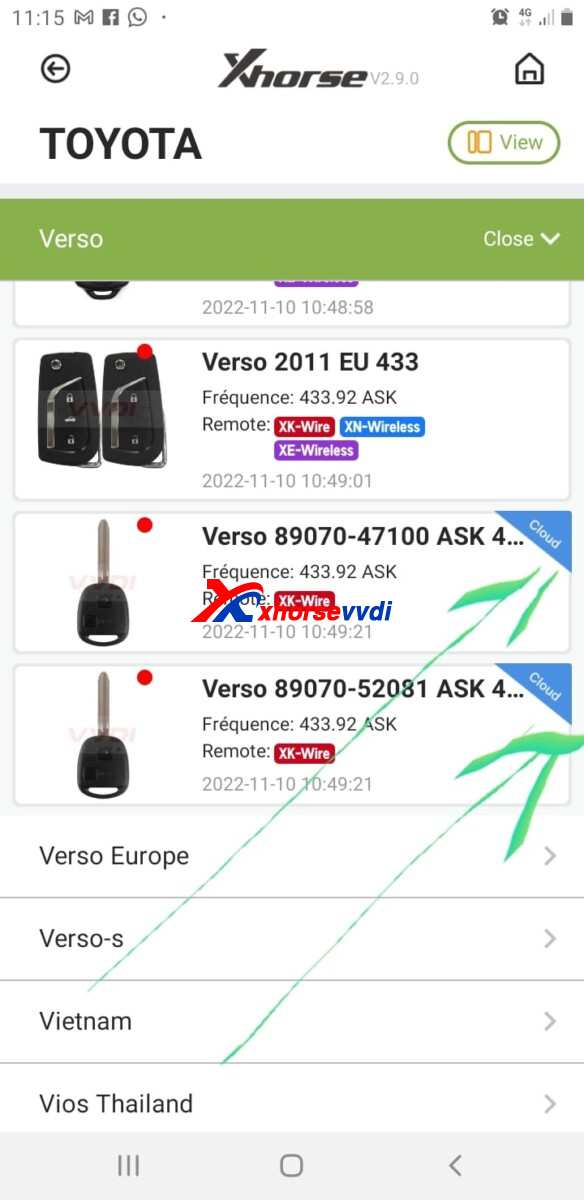
To Generate Cloud Remote,
1.Use VVDI XK Wire Remote
2.Use VVDI2/ Key Tool Max (Pro)/ Key Tool Plus (VVDI Mini is not supported)
3.Wire Remote B5 Type is not supported
Posted by: xhorsevvdi at
10:10 AM
| No Comments
| Add Comment
Post contains 62 words, total size 2 kb.
In this article, we are going to show you how add a key for BMW F20 F21 with FEM module.
Tools:
Clip Adapter
Original Key*1
New Key*1
Procedures:
Step 1. Program FEM
Disconnect car battery.
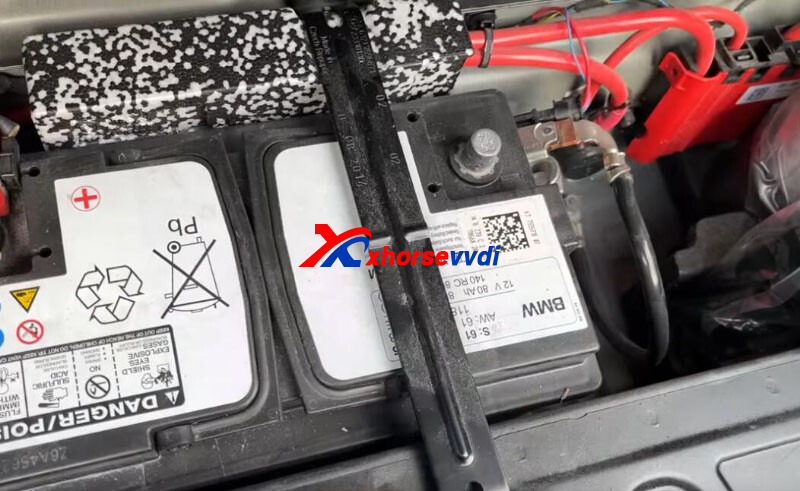
Remove FEM module.
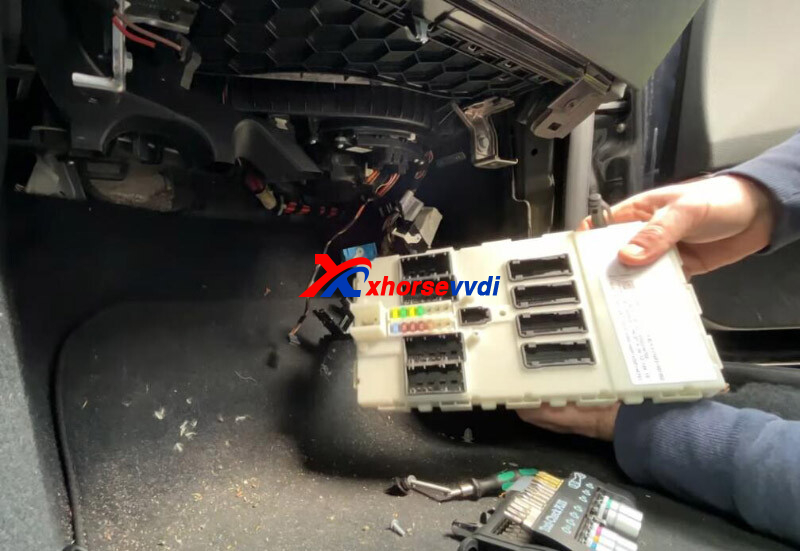
Take out PCB.
Connect Key Tool Plus and FEM via FEM Platform.
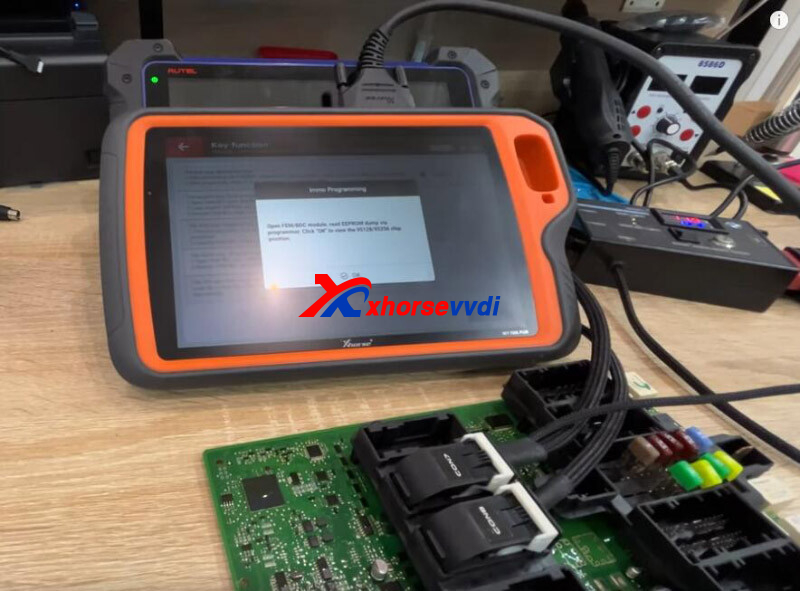
Enter IMMO programming menu of BMW FEM/BDC.
Read FEM data by clip adapter.

Turn on test platform.
FEM in service mode, and pre-configurated.
Write chip by clip adapter.
FEM programming complete.
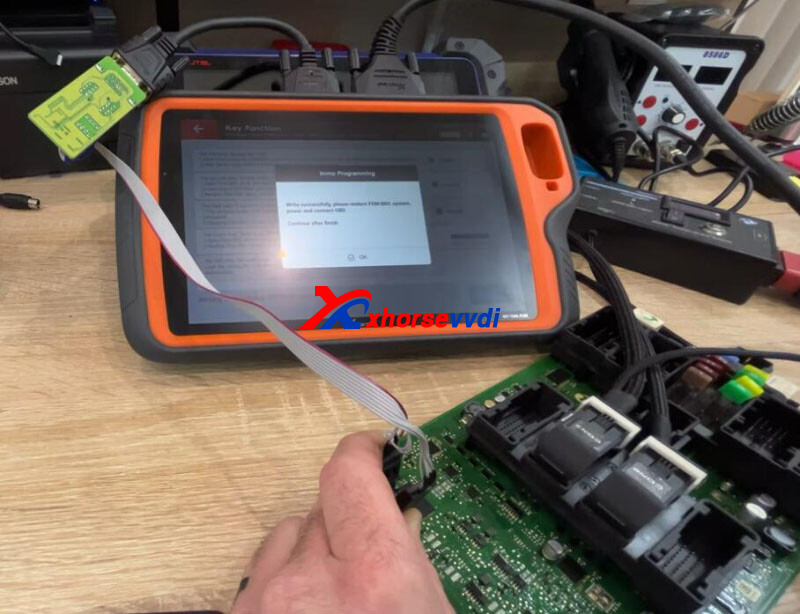
Step 2. Add Key
Go back and enter "Prepare dealer key with ignition switch".
Insert original key into coil of test platform.
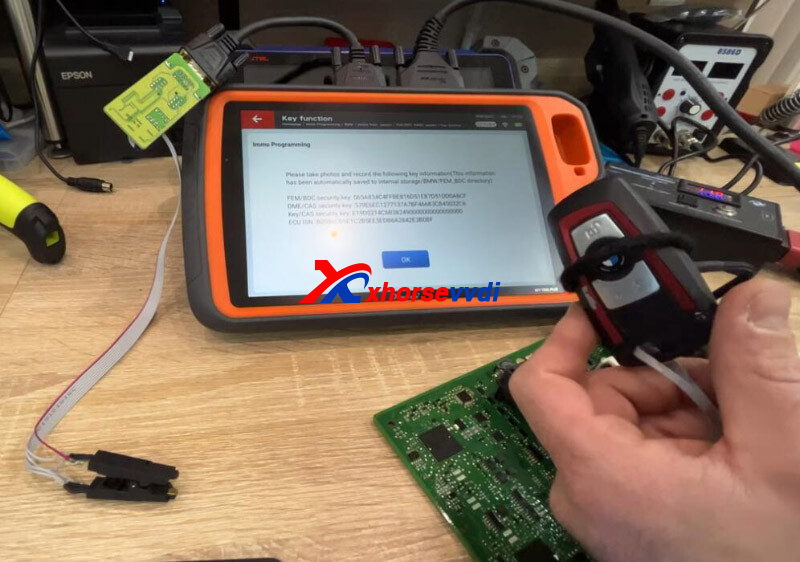
Then insert new key into coil.
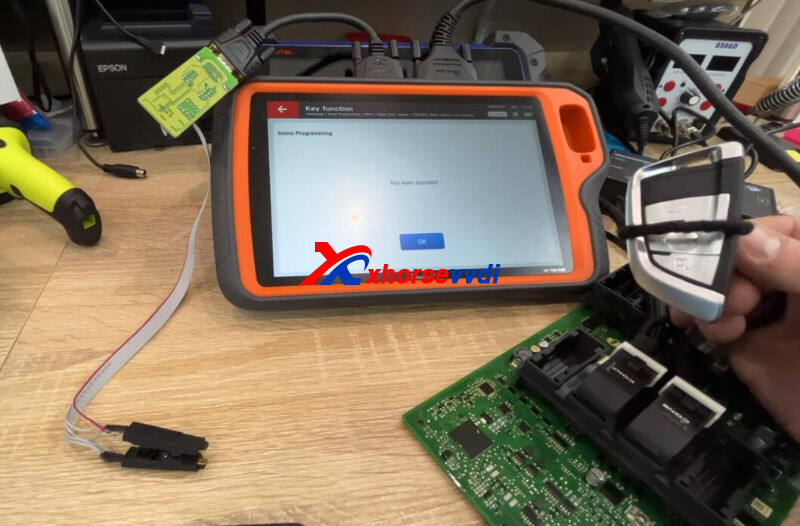
Step 3.Install back and test
Restore FEM and connect battery.
Car starts!.
That's how to add a keys for BMW F20 F21 FEM using VVDI Key Tool Plus.
http://blog.xhorsevvdi.com/how-xhorse-key-tool-plus-add-key-for-bmw-f20-f21-fem/
Posted by: xhorsevvdi at
10:09 AM
| No Comments
| Add Comment
Post contains 157 words, total size 4 kb.
December 15, 2022
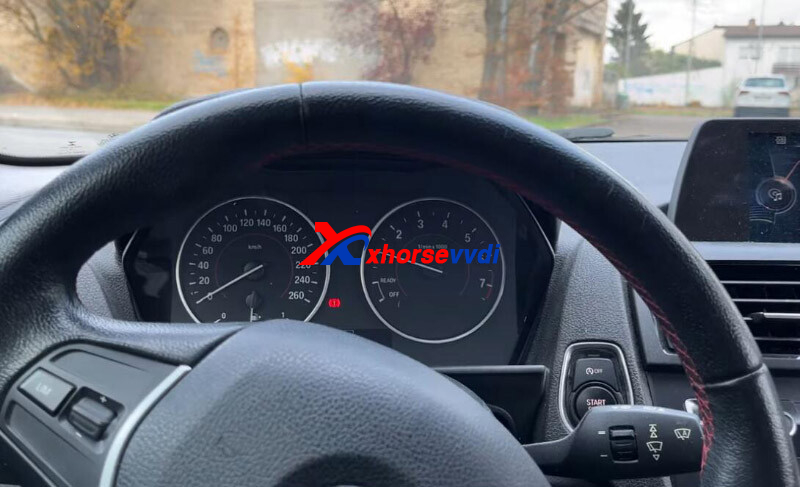
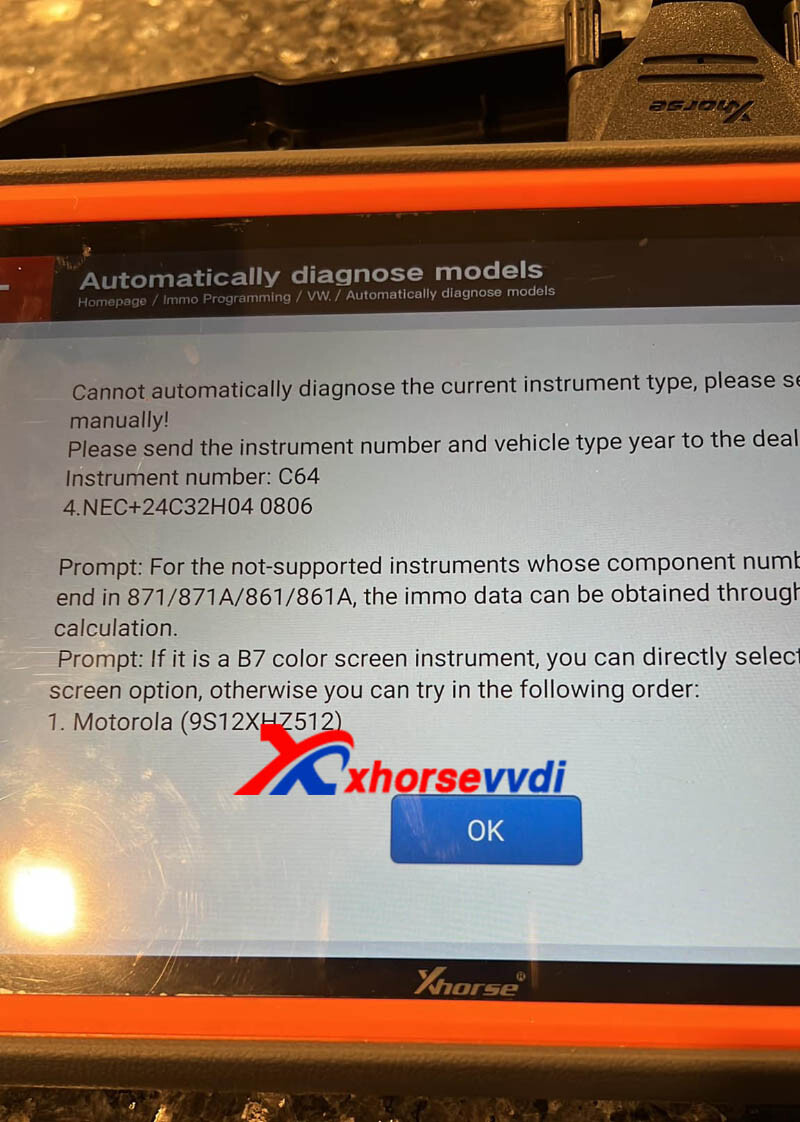
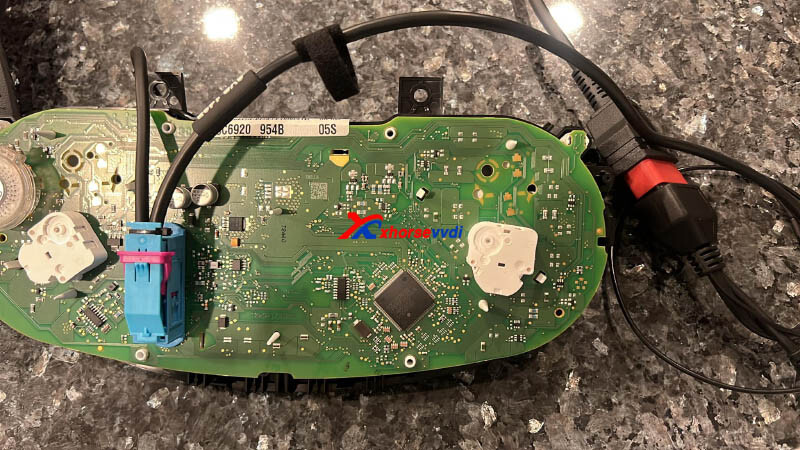
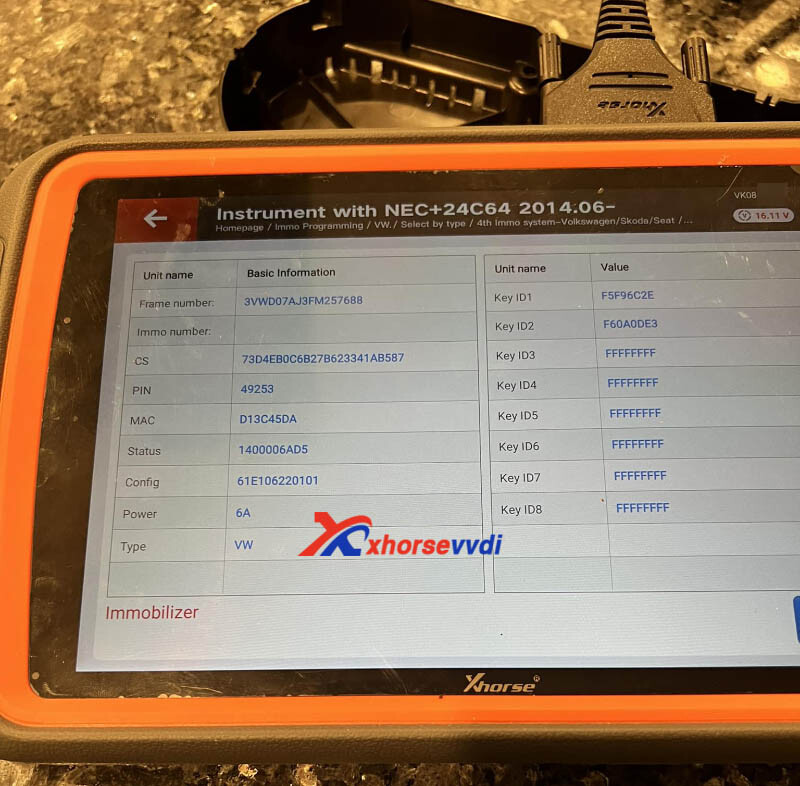
One customer gave feedback that his Key Tool Plus Pad was not detecting via automatic cluster detections.
Here is the
Reason:
This cluster type is 24c64 but not 24c32 as it detects.
Solution:
Read IMMO data via the option "NEC+24C64 2014.06-".
Feedback:
Got the immo data finally!
Xhorse Key Tool Plus did the job!
http://blog.xhorsevvdi.com/solved-xhorse-key-tool-plus-cant-read-2015-jetta-immo-data/
Posted by: xhorsevvdi at
09:42 AM
| No Comments
| Add Comment
Post contains 65 words, total size 2 kb.
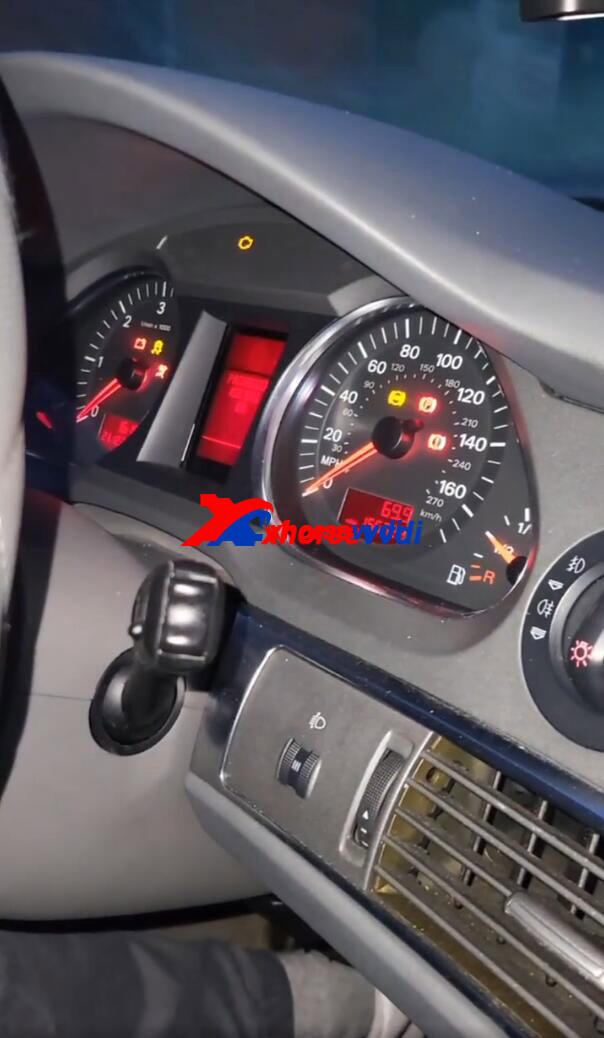
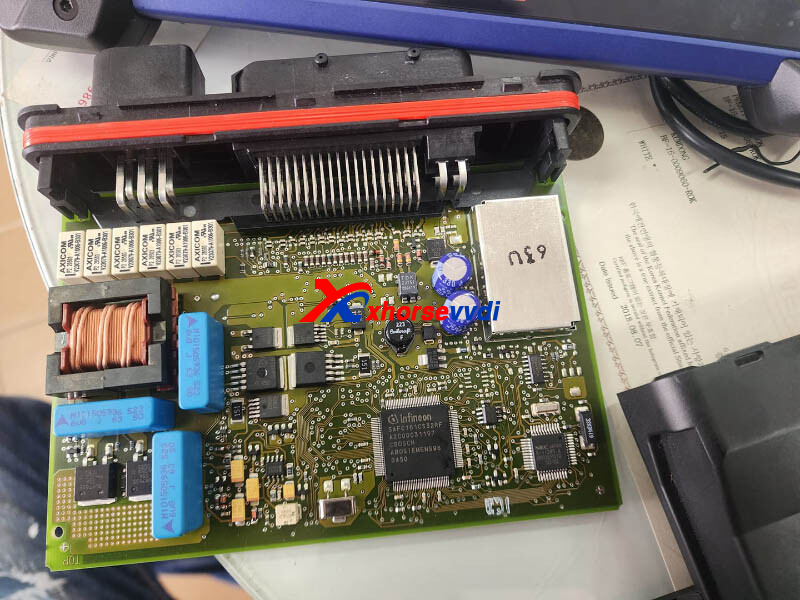
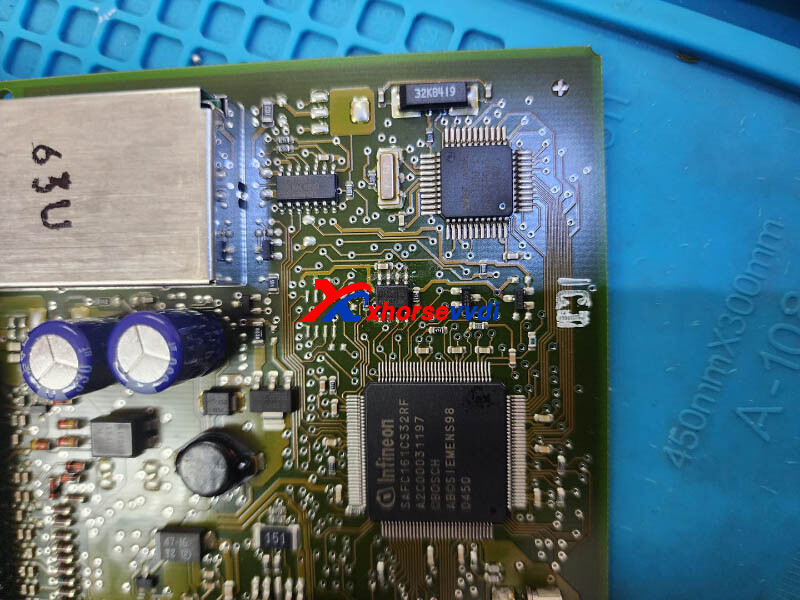
One customer gave feedback that his Key Tool Plus is not possible to program Audi A4 2008 AKL on Bench. It was unable to pull cs and pin from eeprom file. Also, VVDI Tablet showed "unknown version" when trying to load to get key data
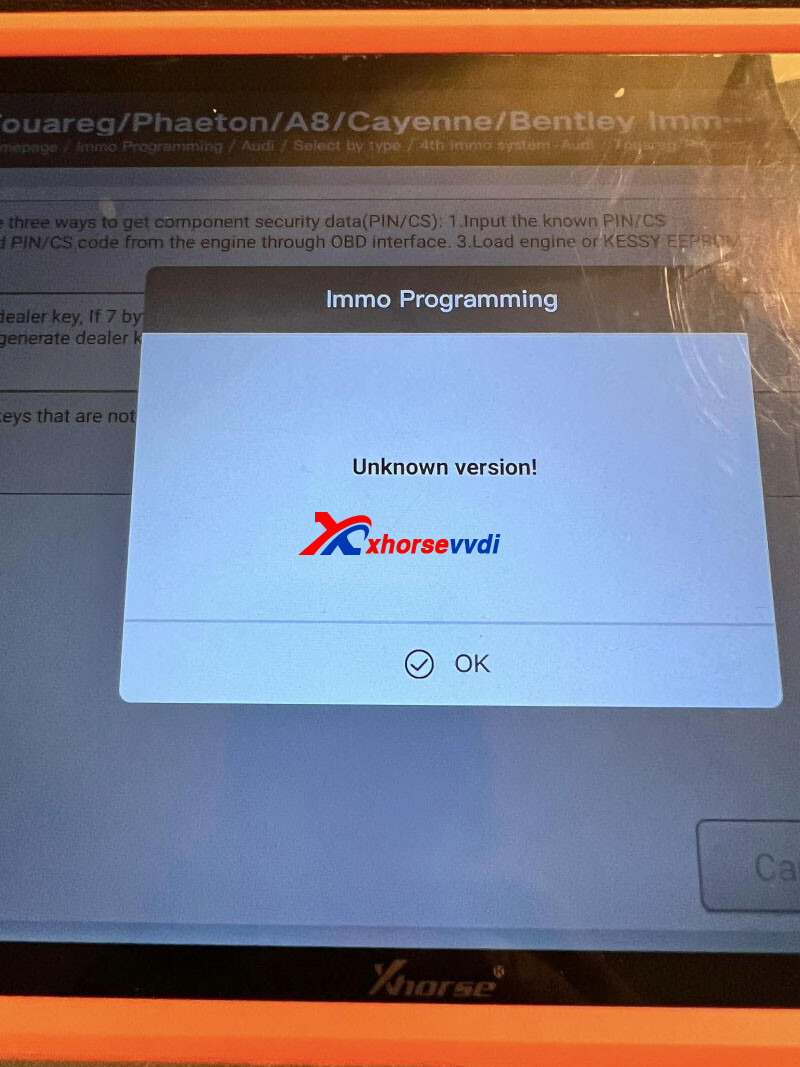
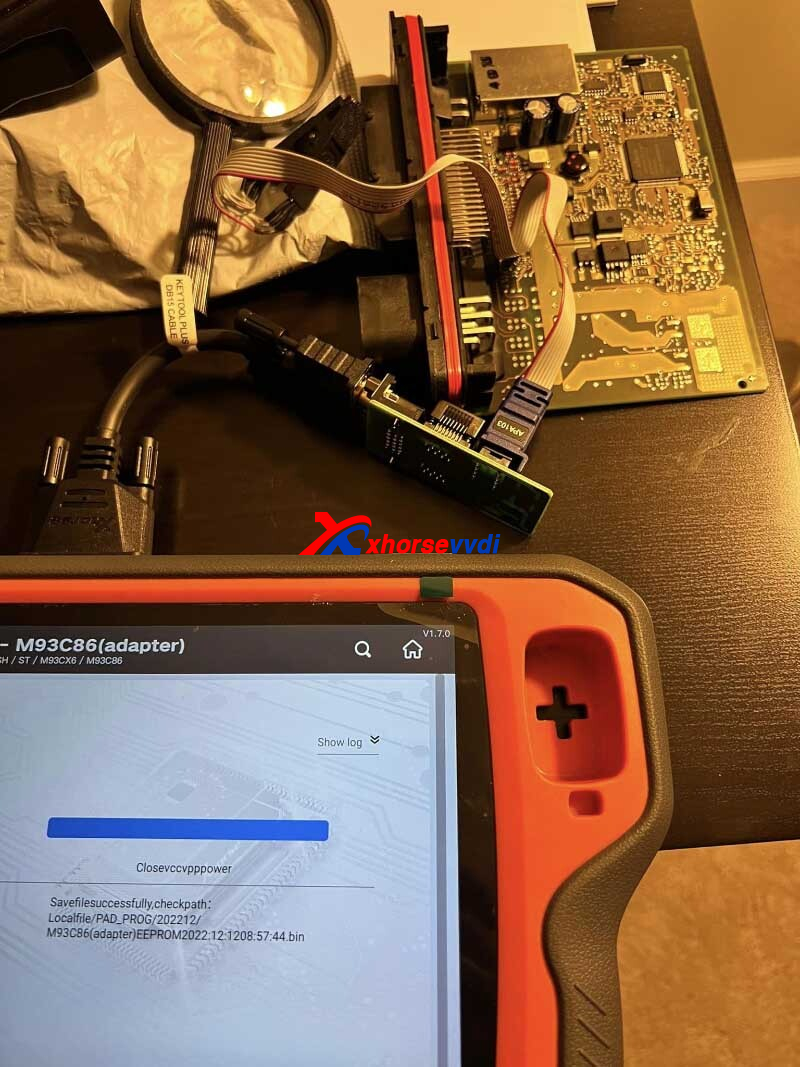
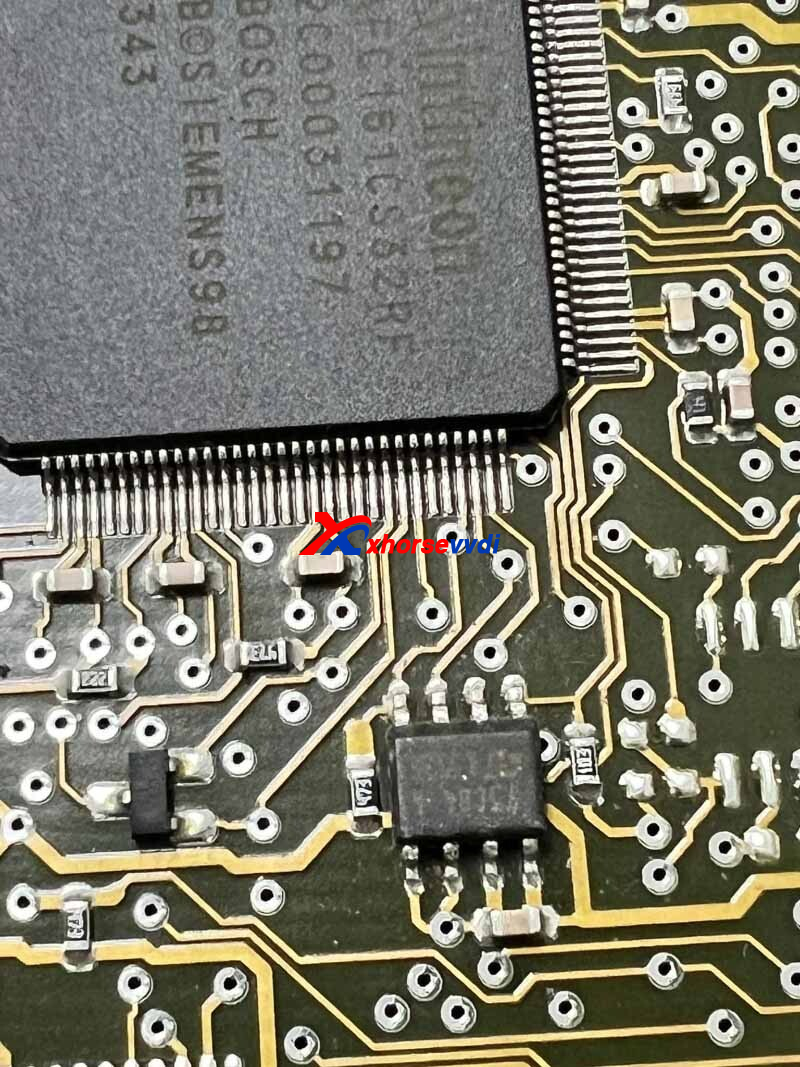
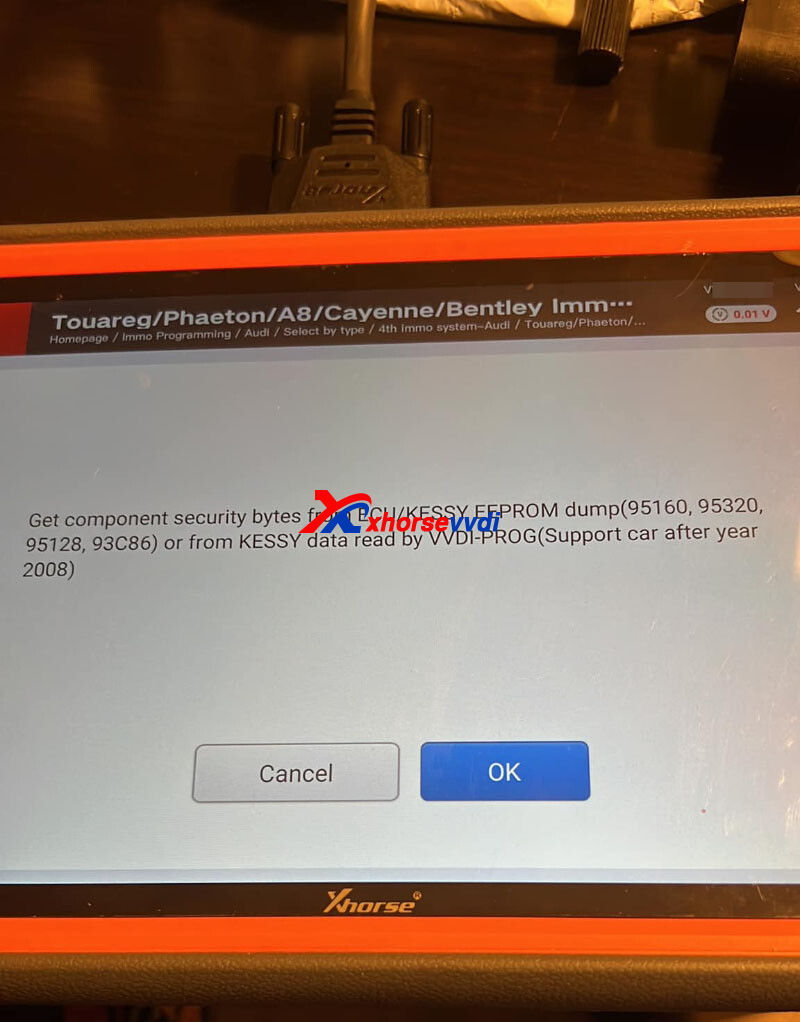
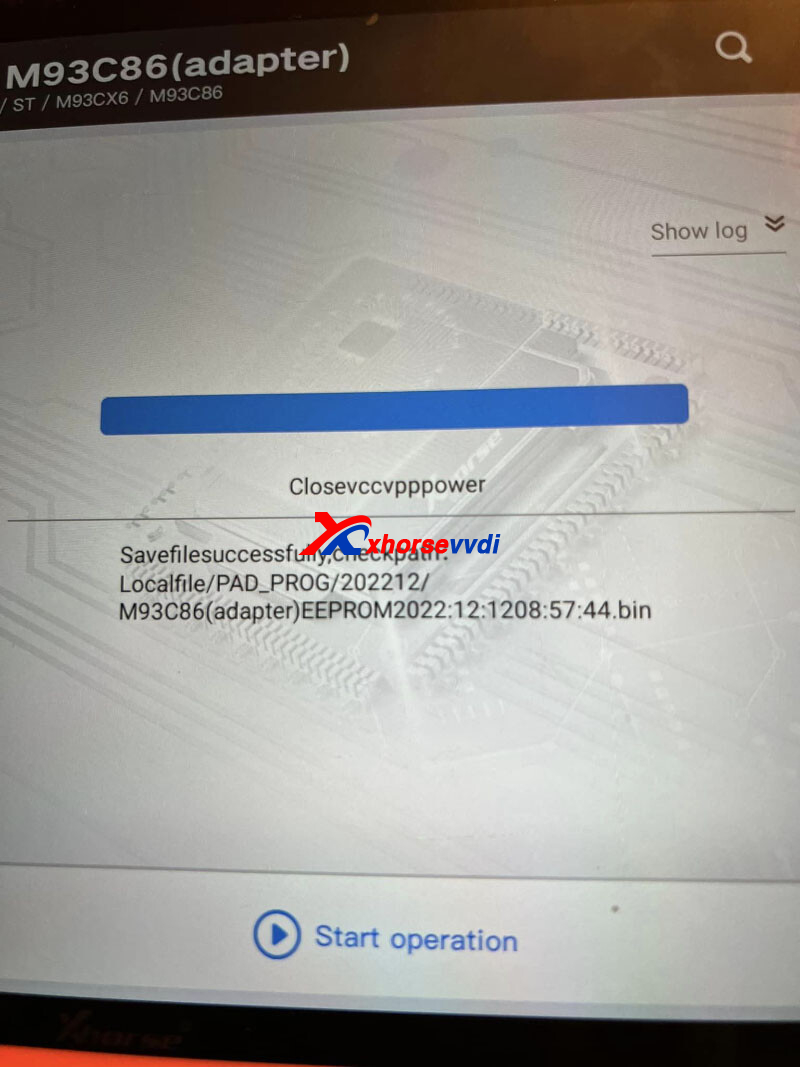
Solution:
Desolder EEPROM and read again.
Steps:
1.Desolder chip
2.Read chip
3.Add key to file
4.Write file to chip
5.solder back chip
Feedback:
Desoldering the chip first before reading did the job
Read Also:
http://blog.xhorsevvdi.com/vvdi2-orange5-akl-programming-for-vw-touareg-2005-success/
http://blog.xhorsevvdi.com/vag-porsche-kessy-module-location/
Posted by: xhorsevvdi at
09:12 AM
| No Comments
| Add Comment
Post contains 92 words, total size 3 kb.
This is an Xhorse VVDI PROG review:
Read BMW MEVD172P ISN by soldering no problem!
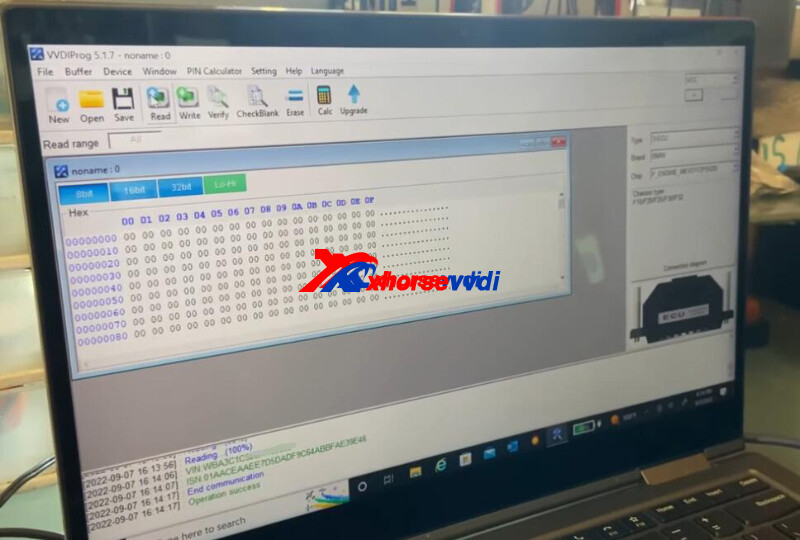
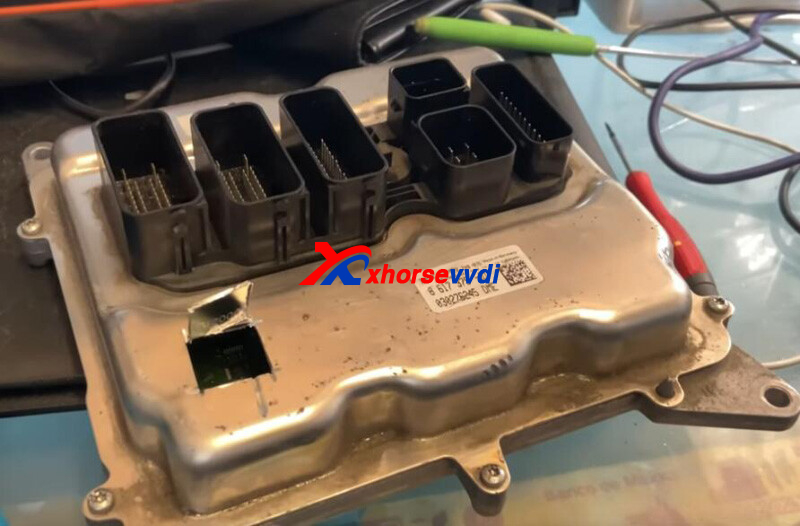
Solder off a small hole as diagrams.
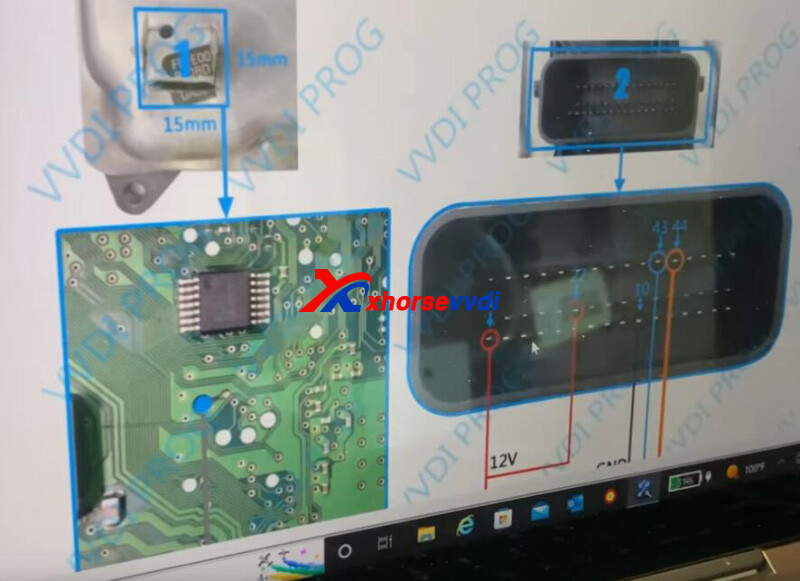
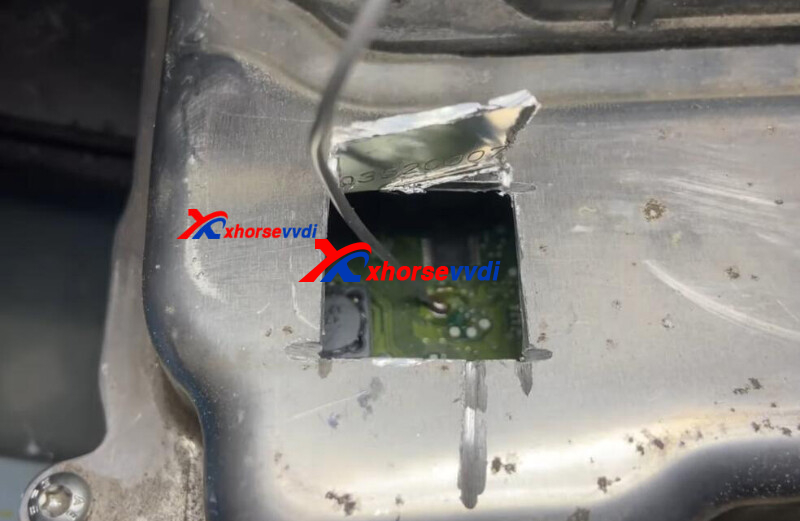
Connect all pins on 2 places by diagrams.
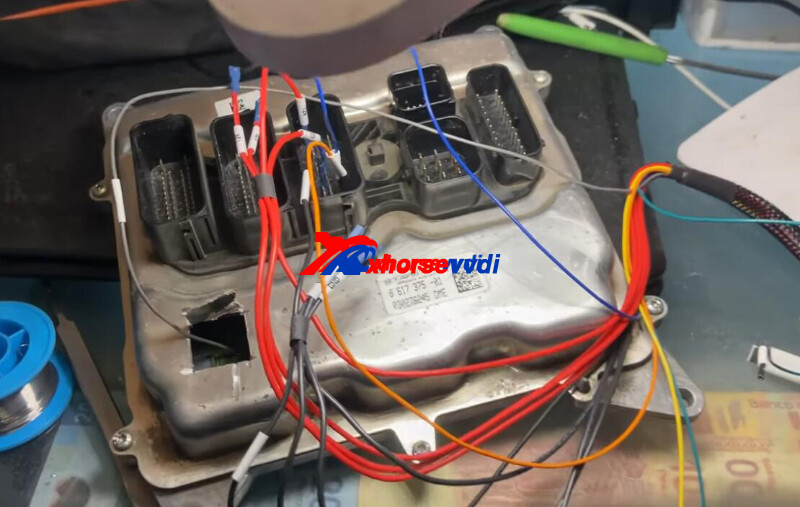
Connect VVDI PROG to PC.
Select:
3-ECU
BMW
F_ENGINE_MEVD172P(N20)
Read out ISN.
http://blog.xhorsevvdi.com/vvdi-prog-read-mevd172p-dme-isn-by-soldering-ok/
Posted by: xhorsevvdi at
09:11 AM
| No Comments
| Add Comment
Post contains 50 words, total size 2 kb.
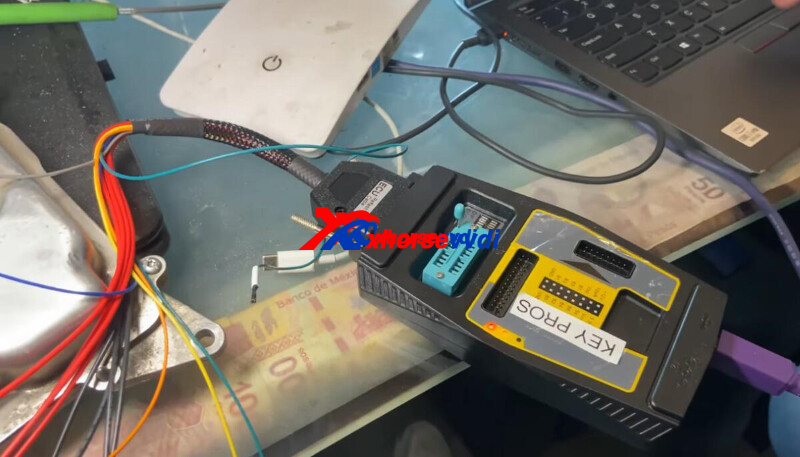
One customer asked if his VVDI Key Tool Plus could unlock a used VVDI Mercedes BE Key.
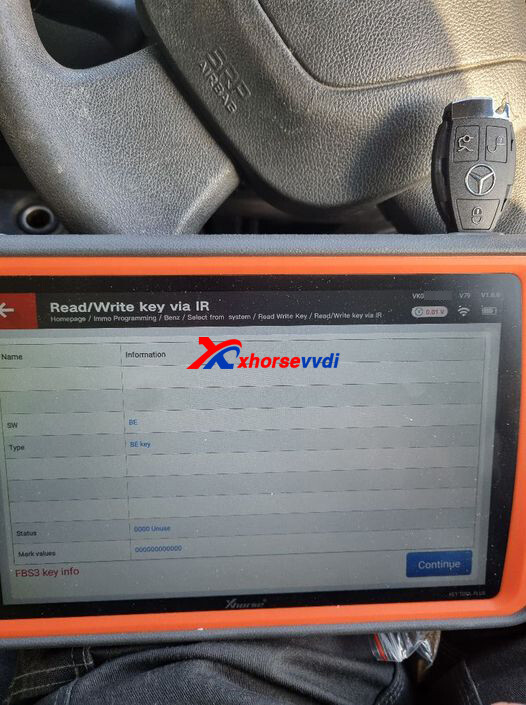
Here Xhorsevvdi tech answer:
Yes, write the key file again and no need to unlock.
Path:
Immo Programming>>Benz>>Select from system>>Read Write Key>>Read/Write key via IR>>Write BE key

Read Also:
http://blog.xhorsevvdi.com/xhorse-vvdi-key-tool-plus-renew-key-mercedes-remote-v57-ok/
https://www.xhorsevvdi.com/
Posted by: xhorsevvdi at
09:10 AM
| No Comments
| Add Comment
Post contains 58 words, total size 2 kb.
When do ID48 transponder clone online, got the error like the following pic:
"Please combine SN with Xhorse APP!"
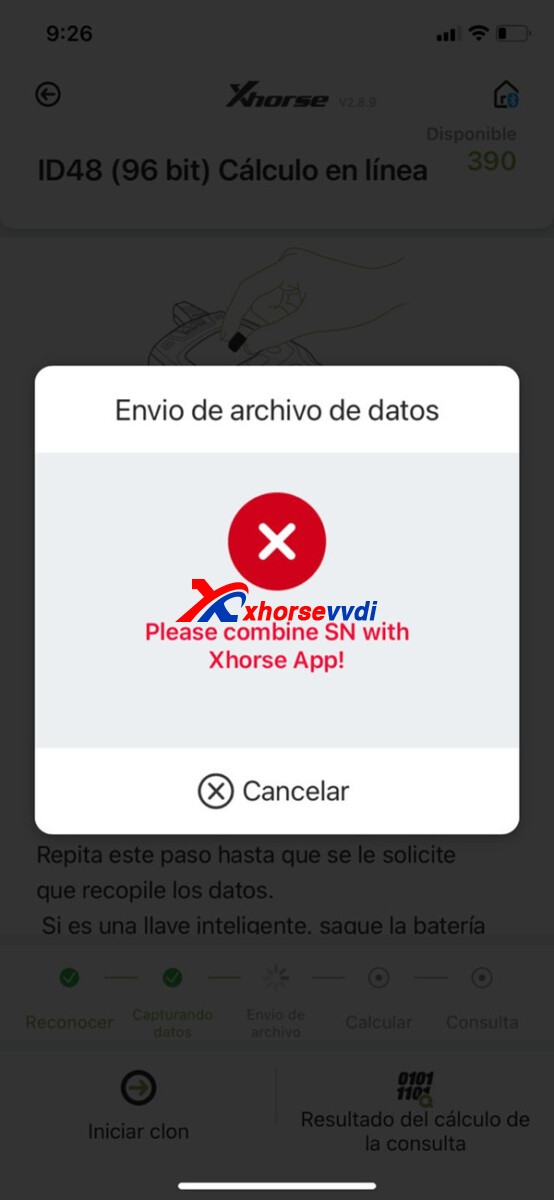
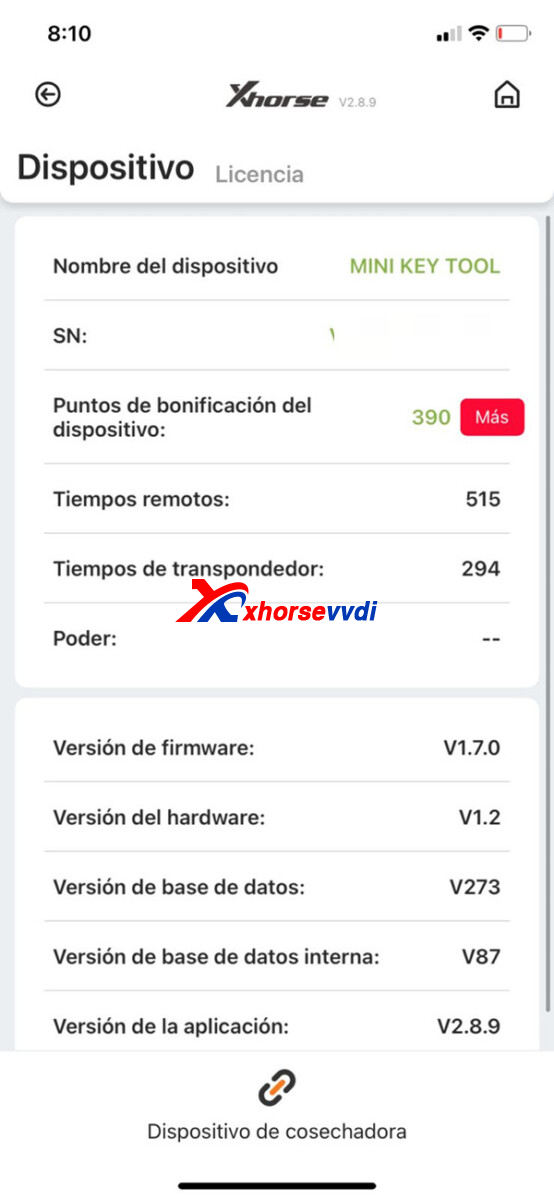
Same error in vvdi key tool plus from an0ther customer feedback
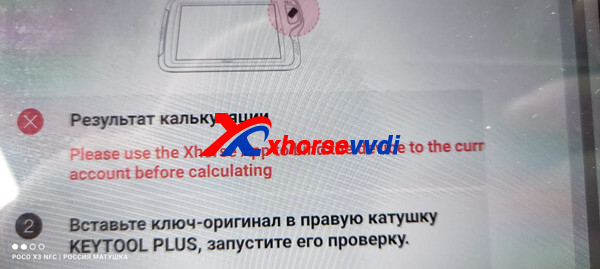
Suggestion:
Please combine your device with xhorse app firstly
https://www.xhorsevvdi.com/upload/pro/19060715598881056953.pdf
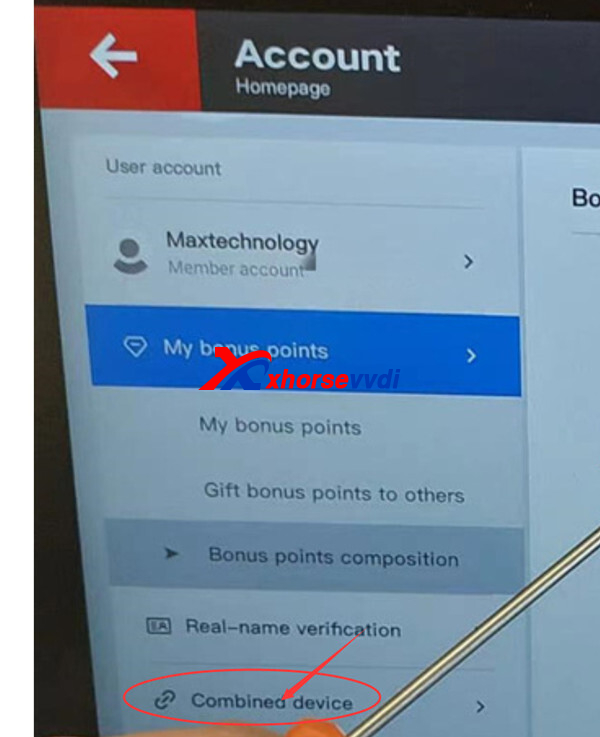
Please send us the combine device page photo
xhorse app>>main page>>account>>combine device
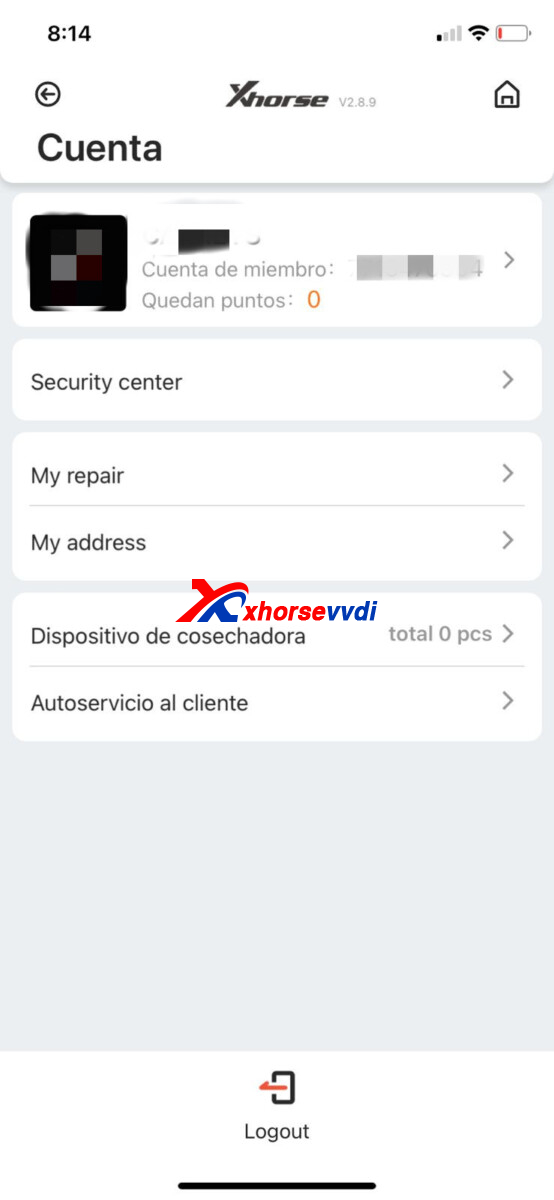
if bind with this account
it will display at least 1 pcs
please click the combine,then do binding device
And key tool plus the same
Posted by: xhorsevvdi at
09:05 AM
| No Comments
| Add Comment
Post contains 90 words, total size 2 kb.
One customer give feedback that his Dolphin XP005's cutter won't rotate or move.
Then we found its belt is broken and it's fixed after replacing. So, here is going to show you how to replace the belt of Xhorse Dolphin Machine.
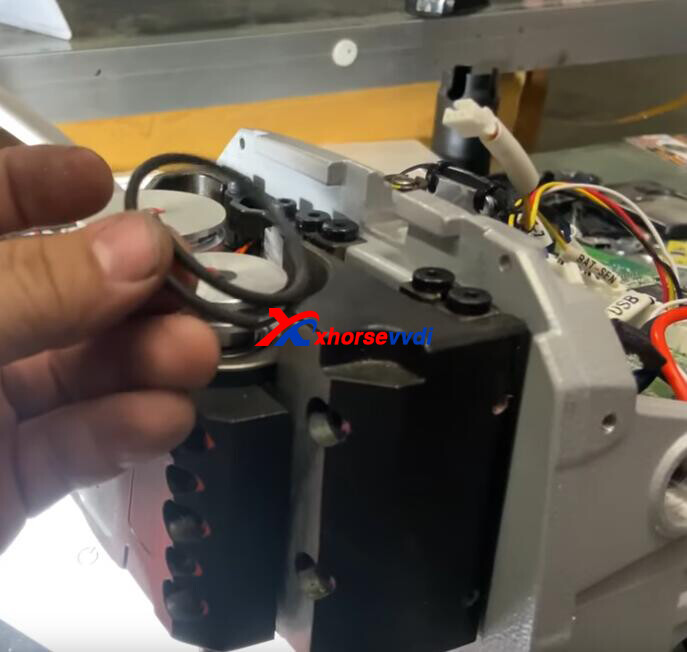
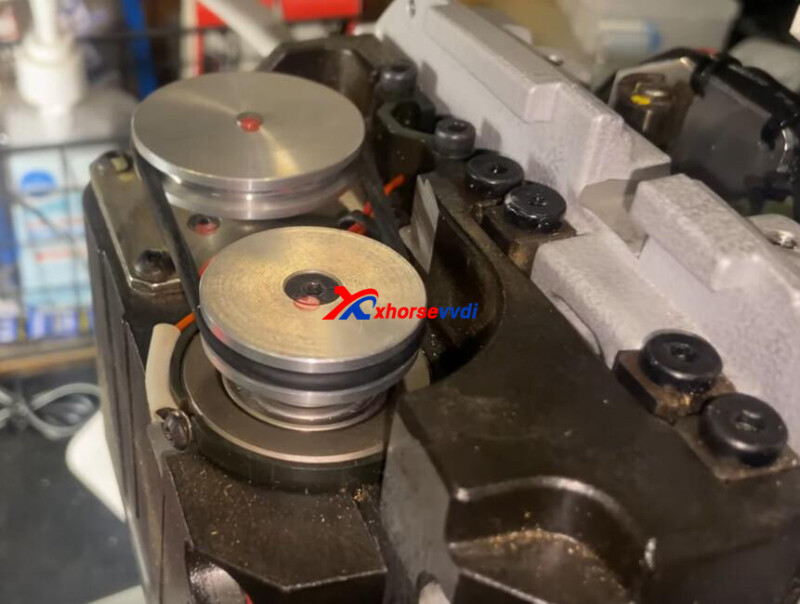
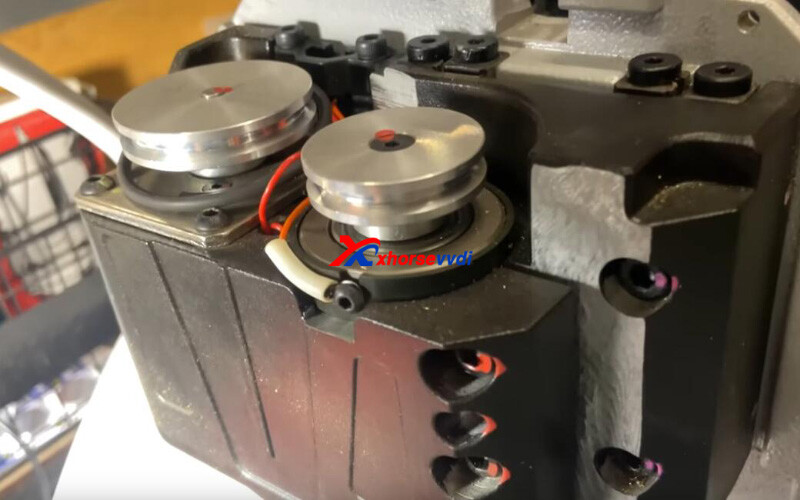
How to Open Dolphin XP-005?
*The process on Dolphin XP005L is similar
http://blog.xhorsevvdi.com/xhorse-dolphin-xp005-error-56-error-code-6-solution/
Where to Get a Belt Replacement?
1.Within warranty period, contact your seller to send you some for free
2.Buy a replacement yourself, diameters are 50mm and 3mm
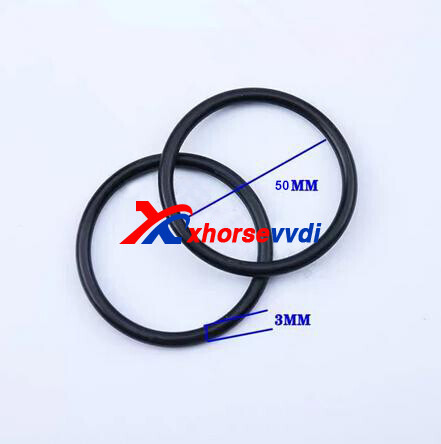
Review:
I had this problem. Solved it by buying some 3MM polyurethane Round drive belting for use on various machinery from ebay. Measured the length then heated up a sharp knife to "weld" the belt together. Worked perfectly
Posted by: xhorsevvdi at
09:05 AM
| No Comments
| Add Comment
Post contains 128 words, total size 3 kb.
This article is going to show you how to duplicate a 2022 Ford Maverick HU198T blade.
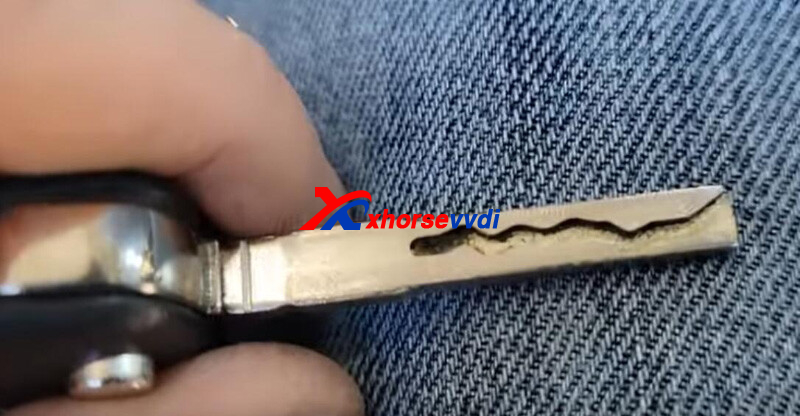
Tools:
Original HU198T Key*1
New HU198T Blank*2
Process:
Go to
Automative>>Brand/ Model>>Ford>>Escape (no option in Maverick)
Try HU101 550*2650.
Put on original key to decode.
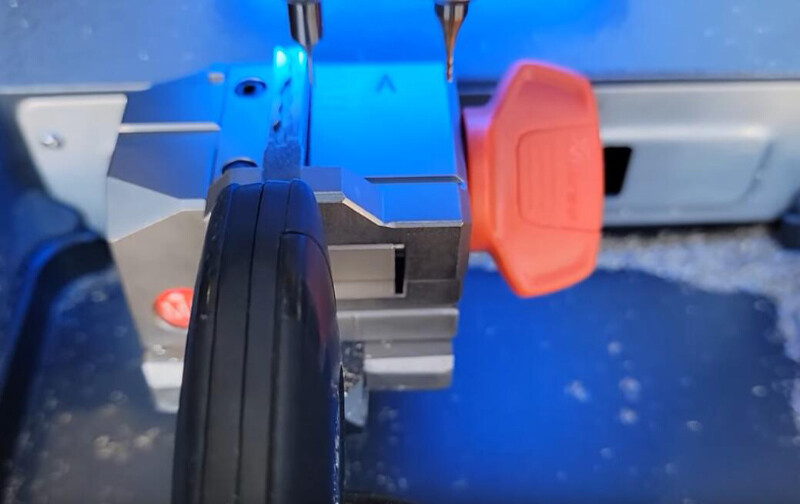
No decoding result, so not the correct option.
Then try HU198T 550*2650.
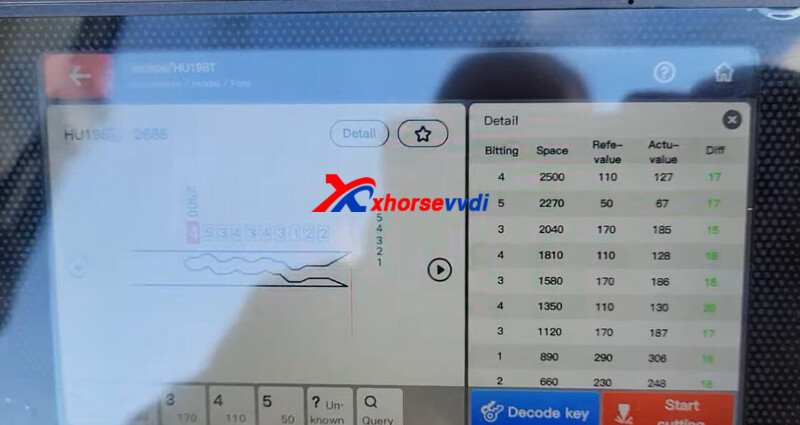
Insert new key to cut.
Both work in the door and the ignition.
Add the other key in the same way.
That's how to cut Ford Maverick 2022 HU198T by Condor II Key Cutting Machine.
http://blog.xhorsevvdi.com/how-to-cut-2022-ford-maverick-hu198t-key-by-condor-ii/
Posted by: xhorsevvdi at
09:04 AM
| No Comments
| Add Comment
Post contains 103 words, total size 2 kb.
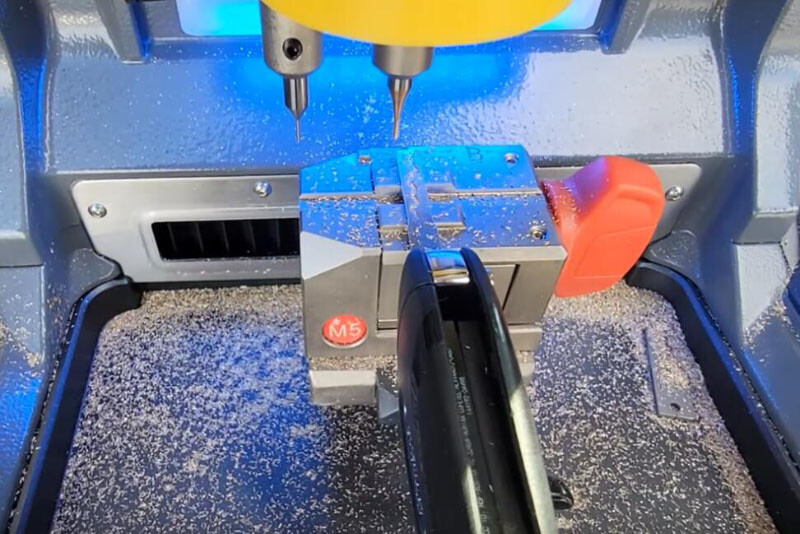
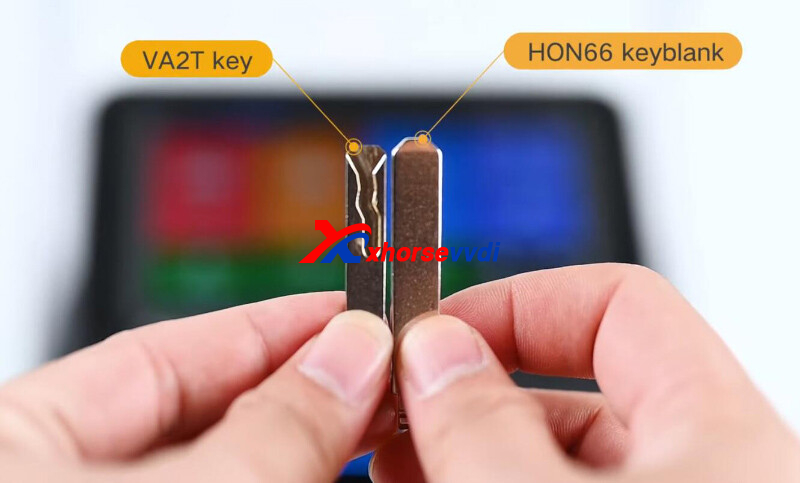
This article is going to show how Condor Mini Plus II Machine duplicates a VA2T key by a HON66 key.
Tools:
Original VA2T Key*1
New HON66 Key*1
Procedure:
Step 1. Narrow HON66 Blank
Go to
Modify key>>VA2T>>VA2T (730*3940*6)
Install new HON66 key.
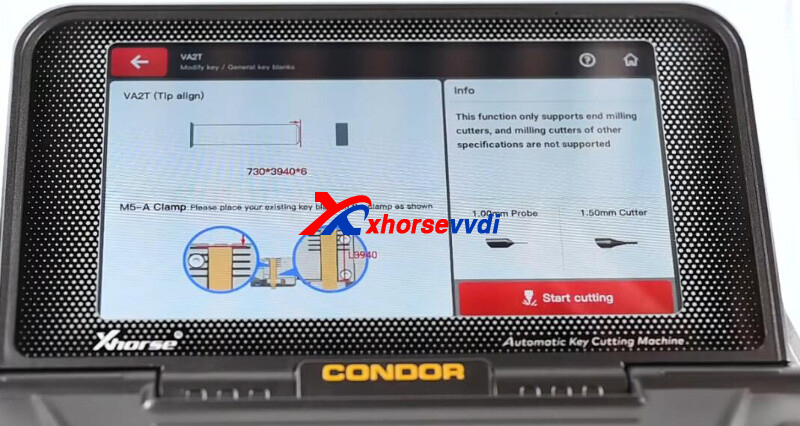
Narrow the front side.
Install reversely and narrow the other side.
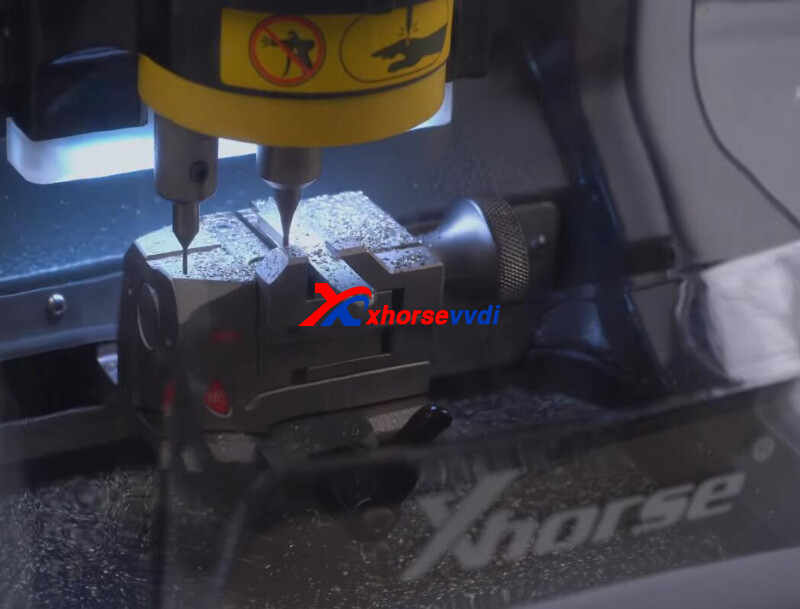
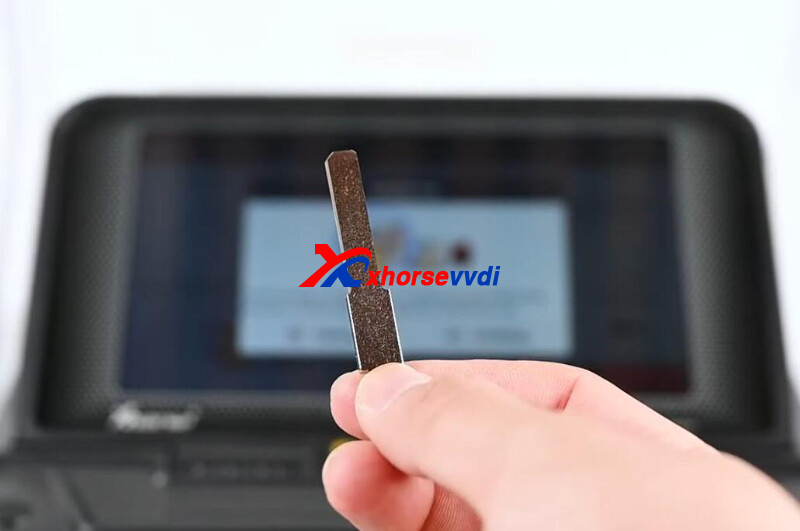
Step 2. Duplicate VA2T Key
Go to
Automotive>>Key blank>>VA2T>>VA2T 1265
Install the original key to decode.
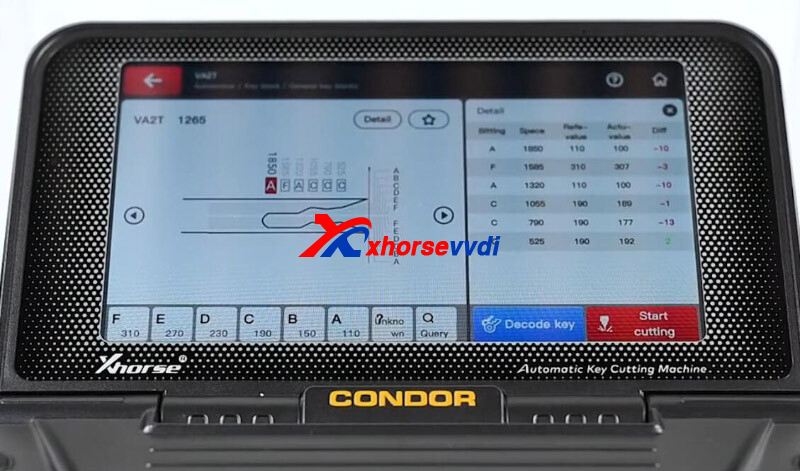
Install the new key to cut.
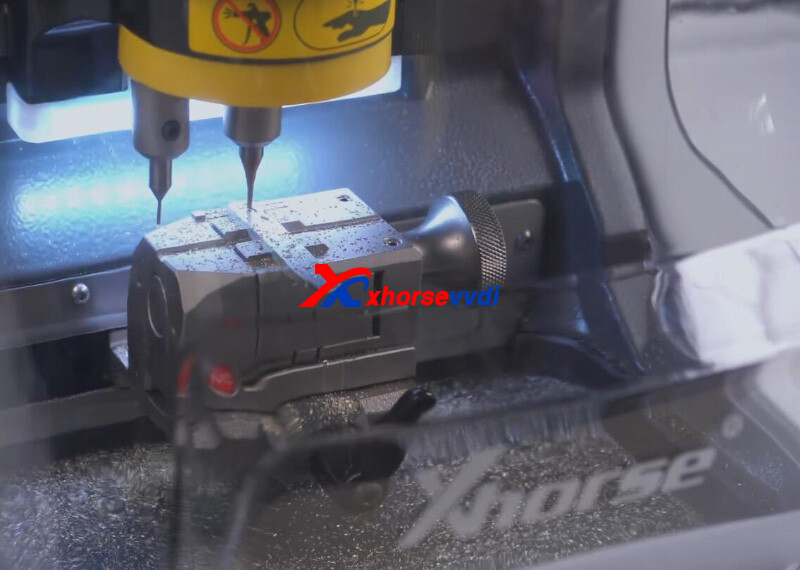
Complete!
http://blog.xhorsevvdi.com/how-to-duplicate-va2t-key-blade-by-condor-mini-plus-ii/
Posted by: xhorsevvdi at
09:03 AM
| No Comments
| Add Comment
Post contains 91 words, total size 3 kb.
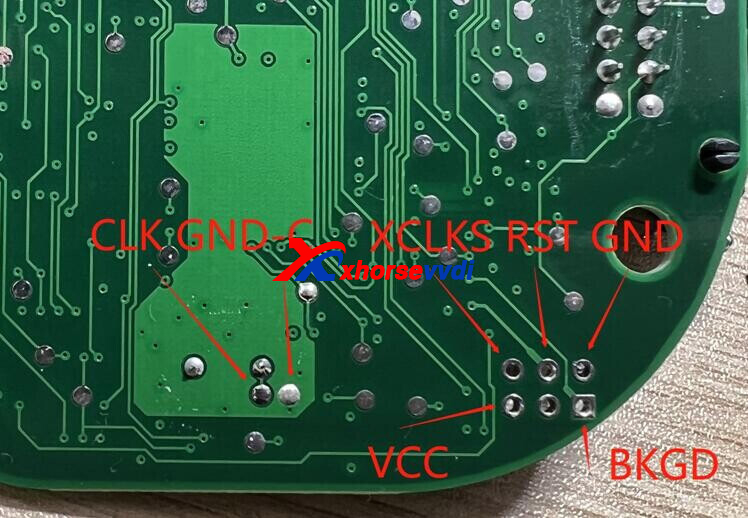
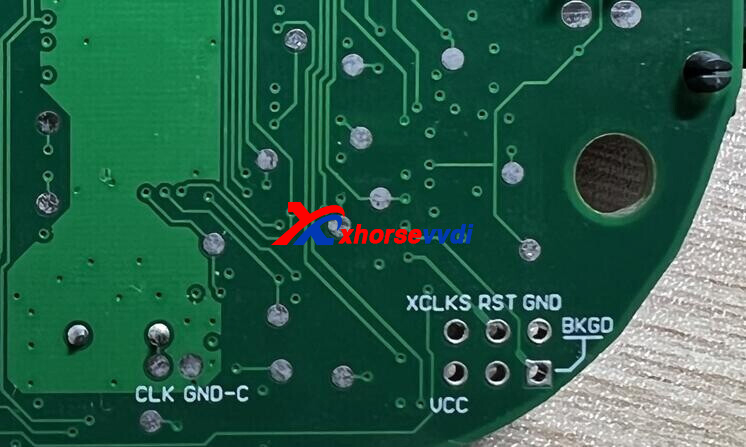
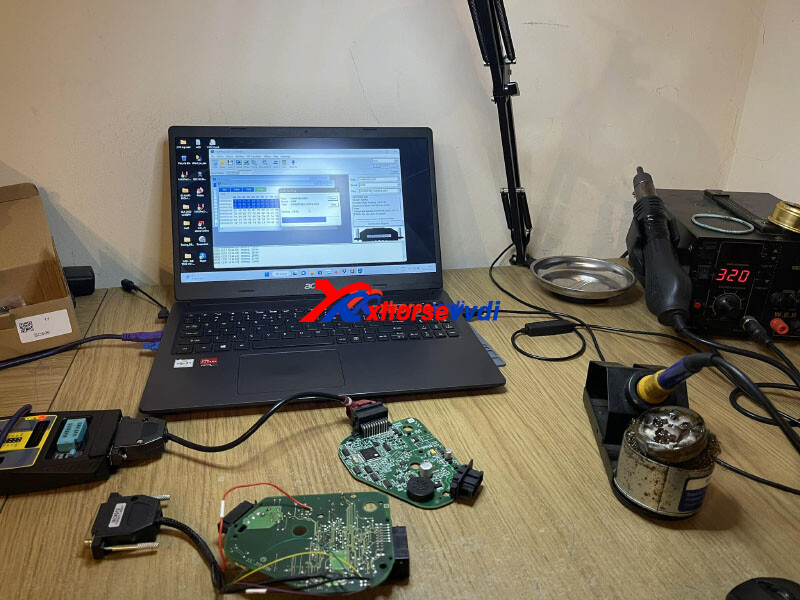
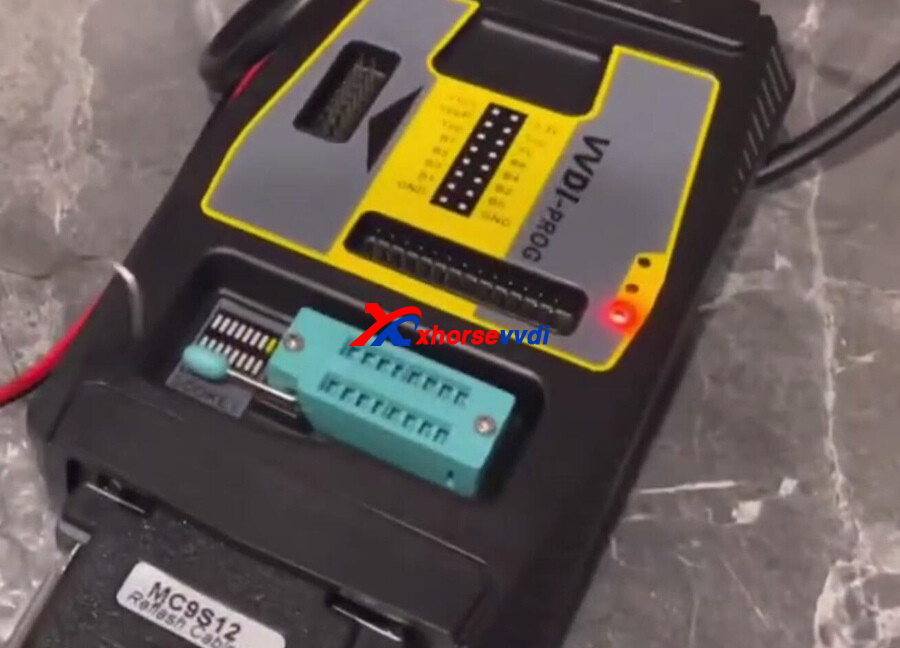
VVDI Prog Programmer new review about reading eeprom and flash data from Ford Transit 2.2 TDCI MCU MC9S12DP512.
1. VVDI Prog connection
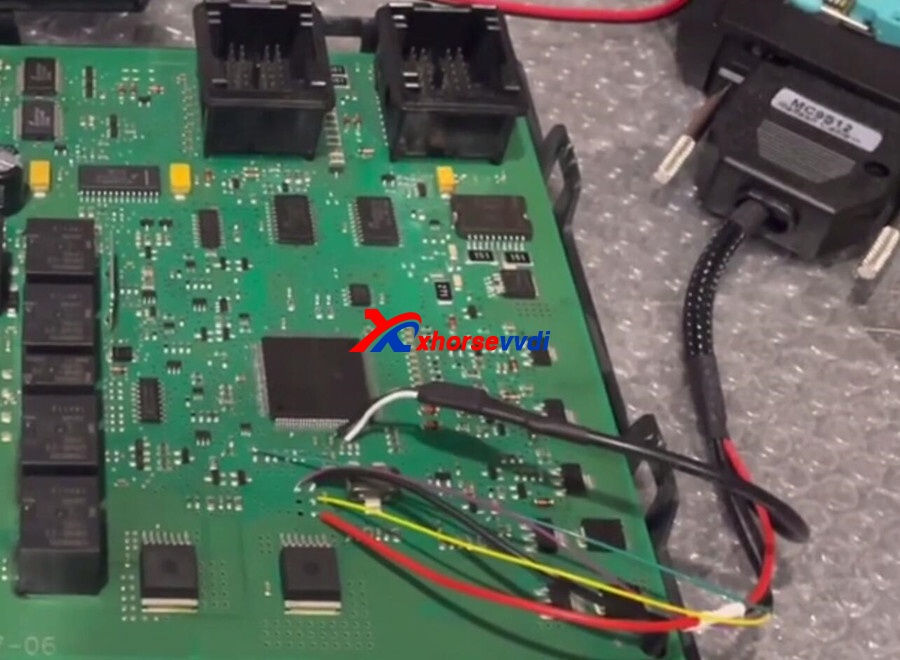
The type in vvdi prog software 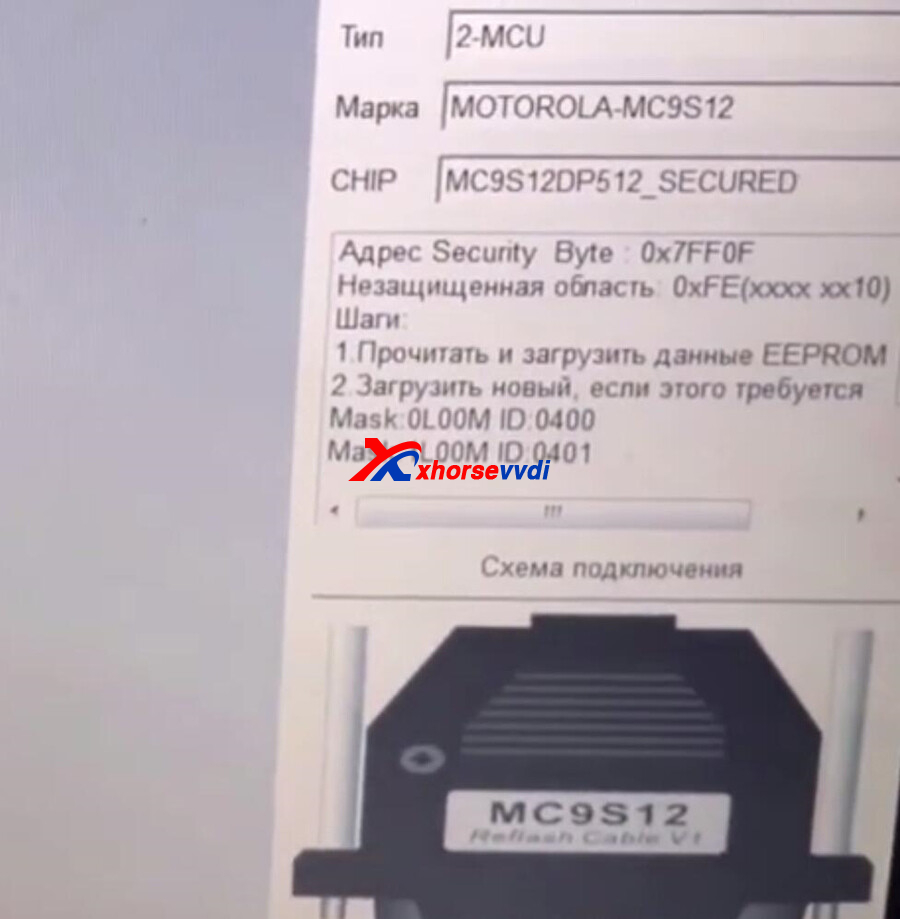
2. After connect well, connect "read" 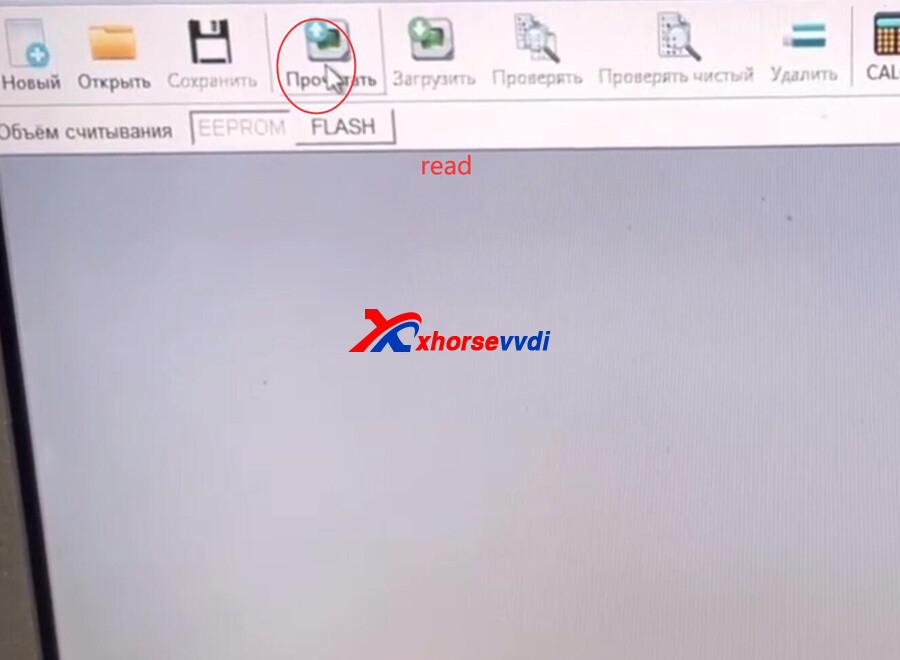
Reading process 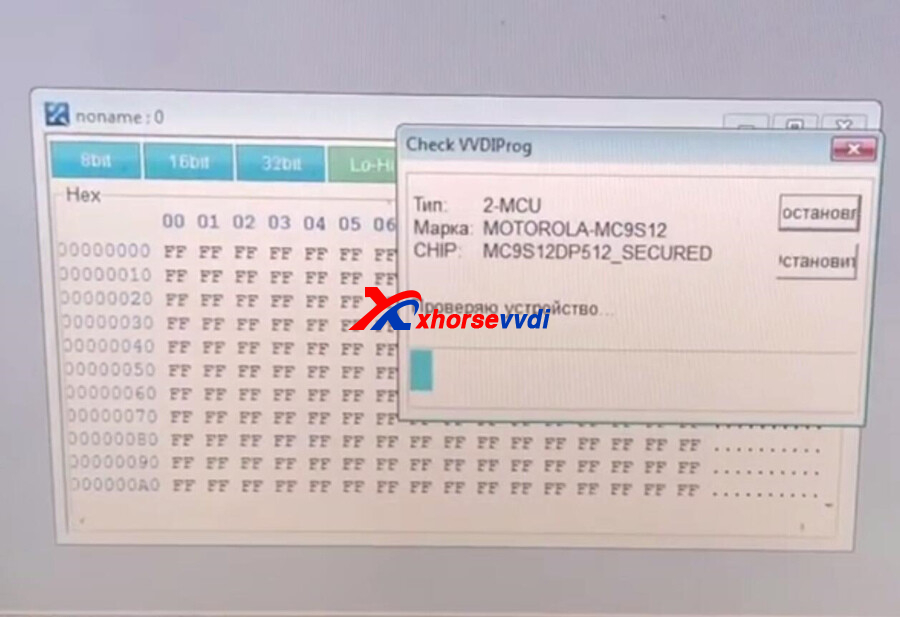
Read OK 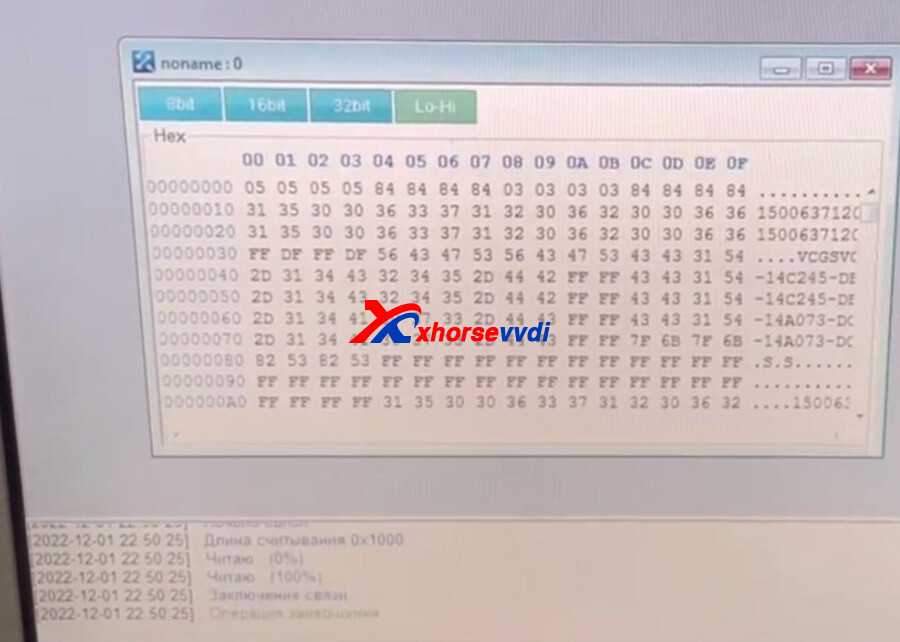
3. After read eeprom, switch to "Flash", then read 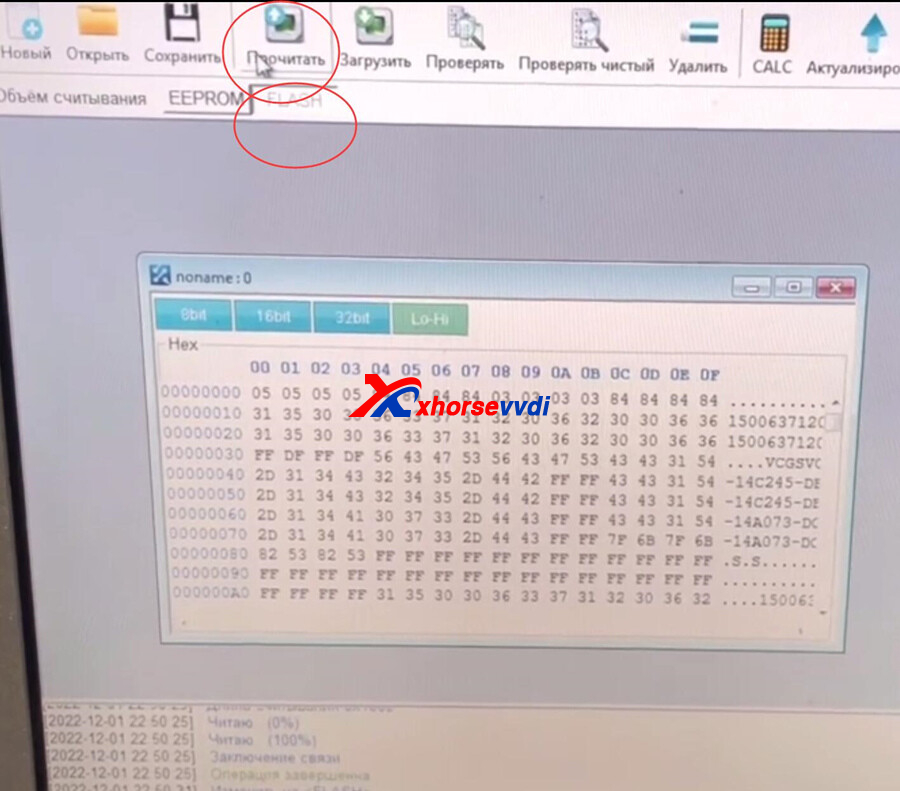
Read OK.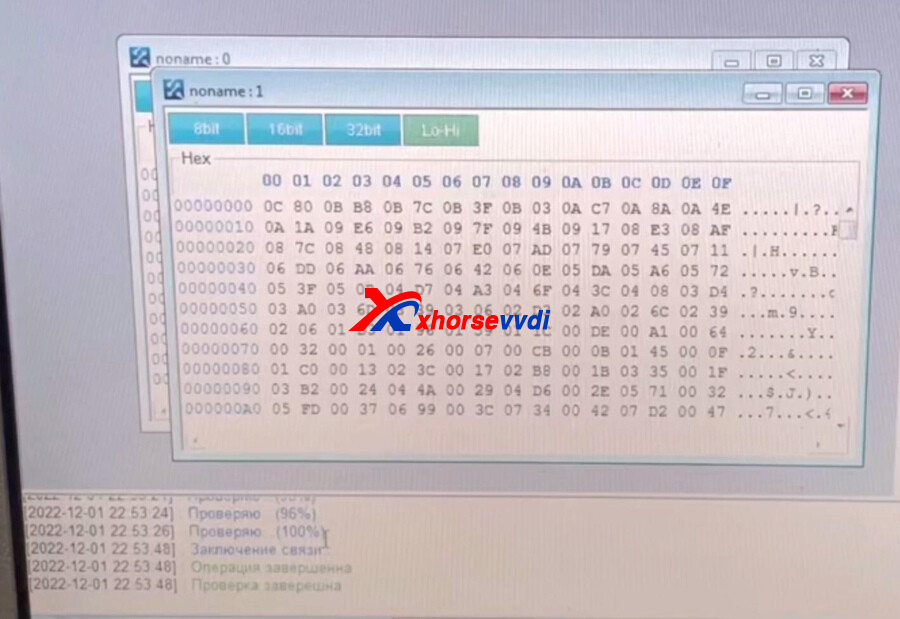
http://blog.xhorsevvdi.com/vvdi-prog-read-ford-transit-2-2-tdci-mcu-mc9s12dp512-ok/
Posted by: xhorsevvdi at
09:01 AM
| No Comments
| Add Comment
Post contains 58 words, total size 2 kb.
One customer gave feedback that his VVDI Key Tool Max Pro needed to replace a screen.
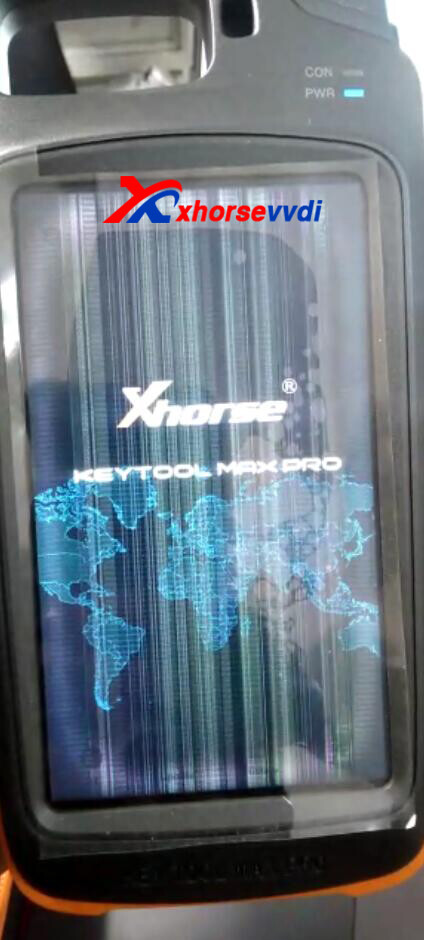
Here is how to replace the screen:
1.Remove 4 screws on the back
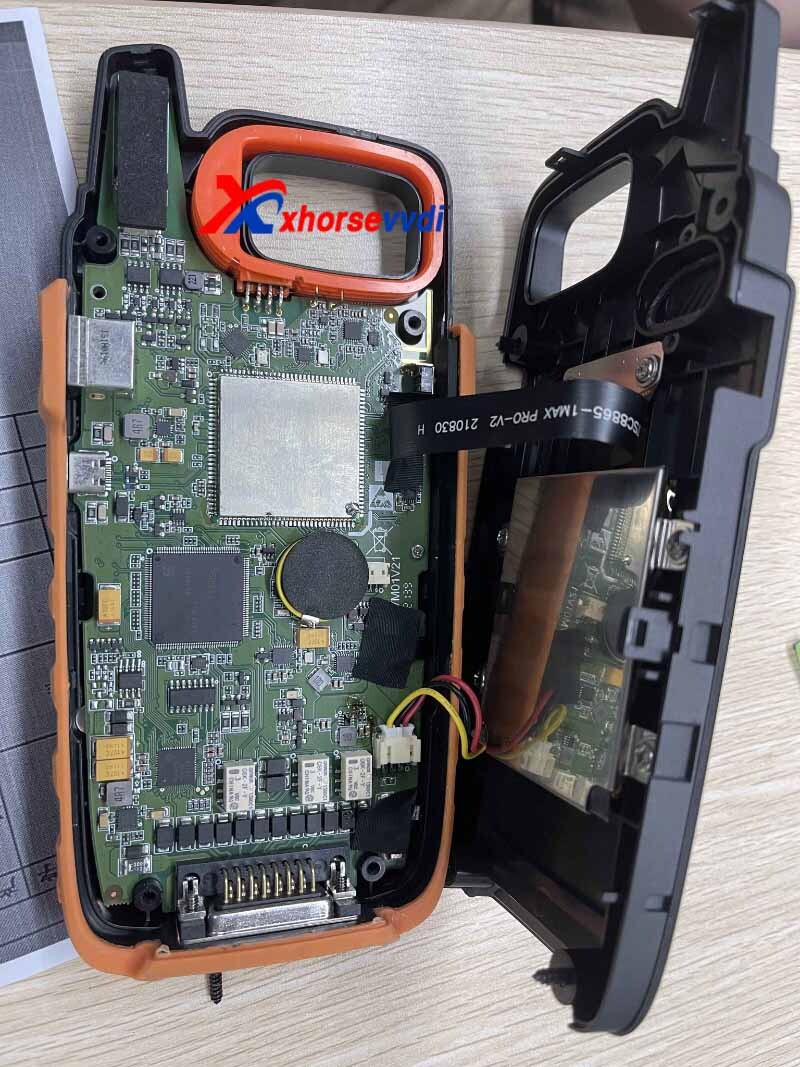
2.Remove 4 screws on the mother board
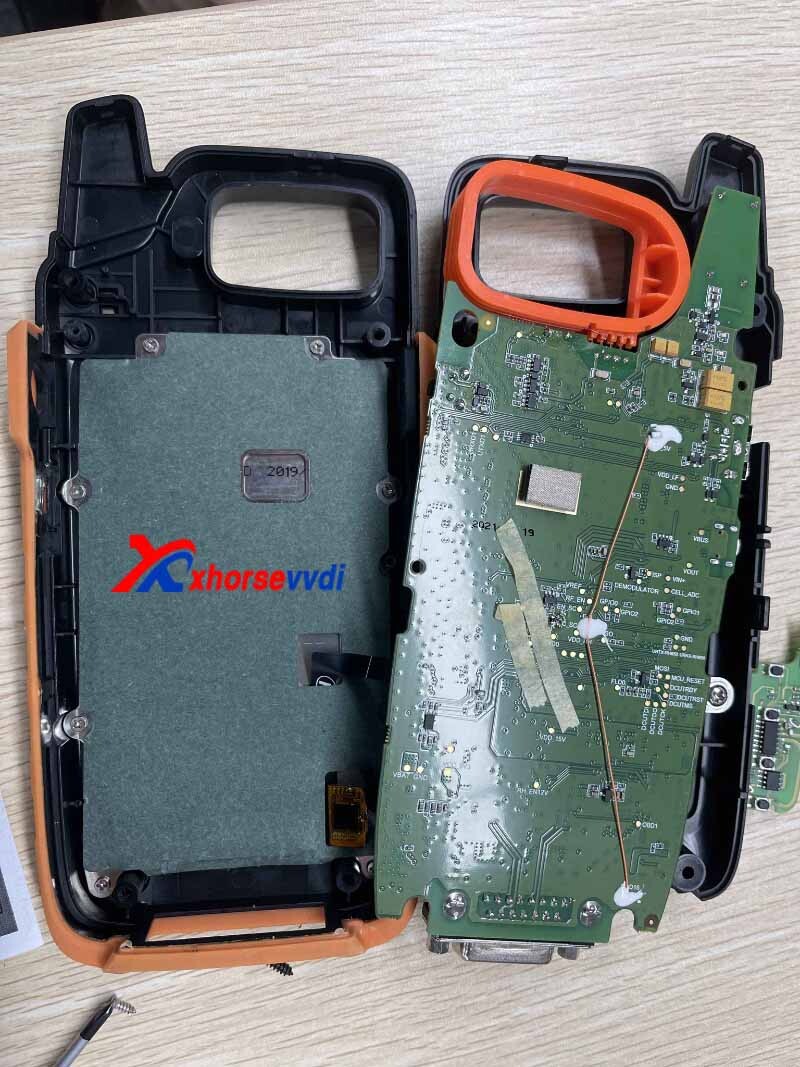
Hope this could help!
http://blog.xhorsevvdi.com/how-to-replace-vvdi-key-tool-max-pro-screen/
Posted by: xhorsevvdi at
09:00 AM
| No Comments
| Add Comment
Post contains 50 words, total size 1 kb.
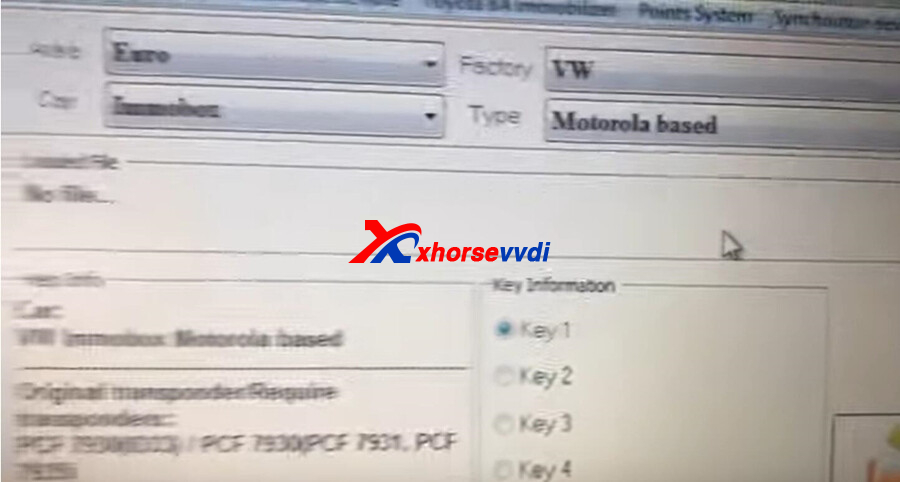
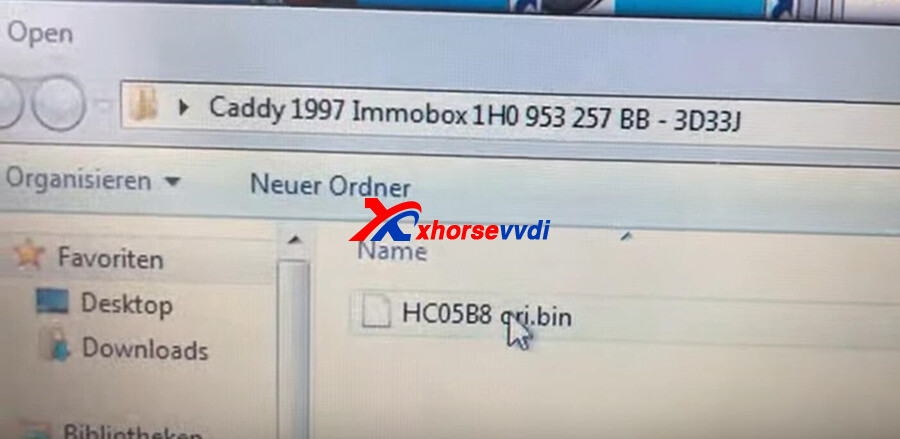
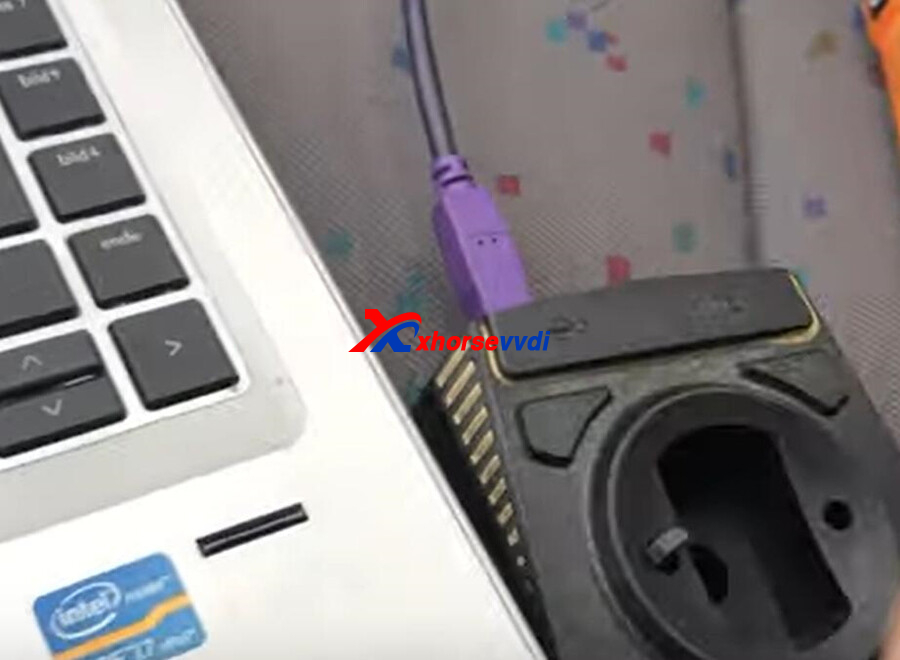
VVDI 7935 Chip XT15 can work like original PCF7935 chip, here is the review about vvdi2 program caddy 1997 with Xhorse 7935 XT15 chip.
VVDI 7935 Chip XT15 Chip:
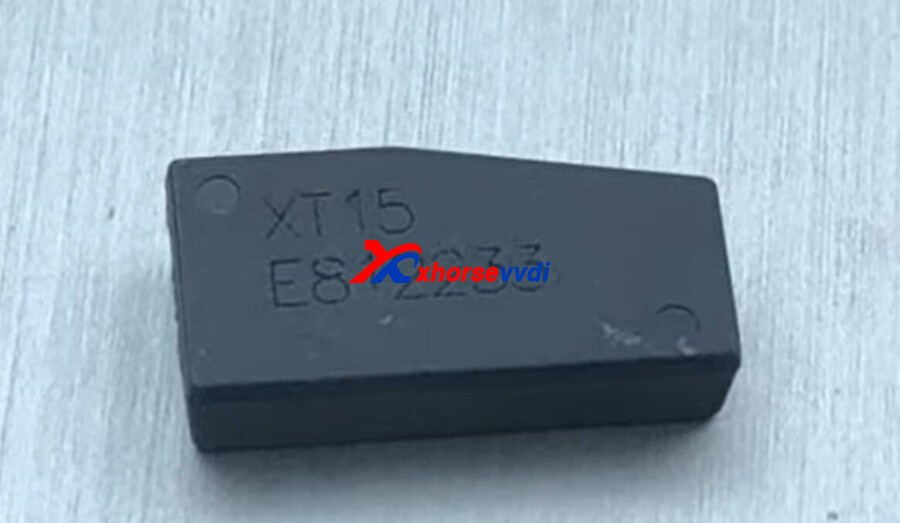
VVDI2 software>>transponder programmer>>immo data tool>>EUR0>VW>IMMO BOX>Motorola based
Load the immo data
Put the 7935 XT15 chip into VVDI2 coil.
Select the transponder type
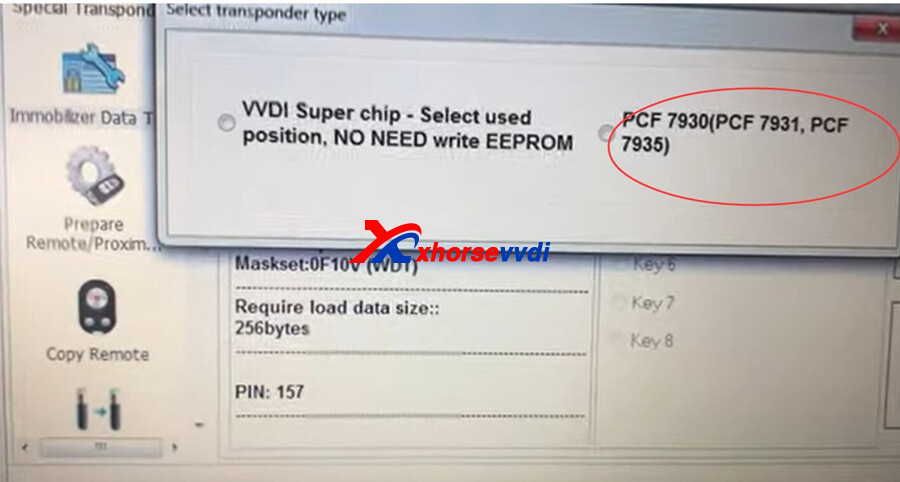
Prepare OK
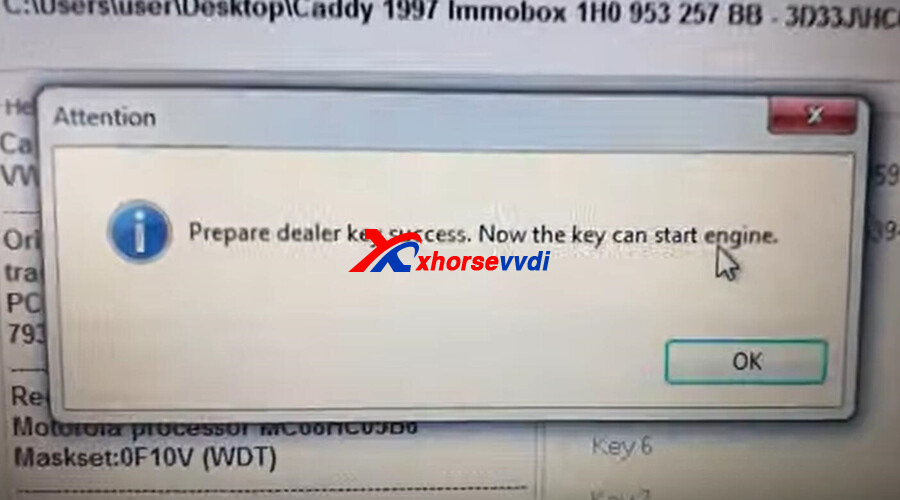
After prepare OK, put the chip close the key to test.
http://blog.xhorsevvdi.com/xhorse-vvdi-7935-chip-xt15-work-as-pcf7935-caddy-1997-ok/
Posted by: xhorsevvdi at
08:59 AM
| No Comments
| Add Comment
Post contains 76 words, total size 2 kb.
Question:
I bought Xhorse XSADJ1GL VVDI Universal Smart Remote Key for Audi (Immo5, BCM2 system) I can't prepare 868 MHz. 315 and 433 MHz prepared ok. But when I try to create 868Mhz I get key with 433 MHz. but work good after programming. I tried with my Mini Key Tool.

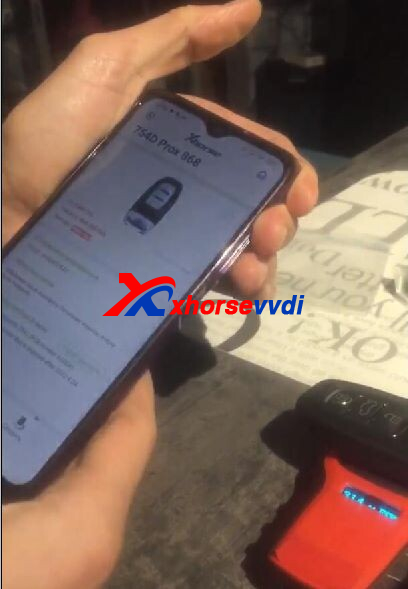
Here Xhorsevvdi tech
Answer:
1.VVDI Mini may not identify the frequency of 868MHz due to its weak signal
2.Program the new 754J Remote after successful remote generation
http://blog.xhorsevvdi.com/fixed-vvdi-audi-754j-remote-generate-868mhz-ok-but-stay-at-433mhz/
Posted by: xhorsevvdi at
08:58 AM
| No Comments
| Add Comment
Post contains 91 words, total size 2 kb.
32 queries taking 0.0965 seconds, 131 records returned.
Powered by Minx 1.1.6c-pink.

