


May 13, 2025
Question:
XhorseBluetoothDigitalSmartKey told "this device is not allowed to be used in the current region", is there a solution, when buying no one warns that it doesn't work in...


Here is the Answer:
There are Global and Chinese Version of Xhorse Digital Smart Key, and CN version won't work outside China.
Simply ask your seller to change version for you.
Done! Hope this helps!
http://blog.xhorsevvdi.com/xhorse-bluetooth-digital-key-not-allowed-in-current-region-solution/
Posted by: xhorsevvdi at
09:07 AM
| No Comments
| Add Comment
Post contains 75 words, total size 1 kb.
One customer wonders if Xhorse Multi Prog read the cluster with MQB48 Adapter, VW T-ROC 2019 year with cluster 17A920790A CPU R7F701401.
Here is the Answer:
Multi Prog will only read/ write one cluster with CPU R7F701401.
Users need to solder cables using RH850 Cable.
Check out if pinout looks identical to PCB.


Done! Hope this helps!
http://blog.xhorsevvdi.com/multi-prog-mqb48-adapter-possible-to-read-vw-cluster-r7f701401/
Posted by: xhorsevvdi at
09:07 AM
| No Comments
| Add Comment
Post contains 68 words, total size 1 kb.
Question:
Xhorse XSBTK0EN Bluetooth Key,
IfIopenthedoorofcarwithoutkey,isthisobddevicestartinitiationon?
WhatistheprotectionagainstcartheftifIleavetheOBDdeviceinthecar?

Here is the Answer:
After key learning using XSBTK0EN Key, Switch to Daily Mode. (Path: Settings>>Advanced Setting>>Switching modes)
Then other phones won't identify this key via Bluetooth and this key cannot start cars without the linked phone.

Done! Hope this helps!
http://blog.xhorsevvdi.com/how-xhorse-xsbtk0en-bluetooth-key-start-initiation/
Posted by: xhorsevvdi at
09:06 AM
| No Comments
| Add Comment
Post contains 56 words, total size 1 kb.
Question:
Xhorse Multi Prog, I see dflash immo and ONLY read NO WRITE and no dflash clone how can I write this bcm, JEEP Renegade BCM R7F701034?

Answer:
Download Database again and it will give a way to clone D-flash.
Then users can clone this BCM unit.

Done! Hope this helps!
http://blog.xhorsevvdi.com/xhorse-multi-prog-possible-to-read-write-jeep-bcm-r7f701034/
Posted by: xhorsevvdi at
09:06 AM
| No Comments
| Add Comment
Post contains 62 words, total size 1 kb.
One customer said there was a problem on Xhorse Key Reader. Tried to decode one key using key reader but every time it read the key it would show different results. Tried 3 times and got three bittings.


Here is the Solution:
If part of bitting is not correct, users can change bitting by arrows below.
Put orange bits on the green line.

Then the correct bitting is 5434421232.
Done! Hope this helps!
http://blog.xhorsevvdi.com/xhorse-key-reader-read-different-bittings-on-identical-key-solution/
Posted by: xhorsevvdi at
09:06 AM
| No Comments
| Add Comment
Post contains 84 words, total size 2 kb.
Question:
Generated remote controls using 11 Xhorse Super Keys, but id48 96 function on Xhorse Key Tool Max Pro still not working, what is going on, how can I fix it?


Here is the Solution:
In this step, users need to put Key Tool Max Pro near ignition lock cylinder for collecting data
Done! Hope this helps!
http://blog.xhorsevvdi.com/key-tool-max-pro-id48-96-function-not-working-solution/
Posted by: xhorsevvdi at
09:05 AM
| No Comments
| Add Comment
Post contains 68 words, total size 2 kb.
Here is a review of Xhorse Multi Prog:
AUTEL IM508S fail to read ECU - Xhorse Multi PROG Did Read with ease & IMMO OFF - PASSAT 2017
Let's take a look at how it is done.
EDC17C74 unit.

2 possible PINOUTs.

Multi Prog Tool on the job.

Read and save EEPROM and FLASH data.


Select
Tool>>Turn off the immo

Load file.

Write immo off file.
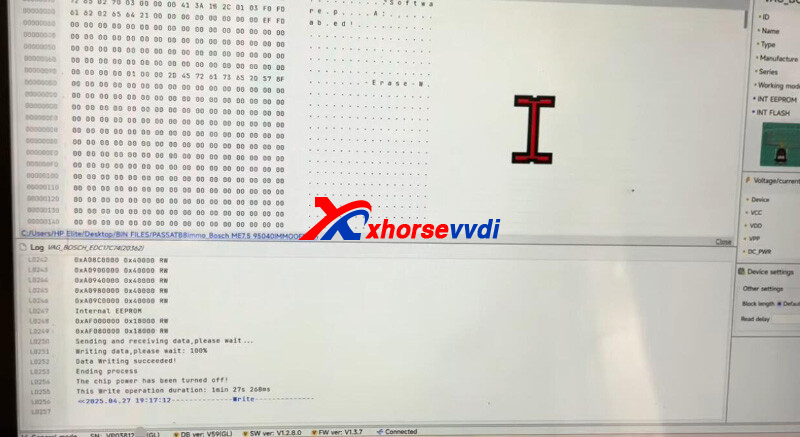
Done! That's how VVDI Multi Prog IMMO OFF Passat 2017.
http://blog.xhorsevvdi.com/xhorse-multi-prog-passat-2017-read-write-immo-off-with-ease/
Posted by: xhorsevvdi at
09:05 AM
| No Comments
| Add Comment
Post contains 89 words, total size 3 kb.
Question:
Xhorse MVCIPROJ2534workwithG-IDSSsoftwareaspassthru?


Here is the Answer:
If G-IDSS requires a J2534 passthru tool for connection, MVCI PRO should work.
G-IDSS is not tested yet, users try at their own risk.
If G-IDSS won't work, try HONDA HDS.
Done! Hope this helps!
http://blog.xhorsevvdi.com/mvci-pro-j2534-possible-to-work-with-isuzu-g-idss/
Posted by: xhorsevvdi at
09:04 AM
| No Comments
| Add Comment
Post contains 52 words, total size 1 kb.
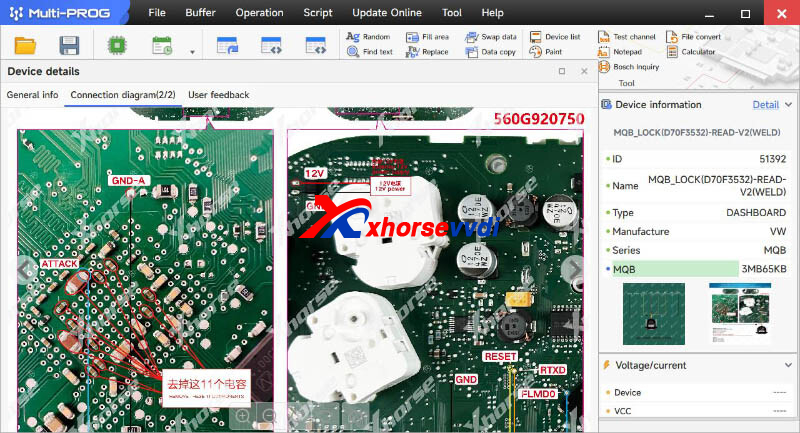
VVDI Multi Prog V60 Database is available! MQB D70F3532 D70F3535 and more are added!

Free Download MULTI PROG Software
*Download software and update database online
V60 Database Update Info (04-28-2025)
* Fix the connection failure issue of 3658110XKU47A, 3658110XKV86A, 3658110XKY00A, 3658110XKY28B, 3658110XKY3BA, 3658110XKZ1DA, 3658110XNZ01A, 3658120XNZ01A options in [AIRBAG]->[GreatWall]->[GreatWall]
+ Add MQB_LOCK(D70F3532)-READ-V2(WELD), MQB_LOCK(D70F3535_36_37)-READ(WELD) options in [DASHBOARD]->[VW]->[MQB]
+ Add CDC3297 option in [MCU]->[TDK-MICRONAS]->[CDC32XX]
+ Add KF32A100GQP(ICSP), KF32A100GQP(DPI), KF32A100GQS(ICSP), KF32A100GQS(DPI), KF32A100GQT(ICSP), KF32A100GQT(DPI), KF32A100IQS(ICSP), KF32A100IQS(DPI), KF32A100IQT(ICSP), KF32A100IQT(DPI), KF32A100KQS(ICSP), KF32A100KQS(DPI), KF32A100KQT(ICSP), KF32A100KQT(DPI), KF32A116INP(ICSP), KF32A116INP(DPI), KF32A116KQS(ICSP), KF32A116KQS(DPI), KF32A120GQP(ICSP), KF32A120GQP(DPI), KF32A120GQS(ICSP), KF32A120GQS(DPI), KF32A120GQT(ICSP), KF32A120GQT(DPI), KF32A120IQS(ICSP), KF32A120IQS(DPI), KF32A120IQT(ICSP), KF32A120IQT(DPI), KF32A120KQS(ICSP), KF32A120KQS(DPI), KF32A120KQT(ICSP), KF32A120KQT(DPI), KF32A126IQS(ICSP), KF32A126IQS(DPI), KF32A126KNP(ICSP), KF32A126KNP(DPI), KF32A126KQS(ICSP), KF32A126KQS(DPI), KF32A136GNP(ICSP), KF32A136GNP(DPI), KF32A136GQS(ICSP), KF32A136GQS(DPI), KF32A136INP(ICSP), KF32A136INP(DPI), KF32A136IQS(ICSP), KF32A136IQS(DPI), KF32A136IQT(ICSP), KF32A136IQT(DPI), KF32A136KNP(ICSP), KF32A136KNP(DPI), KF32A136KQS(ICSP), KF32A136KQS(DPI), KF32A136KQT(ICSP), KF32A136KQT(DPI), KF32A140GQP(ICSP), KF32A140GQP(DPI), KF32A140INP(ICSP), KF32A140INP(DPI), KF32A140IQS(ICSP), KF32A140IQS(DPI), KF32A140IQT(ICSP), KF32A140IQT(DPI), KF32A140KQS(ICSP), KF32A140KQS(DPI), KF32A140KQT(ICSP), KF32A140KQT(DPI), KF32A141GQP(ICSP), KF32A141GQP(DPI), KF32A141GQS(ICSP), KF32A141GQS(DPI), KF32A141INP(ICSP), KF32A141INP(DPI), KF32A141IQS(ICSP), KF32A141IQS(DPI), KF32A141IQT(ICSP), KF32A141IQT(DPI), KF32A146INP(ICSP), KF32A146INP(DPI), KF32A146IQS(ICSP), KF32A146IQS(DPI), KF32A146IQT(ICSP), KF32A146IQT(DPI), KF32A146KQS(ICSP), KF32A146KQS(DPI), KF32A146KQT(ICSP), KF32A146KQT(DPI), KF32A150IQT(ICSP), KF32A150IQT(DPI), KF32A150KQS(ICSP), KF32A150KQS(DPI), KF32A150KQT(ICSP), KF32A150KQT(DPI), KF32A150KQV(ICSP), KF32A150KQV(DPI), KF32A150MNT(ICSP), KF32A150MNT(DPI), KF32A150MQS(ICSP), KF32A150MQS(DPI), KF32A150MQT(ICSP), KF32A150MQT(DPI), KF32A150MQV(ICSP), KF32A150MQV(DPI), KF32A151IQT(ICSP), KF32A151IQT(DPI), KF32A151KQS(ICSP), KF32A151KQS(DPI), KF32A151KQT(ICSP), KF32A151KQT(DPI), KF32A151KQV(ICSP), KF32A151KQV(DPI), KF32A151MQS(ICSP), KF32A151MQS(DPI), KF32A151MQT(ICSP), KF32A151MQT(DPI), KF32A151MQV(ICSP), KF32A151MQV(DPI), KF32A152MQT(ICSP), KF32A152MQT(DPI), KF32A152MQV(ICSP), KF32A152MQV(DPI), KF32A153MQV(ICSP), KF32A153MQV(DPI), KF32A155KQT(ICSP), KF32A155KQT(DPI), KF32A155MQT(ICSP), KF32A155MQT(DPI), KF32A156INP(ICSP), KF32A156INP(DPI), KF32A156IQS(ICSP), KF32A156IQS(DPI), KF32A156KQS(ICSP), KF32A156KQS(DPI), KF32A156KQT(ICSP), KF32A156KQT(DPI), KF32A156KQV(ICSP), KF32A156KQV(DPI), KF32A156MBV(ICSP), KF32A156MBV(DPI), KF32A156MQS(ICSP), KF32A156MQS(DPI), KF32A156MQT(ICSP), KF32A156MQT(DPI), KF32A156MQV(ICSP), KF32A156MQV(DPI), KF32A156MQW(ICSP), KF32A156MQW(DPI), KF32A166KQV(ICSP), KF32A166KQV(DPI), KF32A166KQW(ICSP), KF32A166KQW(DPI), KF32A166MQV(ICSP), KF32A166MQV(DPI), KF32A166MQW(ICSP), KF32A166MQW(DPI), KF32A250GQS(ICSP), KF32A250GQS(DPI), KF32A250KQT(ICSP), KF32A250KQT(DPI), KF32A250MQT(ICSP), KF32A250MQT(DPI), KF32A250MQV(ICSP), KF32A250MQV(DPI), KF32A251IQT(ICSP), KF32A251IQT(DPI), KF32A251KQT(ICSP), KF32A251KQT(DPI), KF32A251KQV(ICSP), KF32A251KQV(DPI), KF32A251MQT(ICSP), KF32A251MQT(DPI), KF32A251MQV(ICSP), KF32A251MQV(DPI) options in [MCU]->[ChipON]->[KF32AXXX]
+ Add KF32F110INP(ICSP), KF32F110INP(DPI), KF32F110IQP(ICSP), KF32F110IQP(DPI), KF32F110IQS(ICSP), KF32F110IQS(DPI), KF32F110IQT(ICSP), KF32F110IQT(DPI), KF32F130GNP(ICSP), KF32F130GNP(DPI), KF32F130GQS(ICSP), KF32F130GQS(DPI), KF32F130GQT(ICSP), KF32F130GQT(DPI), KF32F130INP(ICSP), KF32F130INP(DPI), KF32F130IQS(ICSP), KF32F130IQS(DPI), KF32F130IQT(ICSP), KF32F130IQT(DPI), KF32F130KQT(ICSP), KF32F130KQT(DPI), KF32F130MQT(ICSP), KF32F130MQT(DPI), KF32F142FNP(ICSP), KF32F142FNP(DPI), KF32F142FQS(ICSP), KF32F142FQS(DPI), KF32F142GNP(ICSP), KF32F142GNP(DPI), KF32F142GQS(ICSP), KF32F142GQS(DPI), KF32F142INP(ICSP), KF32F142INP(DPI), KF32F142IQS(ICSP), KF32F142IQS(DPI), KF32F160MQT(ICSP), KF32F160MQT(DPI), KF32F160MQV(ICSP), KF32F160MQV(DPI), KF32F160MQW(ICSP), KF32F160MQW(DPI), KF32F161GNP(ICSP), KF32F161GNP(DPI), KF32F161GNS(ICSP), KF32F161GNS(DPI), KF32F161GQP(ICSP), KF32F161GQP(DPI), KF32F161GQS(ICSP), KF32F161GQS(DPI), KF32F161GQT(ICSP), KF32F161GQT(DPI), KF32F161INP(ICSP), KF32F161INP(DPI), KF32F161INS(ICSP), KF32F161INS(DPI), KF32F161IQP(ICSP), KF32F161IQP(DPI), KF32F161IQS(ICSP), KF32F161IQS(DPI), KF32F161IQT(ICSP), KF32F161IQT(DPI), KF32F161KQT(ICSP), KF32F161KQT(DPI), KF32F161KQV(ICSP), KF32F161KQV(DPI), KF32F161KQW(ICSP), KF32F161KQW(DPI), KF32F161MQV(ICSP), KF32F161MQV(DPI), KF32F161MQW(ICSP), KF32F161MQW(DPI), KF32F330GQS(ICSP), KF32F330GQS(DPI), KF32F330IQS(ICSP), KF32F330IQS(DPI), KF32F330IQT(ICSP), KF32F330IQT(DPI), KF32F330IQV(ICSP), KF32F330IQV(DPI), KF32F330KQT(ICSP), KF32F330KQT(DPI), KF32F330KQV(ICSP), KF32F330KQV(DPI), KF32F330MQT(ICSP), KF32F330MQT(DPI), KF32F330MQV(ICSP), KF32F330MQV(DPI), KF32F341GQP(ICSP), KF32F341GQP(DPI), KF32F341GQS(ICSP), KF32F341GQS(DPI), KF32F341IQS(ICSP), KF32F341IQS(DPI), KF32F341IQT(ICSP), KF32F341IQT(DPI), KF32F350KQS(ICSP), KF32F350KQS(DPI), KF32F350KQT(ICSP), KF32F350KQT(DPI), KF32F350KQV(ICSP), KF32F350KQV(DPI), KF32F350MQS(ICSP), KF32F350MQS(DPI), KF32F350MQT(ICSP), KF32F350MQT(DPI), KF32F350MQV(ICSP), KF32F350MQV(DPI), KF32F351KQT(ICSP), KF32F351KQT(DPI), KF32F351KQV(ICSP), KF32F351KQV(DPI), KF32F351MQT(ICSP), KF32F351MQT(DPI), KF32F351MQV(ICSP), KF32F351MQV(DPI) options in [MCU]->[ChipON]->[KF32FXXX]
+ Add KF32L530KNS(ICSP), KF32L530KNS(DPI), KF32L530KQT(ICSP), KF32L530KQT(DPI), KF32L530KQV(ICSP), KF32L530KQV(DPI), KF32L530MNS(ICSP), KF32L530MNS(DPI), KF32L530MQT(ICSP), KF32L530MQT(DPI), KF32L530MQV(ICSP), KF32L530MQV(DPI) options in [MCU]->[ChipON]->[KF32LXXX]
+ Add KF32LS100GNS(ICSP), KF32LS100GNS(DPI), KF32LS100GQS(ICSP), KF32LS100GQS(DPI), KF32LS100GQT(ICSP), KF32LS100GQT(DPI), KF32LS100INP(ICSP), KF32LS100INP(DPI), KF32LS100INS(ICSP), KF32LS100INS(DPI), KF32LS100IQS(ICSP), KF32LS100IQS(DPI), KF32LS100IQT(ICSP), KF32LS100IQT(DPI), KF32LS100IQV(ICSP), KF32LS100IQV(DPI), KF32LS100KNP(ICSP), KF32LS100KNP(DPI), KF32LS100KNS(ICSP), KF32LS100KNS(DPI), KF32LS100KQS(ICSP), KF32LS100KQS(DPI), KF32LS100KQT(ICSP), KF32LS100KQT(DPI), KF32LS100KQV(ICSP), KF32LS100KQV(DPI), KF32LS100MNS(ICSP), KF32LS100MNS(DPI), KF32LS100MQS(ICSP), KF32LS100MQS(DPI), KF32LS100MQT(ICSP), KF32LS100MQT(DPI), KF32LS100MQV(ICSP), KF32LS100MQV(DPI), KF32LS102GNP(ICSP), KF32LS102GNP(DPI), KF32LS102GNS(ICSP), KF32LS102GNS(DPI), KF32LS102GQS(ICSP), KF32LS102GQS(DPI), KF32LS102GQT(ICSP), KF32LS102GQT(DPI), KF32LS102INP(ICSP), KF32LS102INP(DPI), KF32LS102INS(ICSP), KF32LS102INS(DPI), KF32LS102IQS(ICSP), KF32LS102IQS(DPI), KF32LS102IQT(ICSP), KF32LS102IQT(DPI), KF32LS102KNP(ICSP), KF32LS102KNP(DPI), KF32LS102KNS(ICSP), KF32LS102KNS(DPI), KF32LS102KQS(ICSP), KF32LS102KQS(DPI), KF32LS102KQT(ICSP), KF32LS102KQT(DPI), KF32LS102MNS(ICSP), KF32LS102MNS(DPI), KF32LS102MQS(ICSP), KF32LS102MQS(DPI), KF32LS102MQT(ICSP), KF32LS102MQT(DPI), KF32LS105GNP(ICSP), KF32LS105GNP(DPI), KF32LS105GNS(ICSP), KF32LS105GNS(DPI), KF32LS105GQS(ICSP), KF32LS105GQS(DPI), KF32LS105GQT(ICSP), KF32LS105GQT(DPI), KF32LS105INP(ICSP), KF32LS105INP(DPI), KF32LS105INS(ICSP), KF32LS105INS(DPI), KF32LS105IQS(ICSP), KF32LS105IQS(DPI), KF32LS105IQT(ICSP), KF32LS105IQT(DPI), KF32LS105IQV(ICSP), KF32LS105IQV(DPI), KF32LS105KNP(ICSP), KF32LS105KNP(DPI), KF32LS105KNS(ICSP), KF32LS105KNS(DPI), KF32LS105KQS(ICSP), KF32LS105KQS(DPI), KF32LS105KQT(ICSP), KF32LS105KQT(DPI), KF32LS105KQV(ICSP), KF32LS105KQV(DPI), KF32LS105MNS(ICSP), KF32LS105MNS(DPI), KF32LS105MQS(ICSP), KF32LS105MQS(DPI), KF32LS105MQT(ICSP), KF32LS105MQT(DPI), KF32LS105MQV(ICSP), KF32LS105MQV(DPI), KF32LS200FNP(ICSP), KF32LS200FNP(DPI), KF32LS200FNS(ICSP), KF32LS200FNS(DPI), KF32LS200FQS(ICSP), KF32LS200FQS(DPI), KF32LS200GNP(ICSP), KF32LS200GNP(DPI), KF32LS200GNS(ICSP), KF32LS200GNS(DPI), KF32LS200GQS(ICSP), KF32LS200GQS(DPI), KF32LS200GQT(ICSP), KF32LS200GQT(DPI), KF32LS200INP(ICSP), KF32LS200INP(DPI), KF32LS200INS(ICSP), KF32LS200INS(DPI), KF32LS200IQS(ICSP), KF32LS200IQS(DPI), KF32LS200IQT(ICSP), KF32LS200IQT(DPI), KF32LS200KNP(ICSP), KF32LS200KNP(DPI), KF32LS200KNS(ICSP), KF32LS200KNS(DPI), KF32LS200KQS(ICSP), KF32LS200KQS(DPI), KF32LS200KQT(ICSP), KF32LS200KQT(DPI), KF32LS200KQV(ICSP), KF32LS200KQV(DPI), KF32LS200MNS(ICSP), KF32LS200MNS(DPI), KF32LS200MQS(ICSP), KF32LS200MQS(DPI), KF32LS200MQT(ICSP), KF32LS200MQT(DPI), KF32LS200MQV(ICSP), KF32LS200MQV(DPI), KF32LS201GNP(ICSP), KF32LS201GNP(DPI), KF32LS201GNS(ICSP), KF32LS201GNS(DPI), KF32LS201GQS(ICSP), KF32LS201GQS(DPI), KF32LS201GQT(ICSP), KF32LS201GQT(DPI), KF32LS201INP(ICSP), KF32LS201INP(DPI), KF32LS201INS(ICSP), KF32LS201INS(DPI), KF32LS201IQS(ICSP), KF32LS201IQS(DPI), KF32LS201IQT(ICSP), KF32LS201IQT(DPI), KF32LS201IQV(ICSP), KF32LS201IQV(DPI), KF32LS201KNP(ICSP), KF32LS201KNP(DPI), KF32LS201KNS(ICSP), KF32LS201KNS(DPI), KF32LS201KQS(ICSP), KF32LS201KQS(DPI), KF32LS201KQT(ICSP), KF32LS201KQT(DPI), KF32LS201KQV(ICSP), KF32LS201KQV(DPI), KF32LS201MNS(ICSP), KF32LS201MNS(DPI), KF32LS201MQS(ICSP), KF32LS201MQS(DPI), KF32LS201MQT(ICSP), KF32LS201MQT(DPI), KF32LS201MQV(ICSP), KF32LS201MQV(DPI), KF32LS500GNP(ICSP), KF32LS500GNP(DPI), KF32LS500GNS(ICSP), KF32LS500GNS(DPI), KF32LS500GQS(ICSP), KF32LS500GQS(DPI), KF32LS500GQT(ICSP), KF32LS500GQT(DPI), KF32LS500INP(ICSP), KF32LS500INP(DPI), KF32LS500INS(ICSP), KF32LS500INS(DPI), KF32LS500IQS(ICSP), KF32LS500IQS(DPI), KF32LS500IQT(ICSP), KF32LS500IQT(DPI), KF32LS500KNP(ICSP), KF32LS500KNP(DPI), KF32LS500KNS(ICSP), KF32LS500KNS(DPI), KF32LS500KQS(ICSP), KF32LS500KQS(DPI), KF32LS500KQT(ICSP), KF32LS500KQT(DPI), KF32LS500KQV(ICSP), KF32LS500KQV(DPI), KF32LS500MNS(ICSP), KF32LS500MNS(DPI), KF32LS500MQS(ICSP), KF32LS500MQS(DPI), KF32LS500MQT(ICSP), KF32LS500MQT(DPI), KF32LS500MQV(ICSP), KF32LS500MQV(DPI), KF32LS520GNP(ICSP), KF32LS520GNP(DPI), KF32LS520GNS(ICSP), KF32LS520GNS(DPI), KF32LS520GQS(ICSP), KF32LS520GQS(DPI), KF32LS520GQT(ICSP), KF32LS520GQT(DPI), KF32LS520INP(ICSP), KF32LS520INP(DPI), KF32LS520INS(ICSP), KF32LS520INS(DPI), KF32LS520IQS(ICSP), KF32LS520IQS(DPI), KF32LS520IQT(ICSP), KF32LS520IQT(DPI), KF32LS520KNP(ICSP), KF32LS520KNP(DPI), KF32LS520KNS(ICSP), KF32LS520KNS(DPI), KF32LS520KQS(ICSP), KF32LS520KQS(DPI), KF32LS520KQT(ICSP), KF32LS520KQT(DPI), KF32LS520KQV(ICSP), KF32LS520KQV(DPI), KF32LS520MNS(ICSP), KF32LS520MNS(DPI), KF32LS520MQS(ICSP), KF32LS520MQS(DPI), KF32LS520MQT(ICSP), KF32LS520MQT(DPI), KF32LS520MQV(ICSP), KF32LS520MQV(DPI) options in [MCU]->[ChipON]->[KF32LSXXX]


Stay tuned!
http://blog.xhorsevvdi.com/multi-prog-v60-database-update-mqb-d70f3532-d70f3535/
Posted by: xhorsevvdi at
09:04 AM
| No Comments
| Add Comment
Post contains 639 words, total size 13 kb.
Question:
XhorseBluetoothDigitalSmartKeyXSBTK0EN,
Canweuseitforallkeylostvehiclestooandisitreusable?
Willthisworkwith2023NissanPatrolY62Til?

Here is the Answer:
This key has an Xhorse XM38 Toyota Remote PCB inside, so it supports all remote controls marked by 'XM38-TOYOTA'.
And it is reusable and can be used for AKL vehicles.
*If original keys in vehicle cannot lock car doors, such car models are not supported

Done! Hope this helps!
http://blog.xhorsevvdi.com/what-car-models-will-xhorse-bluetooth-digital-smart-key-support/
Posted by: xhorsevvdi at
09:03 AM
| No Comments
| Add Comment
Post contains 68 words, total size 2 kb.
Question:
VVDI Multi Prog, done many BMW MSV80 before but this time it won't work, tried bench, boot, and obd mode many times, is server done?

Here is the Solution:
On the low right,
Select
Device settings>>Block length
Try 0x500,0x1000,0x2000 and so on.

Done!
http://blog.xhorsevvdi.com/fixed-vvdi-multi-prog-read-bmw-msv80-data-loading-fail/
Posted by: xhorsevvdi at
09:03 AM
| No Comments
| Add Comment
Post contains 55 words, total size 1 kb.
Xhorse Bluetooth Digital Smart Key will enable your phone to unlock your car.
Here we will show you how.

Step-by-step Guidance:
Step 1. Key Programming
Press the hole and take the key apart.


Every key has a smart key pcb inside.

Install a CR2032 coin battery.

Put key into coil on Key Tool Plus Tablet.
Select
Remote Program>>BYD>>Han>>Han ID46/ 4A 433.92

Check chip type and frequency.
If tool won't recognize key, insert it into OBD port, pair it with phone via Bluetooth, and unlock key using phone app.

Select
IMMO Programming>>BYD>>Select by year>>2021-(New)>>Smart keys programming>>key programming
Put new key in sensing area.


Step 2.Link Key and Phone App
Download smart key app.
Remove battery and install key pcb back.
Insert smart key into OBD port.
Select
Settings>>Connect
Pair smart key with your phone.

Step 3.Write OBD Diagnostic Program
Select
Settings>>OBD Diagnosis>>BYD>>Han>>2020-2024

*If your car is not on the support list, only Real-time vehicle access and fault information are not available

Done! That's how to use Xhorse Digital Smart Key.
http://blog.xhorsevvdi.com/how-to-use-xhorse-bluetooth-digital-smart-key/
Posted by: xhorsevvdi at
09:02 AM
| No Comments
| Add Comment
Post contains 178 words, total size 5 kb.
Xhorse VVDI Multi-Prog Programmer is 2nd generation of VVDI Prog Programmer. Support ECU & TCU Read/Write/Clone. And we received customer feedback that:
I’m trying to read engine computer for Ford transit 2017 with diesel engine
I need to know how to decode label on the engine computer
How to decode labels from ECU and find the right menu in the Multi-prog ?


Xhorse Engineer replied it is OK in multi prog software, it has option, check SID209
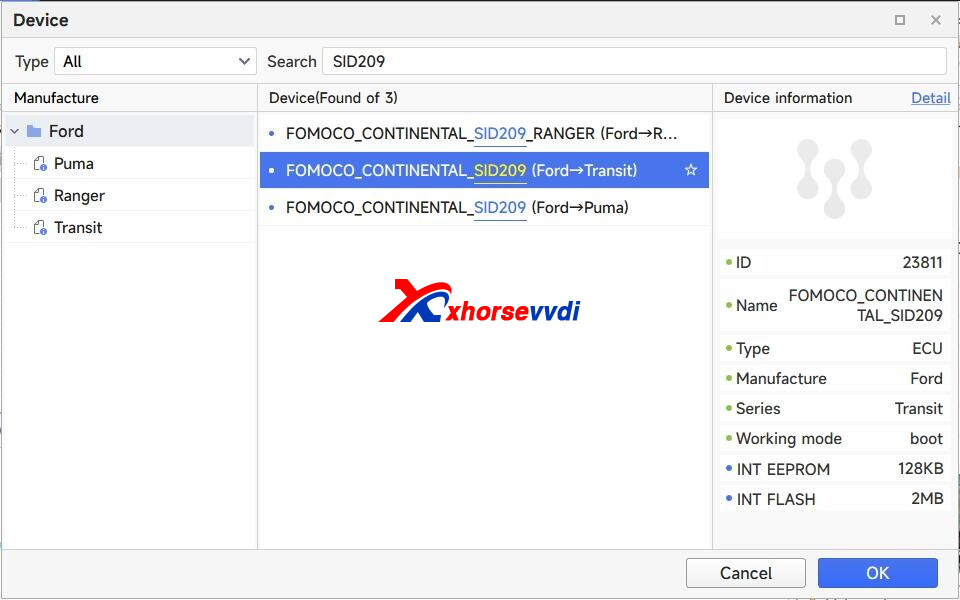
And the connection diagram


Posted by: xhorsevvdi at
09:01 AM
| No Comments
| Add Comment
Post contains 92 words, total size 3 kb.
Question:
For the VVDI PROG EEPROM Read Clip which colour wire is for pin number 1 so I know correct location on the eeprom (chip) when I use VVDI Programmer.

Also what are the 2 free hanging wires used for as you can see them in the photo.

Here is the Answer:
PIN1>>Black wire, also a white dot is marked on PIN1.
2 free hanging GND wires are connected to the probe for some chips
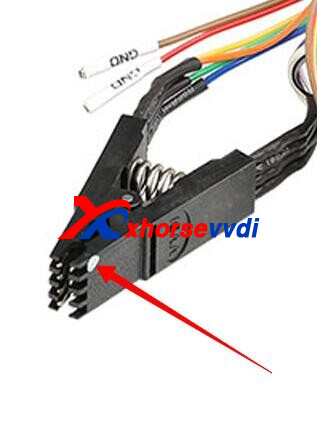

Done! Hope this helps!
http://blog.xhorsevvdi.com/xhorse-vvdi-prog-eeprom-clip-using-tips/
Posted by: xhorsevvdi at
09:01 AM
| No Comments
| Add Comment
Post contains 87 words, total size 2 kb.
Question:
Can't write dump file into XT27A Super Chip since Xhorse Key Tool Max Pro won't recognize it. Already updated to the latest versions, how to solve it?


Here is the Answer:
Try the latest Firmware V2.0.5.
Generate super chip first and put it into the small chip coil on Key Tool Max Pro.
Done! Hope this helps!
http://blog.xhorsevvdi.com/solved-key-tool-max-pro-wont-recognize-super-chip/
Posted by: xhorsevvdi at
09:00 AM
| No Comments
| Add Comment
Post contains 68 words, total size 1 kb.
Multi PROG works great in cloning ECU.
Here is a review:
2013 Dodge Ram 2500 BCM Clone w/ Multi-PROG
Check out how it's done.
PINOUT.

Take out PCB and connect it to VVDI MULTI PROG.


Read Code Flash.


Connect new BCM to MULTI PROG and write date into it.

Credit to Drew Johnson.
Done!
http://blog.xhorsevvdi.com/multi-prog-2013-dodge-ram-2500-bcm-clone-pinout-included/
Posted by: xhorsevvdi at
09:00 AM
| No Comments
| Add Comment
Post contains 65 words, total size 2 kb.
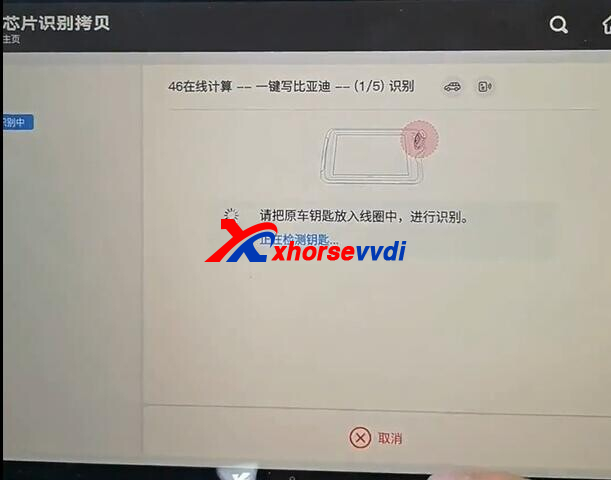
Xhorse vvdi key tool plus is all in one key programming tool, here is the step about Xhorse VVDI Key Tool Plus BYD Key Programming Process.

1. Add new BYD key
- VVDI Key Tool Plus tablet, go to Vehicle Remote > BYD. Use Xhorse VVDI smart universal key to generate a key with the same appearance and frequency as the original key. Once generated successfully, set it aside for later use.
- Then choose Transponder Clone > 46 Online Calculation > Start Clone > One-click Write BYD. Place the original key into the device's coil to read the key data.
- Once the original key is successfully recognized, remove its battery. Place the device coil near the vehicle’s start button area, and use the original key to start the vehicle in emergency mode. The device will begin collecting data — a total of 8 sets are needed. Each time you press the vehicle’s start button with the original key, one set of data is collected.
- After collecting 8 data sets, the device will automatically upload and process the data. Once the calculation is successful, click Query. Then place the pre-generated universal key from step 1 into the device coil to write the data. After successful writing, use the matching device to pair the new key. Choose Aftermarket Key Matching to complete password-free pairing.
- After successful matching, the new key will support emergency start, remote control, and smart key functions.

2. BYD All-Key-Lost Operation Process
- Use the smart key to generate the BYD All-Key-Lost Collector V1. The smart key must have a battery installed. (In rare cases, the V2 option may be required.)
- Go to Transponder Clone > Identify to identify the collector as "D” and take note of the result. Then press the trunk button on the collector once (only press it once). The LED light on the collector will flash — this is normal.
- Next, use the collector to press the vehicle’s start button. The LED will turn off, indicating successful initialization. Then identify the collector again using Transponder Clone > Identify. The newly identified "D” value must be different from the one in Step 2. If it’s the same, restart the entire process from Step 1.
- Place the collector into the device’s coil. Go to Transponder Clone > Clone > 46 Online Calculation > Start Clone > BYD All Key Lost.
- Follow the device prompts. Use the collector to press the vehicle’s start button to collect 8 sets of data. You can use Special Clone Remote Collection mode — press the start button once with the collector to gather one set of data (repeat until all 8 are collected). After collection, place the collector back into the coil, and the device will begin calculating. Once successful, follow the on-screen instructions to write the data.
Note: When collecting data, firmly press the vehicle’s start button using the collector once per second. The device will indicate each successful data group collected. Repeat until all 8 sets are completed. - After successful data writing, the collector can be used to emergency start the vehicle. Once the vehicle is started, follow the Aftermarket Key Addition Process to match a new key. After successful pairing, the collector will have both remote and smart functions.
- 200 bonus points will be deducted for each successful data calculation.

Xhorse vvdi key tool plus is all in one key programming tool, here is the step about Xhorse VVDI Key Tool Plus BYD Key Programming Process.
1. Add new BYD key
- VVDI Key Tool Plus tablet, go to Vehicle Remote > BYD. Use Xhorse VVDI smart universal key to generate a key with the same appearance and frequency as the original key. Once generated successfully, set it aside for later use.
- Then choose Transponder Clone > 46 Online Calculation > Start Clone > One-click Write BYD. Place the original key into the device's coil to read the key data.
- Once the original key is successfully recognized, remove its battery. Place the device coil near the vehicle’s start button area, and use the original key to start the vehicle in emergency mode. The device will begin collecting data — a total of 8 sets are needed. Each time you press the vehicle’s start button with the original key, one set of data is collected.
- After collecting 8 data sets, the device will automatically upload and process the data. Once the calculation is successful, click Query. Then place the pre-generated universal key from step 1 into the device coil to write the data. After successful writing, use the matching device to pair the new key. Choose Aftermarket Key Matching to complete password-free pairing.
- After successful matching, the new key will support emergency start, remote control, and smart key functions.
2. BYD All-Key-Lost Operation Process
- Use the smart key to generate the BYD All-Key-Lost Collector V1. The smart key must have a battery installed. (In rare cases, the V2 option may be required.)
- Go to Transponder Clone > Identify to identify the collector as "D” and take note of the result. Then press the trunk button on the collector once (only press it once). The LED light on the collector will flash — this is normal.
- Next, use the collector to press the vehicle’s start button. The LED will turn off, indicating successful initialization. Then identify the collector again using Transponder Clone > Identify. The newly identified "D” value must be different from the one in Step 2. If it’s the same, restart the entire process from Step 1.
- Place the collector into the device’s coil. Go to Transponder Clone > Clone > 46 Online Calculation > Start Clone > BYD All Key Lost.
- Follow the device prompts. Use the collector to press the vehicle’s start button to collect 8 sets of data. You can use Special Clone Remote Collection mode — press the start button once with the collector to gather one set of data (repeat until all 8 are collected). After collection, place the collector back into the coil, and the device will begin calculating. Once successful, follow the on-screen instructions to write the data.
Note: When collecting data, firmly press the vehicle’s start button using the collector once per second. The device will indicate each successful data group collected. Repeat until all 8 sets are completed. - After successful data writing, the collector can be used to emergency start the vehicle. Once the vehicle is started, follow the Aftermarket Key Addition Process to match a new key. After successful pairing, the collector will have both remote and smart functions.
- 200 bonus points will be deducted for each successful data calculation.
Posted by: xhorsevvdi at
08:59 AM
| No Comments
| Add Comment
Post contains 1107 words, total size 13 kb.
Question:
This Xhorse Multi Prog not working.
Need reading eis w211 hc12.


Here is the Solution:
Double check Red (VCC) and Yellow (RESET) wire.

Done! Hope this helps!
http://blog.xhorsevvdi.com/xhorse-multi-prog-read-eis-w211-not-working-solution/
Posted by: xhorsevvdi at
08:58 AM
| No Comments
| Add Comment
Post contains 38 words, total size 1 kb.
One customer wondered if there is any difference between new and old XT27A Super Chip. New chips won't be copied by VVDI Mini Key Tool, but chips bought before works fine.


Here is the Solution:
1)Update VVDI MINI to the latest version
2)Do Not use VVDI2 (its copy function error will be fixed in next version)
3)Generate VVDI Super Chip into 4D chip and the try to clone it
4)Put chip in the smaller coil in VVDI MINI and try again.

Done! Hope this helps!
http://blog.xhorsevvdi.com/vvdi-mini-dont-copy-xt27a-super-chip-solution/
Posted by: xhorsevvdi at
08:58 AM
| No Comments
| Add Comment
Post contains 94 words, total size 2 kb.
Xhorse Key Tool Max Pro will program smart keys for Toyota after 2016.
Here is a review:
Toyota land cruiser 2023 BA model add key xhorse Max pro vvdi remote good work.
Let's check out how it is done:
Key Tool Max Pro supports various types of Toyota Smart Key.

Read and upload smart box data to server.


Put keys close to start button as required.


Key is added and VVDI XM38 Remote works fine.


Done!
http://blog.xhorsevvdi.com/toyota-land-cruiser-2023-ba-model-add-key-by-xhorse-max-pro/
Posted by: xhorsevvdi at
08:57 AM
| No Comments
| Add Comment
Post contains 89 words, total size 3 kb.
30 queries taking 0.0531 seconds, 129 records returned.
Powered by Minx 1.1.6c-pink.

