


May 13, 2025
Multi PROG works great in cloning ECU.
Here is a review:
2013 Dodge Ram 2500 BCM Clone w/ Multi-PROG
Check out how it's done.
PINOUT.

Take out PCB and connect it to VVDI MULTI PROG.


Read Code Flash.


Connect new BCM to MULTI PROG and write date into it.

Credit to Drew Johnson.
Done!
http://blog.xhorsevvdi.com/multi-prog-2013-dodge-ram-2500-bcm-clone-pinout-included/
Posted by: xhorsevvdi at
09:00 AM
| No Comments
| Add Comment
Post contains 65 words, total size 2 kb.
Xhorse vvdi key tool plus is all in one key programming tool, here is the step about Xhorse VVDI Key Tool Plus BYD Key Programming Process.

1. Add new BYD key
- VVDI Key Tool Plus tablet, go to Vehicle Remote > BYD. Use Xhorse VVDI smart universal key to generate a key with the same appearance and frequency as the original key. Once generated successfully, set it aside for later use.
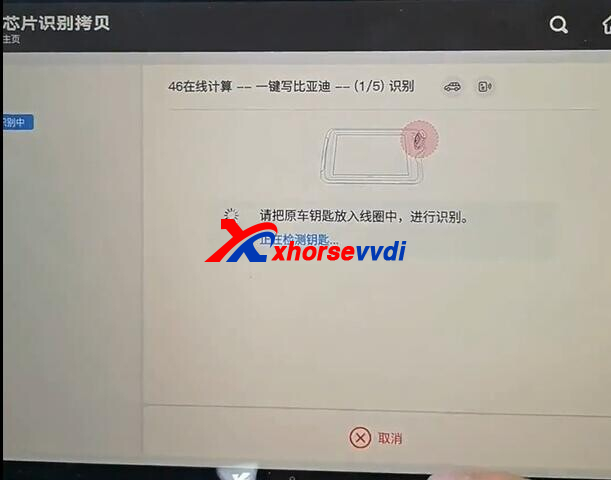
- Then choose Transponder Clone > 46 Online Calculation > Start Clone > One-click Write BYD. Place the original key into the device's coil to read the key data.
- Once the original key is successfully recognized, remove its battery. Place the device coil near the vehicle’s start button area, and use the original key to start the vehicle in emergency mode. The device will begin collecting data — a total of 8 sets are needed. Each time you press the vehicle’s start button with the original key, one set of data is collected.
- After collecting 8 data sets, the device will automatically upload and process the data. Once the calculation is successful, click Query. Then place the pre-generated universal key from step 1 into the device coil to write the data. After successful writing, use the matching device to pair the new key. Choose Aftermarket Key Matching to complete password-free pairing.
- After successful matching, the new key will support emergency start, remote control, and smart key functions.

2. BYD All-Key-Lost Operation Process
- Use the smart key to generate the BYD All-Key-Lost Collector V1. The smart key must have a battery installed. (In rare cases, the V2 option may be required.)
- Go to Transponder Clone > Identify to identify the collector as "D” and take note of the result. Then press the trunk button on the collector once (only press it once). The LED light on the collector will flash — this is normal.
- Next, use the collector to press the vehicle’s start button. The LED will turn off, indicating successful initialization. Then identify the collector again using Transponder Clone > Identify. The newly identified "D” value must be different from the one in Step 2. If it’s the same, restart the entire process from Step 1.
- Place the collector into the device’s coil. Go to Transponder Clone > Clone > 46 Online Calculation > Start Clone > BYD All Key Lost.
- Follow the device prompts. Use the collector to press the vehicle’s start button to collect 8 sets of data. You can use Special Clone Remote Collection mode — press the start button once with the collector to gather one set of data (repeat until all 8 are collected). After collection, place the collector back into the coil, and the device will begin calculating. Once successful, follow the on-screen instructions to write the data.
Note: When collecting data, firmly press the vehicle’s start button using the collector once per second. The device will indicate each successful data group collected. Repeat until all 8 sets are completed. - After successful data writing, the collector can be used to emergency start the vehicle. Once the vehicle is started, follow the Aftermarket Key Addition Process to match a new key. After successful pairing, the collector will have both remote and smart functions.
- 200 bonus points will be deducted for each successful data calculation.

Xhorse vvdi key tool plus is all in one key programming tool, here is the step about Xhorse VVDI Key Tool Plus BYD Key Programming Process.
1. Add new BYD key
- VVDI Key Tool Plus tablet, go to Vehicle Remote > BYD. Use Xhorse VVDI smart universal key to generate a key with the same appearance and frequency as the original key. Once generated successfully, set it aside for later use.
- Then choose Transponder Clone > 46 Online Calculation > Start Clone > One-click Write BYD. Place the original key into the device's coil to read the key data.
- Once the original key is successfully recognized, remove its battery. Place the device coil near the vehicle’s start button area, and use the original key to start the vehicle in emergency mode. The device will begin collecting data — a total of 8 sets are needed. Each time you press the vehicle’s start button with the original key, one set of data is collected.
- After collecting 8 data sets, the device will automatically upload and process the data. Once the calculation is successful, click Query. Then place the pre-generated universal key from step 1 into the device coil to write the data. After successful writing, use the matching device to pair the new key. Choose Aftermarket Key Matching to complete password-free pairing.
- After successful matching, the new key will support emergency start, remote control, and smart key functions.
2. BYD All-Key-Lost Operation Process
- Use the smart key to generate the BYD All-Key-Lost Collector V1. The smart key must have a battery installed. (In rare cases, the V2 option may be required.)
- Go to Transponder Clone > Identify to identify the collector as "D” and take note of the result. Then press the trunk button on the collector once (only press it once). The LED light on the collector will flash — this is normal.
- Next, use the collector to press the vehicle’s start button. The LED will turn off, indicating successful initialization. Then identify the collector again using Transponder Clone > Identify. The newly identified "D” value must be different from the one in Step 2. If it’s the same, restart the entire process from Step 1.
- Place the collector into the device’s coil. Go to Transponder Clone > Clone > 46 Online Calculation > Start Clone > BYD All Key Lost.
- Follow the device prompts. Use the collector to press the vehicle’s start button to collect 8 sets of data. You can use Special Clone Remote Collection mode — press the start button once with the collector to gather one set of data (repeat until all 8 are collected). After collection, place the collector back into the coil, and the device will begin calculating. Once successful, follow the on-screen instructions to write the data.
Note: When collecting data, firmly press the vehicle’s start button using the collector once per second. The device will indicate each successful data group collected. Repeat until all 8 sets are completed. - After successful data writing, the collector can be used to emergency start the vehicle. Once the vehicle is started, follow the Aftermarket Key Addition Process to match a new key. After successful pairing, the collector will have both remote and smart functions.
- 200 bonus points will be deducted for each successful data calculation.
Posted by: xhorsevvdi at
08:59 AM
| No Comments
| Add Comment
Post contains 1107 words, total size 13 kb.
Question:
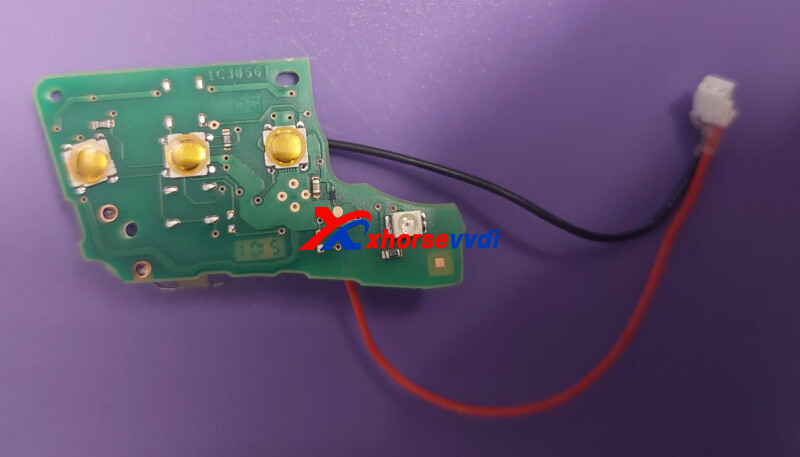
This Xhorse Multi Prog not working.
Need reading eis w211 hc12.


Here is the Solution:
Double check Red (VCC) and Yellow (RESET) wire.

Done! Hope this helps!
http://blog.xhorsevvdi.com/xhorse-multi-prog-read-eis-w211-not-working-solution/
Posted by: xhorsevvdi at
08:58 AM
| No Comments
| Add Comment
Post contains 38 words, total size 1 kb.
One customer wondered if there is any difference between new and old XT27A Super Chip. New chips won't be copied by VVDI Mini Key Tool, but chips bought before works fine.


Here is the Solution:
1)Update VVDI MINI to the latest version
2)Do Not use VVDI2 (its copy function error will be fixed in next version)
3)Generate VVDI Super Chip into 4D chip and the try to clone it
4)Put chip in the smaller coil in VVDI MINI and try again.

Done! Hope this helps!
http://blog.xhorsevvdi.com/vvdi-mini-dont-copy-xt27a-super-chip-solution/
Posted by: xhorsevvdi at
08:58 AM
| No Comments
| Add Comment
Post contains 94 words, total size 2 kb.
Xhorse Key Tool Max Pro will program smart keys for Toyota after 2016.
Here is a review:
Toyota land cruiser 2023 BA model add key xhorse Max pro vvdi remote good work.
Let's check out how it is done:
Key Tool Max Pro supports various types of Toyota Smart Key.

Read and upload smart box data to server.


Put keys close to start button as required.


Key is added and VVDI XM38 Remote works fine.


Done!
http://blog.xhorsevvdi.com/toyota-land-cruiser-2023-ba-model-add-key-by-xhorse-max-pro/
Posted by: xhorsevvdi at
08:57 AM
| No Comments
| Add Comment
Post contains 89 words, total size 3 kb.
Question:
VVDI MB Tool, If I want to virginize like VGS2-NAG2 TCU, or like CRD2.16 ECU, do I need any adaptors or accessories,
Here is the Answer:
Check out PINOUT below,
PIN2 - GND
PIN1, 15 - +12V
PIN41 - CAN-H
PIN54 - CAN-L
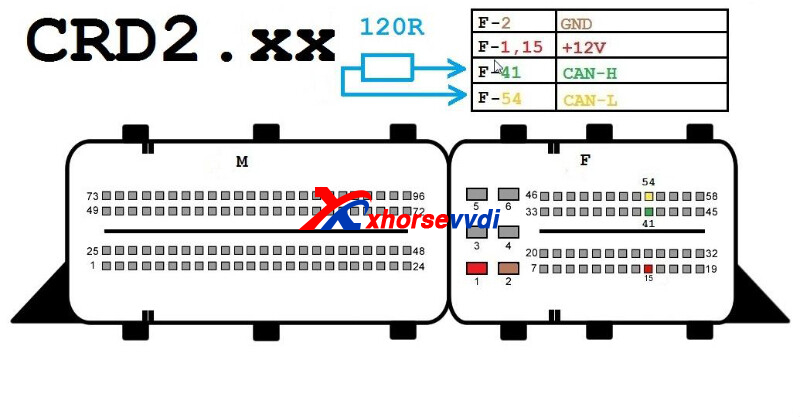
PIN4, 16 - +12V
PIN6 - CAN-H
PIN14 - CAN-L

Done! Hope this helps!
http://blog.xhorsevvdi.com/vvdi-mb-renew-vgs2-nag2-tcu-pinout/
Posted by: xhorsevvdi at
08:57 AM
| No Comments
| Add Comment
Post contains 65 words, total size 1 kb.
Autel for the win on frm repairing jobs, but how is Xhorse on these?
Xhorse Tools will also work on FRM.
If E-series, use VVDI PROG, Multi Prog, or Key Tool Plus
If F-series, use VVDI PROG or Multi Prog
Follow steps below:
1.Read original corrupted file from dflash
2.Use 'data repair' function and load dflash
3.Write back modified flash data
4.Compare repaired dump files with other file solutions
PROG>>OTHER>> BMW>>FRM-E-SERIES (MC9S12XEQ384)DATA REPAIR

FRM-E/F-SERIES REPAIR>>DATA-REPAIR

8-OTHER>>BMW>>FRM-E/F-SERIES REPAIR

Notice:
1.If no works, try dflash_to_eeprom software, convert flash to eeprom, and write back eeprom
2.Both FRM Adapter and soldering will work

Done! Hope this helps!
http://blog.xhorsevvdi.com/how-to-repair-corrupt-frm-data-using-xhorse-tool/
Posted by: xhorsevvdi at
08:56 AM
| No Comments
| Add Comment
Post contains 120 words, total size 2 kb.
One customer said that his Xhorse VVDI PROG won't read 93LC66 chip. Desolder chip and use eeprom adapter of VVDI PROG but it shows connection errors.


Here XhorseVVDI engineer answers:
Rotate the chip 180 degrees clockwise and read it again.
*Watch out the point on the chip

Done! Hope this helps!
http://blog.xhorsevvdi.com/vvdi-prog-wont-read-93lc66-8-pin-chip-solution/
Posted by: xhorsevvdi at
08:56 AM
| No Comments
| Add Comment
Post contains 60 words, total size 2 kb.
One customer wondered where to find EDC17/ MED17 data calculation and immo off function menu on VVDI Multi Prog. And where is the data decoder menu.
Data Calculation Function:
All ecus marked by a 'C' have checksum.
It supports auto checksum during immo off.
Path: Tool>> Turn off the immo


Data Decoder Function:
Search 'Unlock' on the list and check out all supported ecus.
Support List
Delphi ME20U2-XET256
Delphi ME20U2-XET512
Delphi MT22-XEP768
Delphi MT60-XEP768
Bosch ME7.8.8
Bosch ME7
Bosch M7.8
Bosch M7

Done! Hope this helps!
http://blog.xhorsevvdi.com/how-is-multi-prog-data-calculation-and-decoder-function/
Posted by: xhorsevvdi at
08:55 AM
| No Comments
| Add Comment
Post contains 96 words, total size 2 kb.
Here is a review of Xhorse VVDI PROG:
Read Ford Airbag Module Data! Vvdi Prog! GN15-14B321-KB!
Airbag module (Restraint Control Module).

How to connect tool to airbag module.


VVDI PROG Programmer reads eeprom no problem.


Done!
http://blog.xhorsevvdi.com/vvdi-prog-read-ford-airbag-gn15-14b321-kb-pinout/
Posted by: xhorsevvdi at
08:54 AM
| No Comments
| Add Comment
Post contains 44 words, total size 2 kb.
Question:
I activated BMW Motorcycle OBD Key Learning License on my VVDI Key Tool Plus last year, but when I connected it to 2020 gs1250 8A Key Type by diagrams, the tool won't recognize EZL module.


Here is the Answer:
Check out connection, CAN-H and CAN-L seem to be connected in reverse.


Done!
http://blog.xhorsevvdi.com/solved-vvdi-key-tool-plus-wont-recognize-2020-bmw-gs1250-8a/
Posted by: xhorsevvdi at
08:54 AM
| No Comments
| Add Comment
Post contains 65 words, total size 2 kb.
Question:
me7.1 Won't start reading gives me error. Tested with Ecu Adapter and obd because I have bench obd adapter for this ECU (mpps works ok), but still the same error fromXhorse Multi Prog. It says "Error code: 07030009 The power adapter is not suitable".

Here is the Solution:
Check out DC-PWR voltage and pick a correct power adapter.
Path: Operation>> Power settings>>DC_PWR


Done! Hope this helps!
http://blog.xhorsevvdi.com/how-to-fix-multi-prog-read-vw-me7-1-power-adapter-error/
Posted by: xhorsevvdi at
08:53 AM
| No Comments
| Add Comment
Post contains 79 words, total size 2 kb.
Here is a review of VVDI Multi Prog:
Successfully reading and writing pcm E69(med9.6.1) GM Traverse cloning successful
Check out the process:
ACDelco E69(med9.6.1)

Bench PINOUT.

Connect Multi Prog Programmer to E69 Module.

Read and write data no problem.


Done!
http://blog.xhorsevvdi.com/vvdi-multi-prog-read-write-gm-e69-med9-6-1-no-problem/
Posted by: xhorsevvdi at
08:53 AM
| No Comments
| Add Comment
Post contains 51 words, total size 2 kb.
One customer gave feedback that he cannot change VVDI Super Chip type using VVDI2 Full Version. He wanted to generate super chip again but the tool won't recognize it.

Here is the Answer:
Use other tools and wait for VVDI2 firmware update.
The Next firmware version will fix this problem.
Stay tuned!
http://blog.xhorsevvdi.com/xhorse-vvdi2-cant-generate-vvdi-super-chip-solution/
Posted by: xhorsevvdi at
08:52 AM
| No Comments
| Add Comment
Post contains 61 words, total size 1 kb.
Question:
Ican'tcollectthekeydata using Xhorse MLB MQB48 Adapter.
IalsotriedonaPCandthereisthesameerror.
Software notice is 'the current power supply quality is critically poor' and it lets me check out power supply, but I do connect two usb cables to the adapter and MLB Tool.


Here is the Solution:
1)Try VVDI MLB Tool Software V2.0.5.0 (this version is not available on software update center, ask your seller to send you the test version)
2)Double check if capacitors are removed as required


Done! Hope this helps!
http://blog.xhorsevvdi.com/how-to-solve-xhorse-mlb-mqb48-adapter-power-supply-error/
Posted by: xhorsevvdi at
08:51 AM
| No Comments
| Add Comment
Post contains 91 words, total size 2 kb.
VVDI BE Key PRO has 200 points for MB key password online calculation.
One customer asked how to check if points in BE keys run out. Some of them are used some are not.
Here is the Answer:
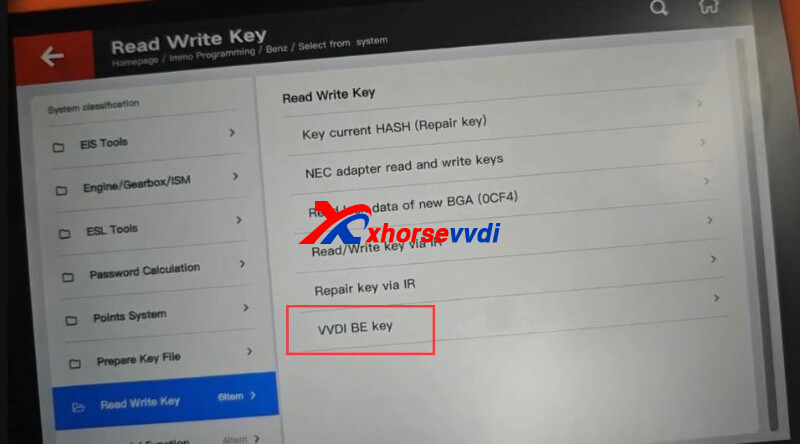
Use VVDI Key Tool Plus or VVDI MB.
On Key Tool Plus,
Select
Immo programming>>Benz>>Select from system>>Read Write Key>>VVDI BE Key>>Online verify BE key


Done! Hope this helps!
http://blog.xhorsevvdi.com/how-to-check-if-vvdi-be-key-pro-point-run-out/
Posted by: xhorsevvdi at
08:51 AM
| No Comments
| Add Comment
Post contains 78 words, total size 2 kb.
One customer gave feedback that PINs on Xhorse MLB Key Adapter are not correct. Some pins seem not to move completely down.


Here are Solutions:
1)Ask your seller to send new adapters to you
2)Try to straighten bent pins
3)Try to replace bent pins using pins of other Xhorse Adapter
Although the specification is different, replaced pins should work as long as the circuit is conducting

Done! Hope this helps!
http://blog.xhorsevvdi.com/how-to-solve-xhorse-solder-free-adapter-broken-or-bent-pin/
Posted by: xhorsevvdi at
08:50 AM
| No Comments
| Add Comment
Post contains 81 words, total size 2 kb.
Xhorse XDNP61GL Solder Free Adapter for VW KESSY 2018- work with Key Tool Plus, Multi Prog. But for multi prog software, we received feedback that:
Send me the connection circuit
There is no connection method
kessy is not in theptions

Multi Prog Kessy Option will be OK in this week.
Here is the Multi Prog and XDNP61 Adapter Connection Diagram


Posted by: xhorsevvdi at
08:50 AM
| No Comments
| Add Comment
Post contains 71 words, total size 2 kb.
This article is a quick start guide of Xhorse Condor XC002 PRO Key Cutting Machine.
How to Use?
Step 1. Insert the dimple probe and cutter (internal)
Step 2. Insert the original key and the blank key

Step 3. Rotate the knob to standard mode
Step 4. Finish the calibration

Step 5. Duplicate the key
Step 6. Insert the dimple probe and cutter (external)

Step 7. Rotate the knob to dimple mode
Step 8. Insert the keys and then finish the calibration

Step 9. Duplicate the key

Done! That's how to use Condor XC002 PRO Machine.
http://blog.xhorsevvdi.com/xhorse-condor-xc002-pro-quick-start-guide/
Posted by: xhorsevvdi at
08:49 AM
| No Comments
| Add Comment
Post contains 104 words, total size 2 kb.
Question:
Some help here people… I understand very well "re-generate” the Universal Key XM38, but "Clear it”? What they mean? What is the option to do that? I have been looking on my Xhorse Tools and no clue. (No prox working when matching to the vehicle)

Here is the Answer:
If the frequency of XM38 Key is incorrect after key learning and you re-generate the remote, you need to delete the programmed key from the car’s system and learn it again, then the prox function works.

Next when the frequency is wrong after key learning,
Update remote instead of generate remote. (Path: special function>> VVDI remote function>> smart key customization>>change frequency)
Done! Hope this helps!
http://blog.xhorsevvdi.com/how-to-clear-vvdi-xm38-key-after-regenerate-remote/
Posted by: xhorsevvdi at
08:48 AM
| No Comments
| Add Comment
Post contains 125 words, total size 2 kb.
32 queries taking 0.0748 seconds, 131 records returned.
Powered by Minx 1.1.6c-pink.

