


October 25, 2021
Tips to Take Out Xhorse VVDI Key Tool Plus PCB
Today xhorsevvdi is going to share with you how to take out PCB Board inside VVDI Key Tool Plus.
Let’s start it, easy and simple.
1. Remove 12 screws on the back. (8 surrounded, 4 on the center)

2. Make the front side up and remove the front cover. (note: watch the cable connected to the screen)
3. Disconnect 3 ribbon cables.

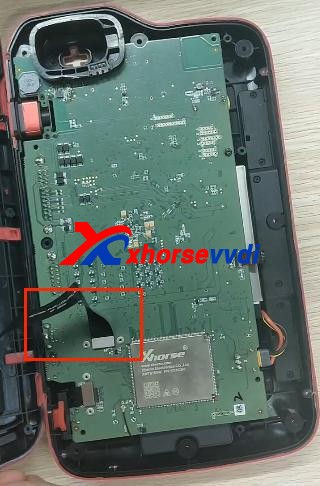
4. Remove the thin cable as shown.

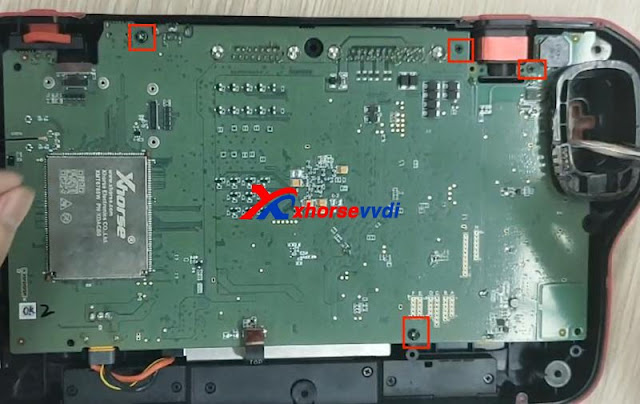
5. Unscrew 4 screws on the PCB board.
6. Take out PCB board and disconnect battery cable.

Finished, that’s the process of taking out PCB board from Key Tool Plus Pad.
Video demo:
For more info, you can check
Source:http://blog.xhorsevvdi.com/how-to-take-out-xhorse-vvdi-key-tool-plus-pcb-board/
Let’s start it, easy and simple.
1. Remove 12 screws on the back. (8 surrounded, 4 on the center)
2. Make the front side up and remove the front cover. (note: watch the cable connected to the screen)
3. Disconnect 3 ribbon cables.
4. Remove the thin cable as shown.
5. Unscrew 4 screws on the PCB board.
6. Take out PCB board and disconnect battery cable.
Finished, that’s the process of taking out PCB board from Key Tool Plus Pad.
Video demo:
For more info, you can check
Source:http://blog.xhorsevvdi.com/how-to-take-out-xhorse-vvdi-key-tool-plus-pcb-board/
Posted by: xhorsevvdi at
10:20 AM
| No Comments
| Add Comment
Post contains 119 words, total size 5 kb.
16kb generated in CPU 0.0259, elapsed 0.0683 seconds.
35 queries taking 0.0573 seconds, 97 records returned.
Powered by Minx 1.1.6c-pink.
35 queries taking 0.0573 seconds, 97 records returned.
Powered by Minx 1.1.6c-pink.

