


August 20, 2025
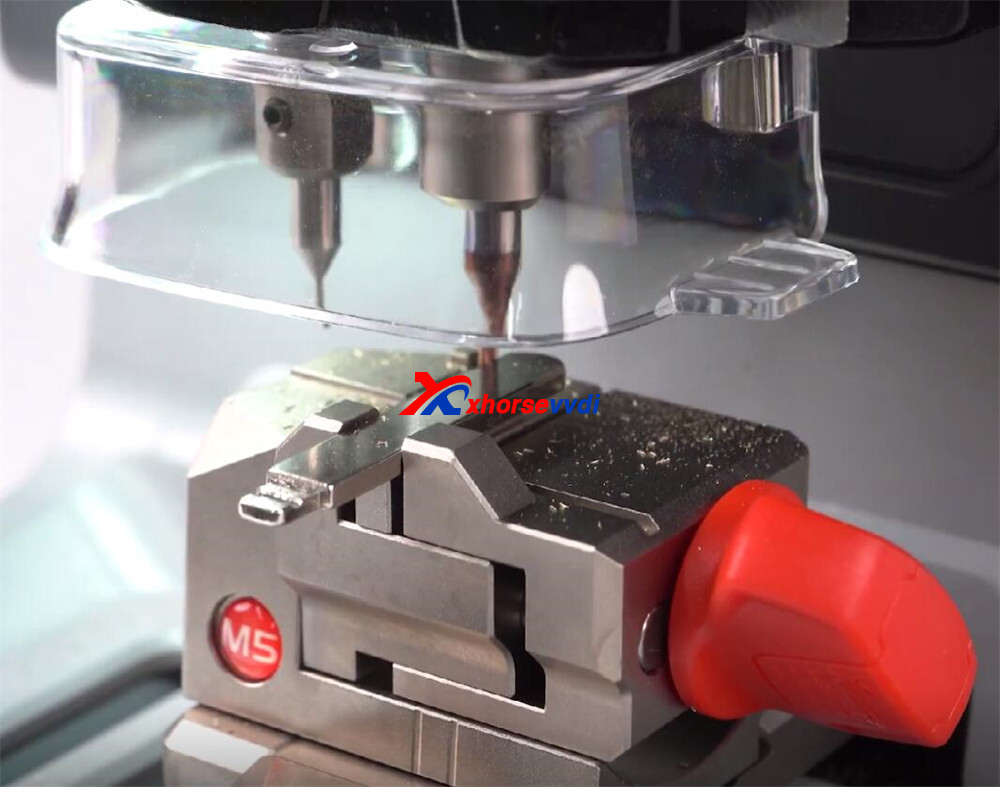
The Xhorse Dolphin XP005L is designed for precision, convenience, and versatility. With its advanced M5 clamp and calibration features, users can ensure accurate key cutting right from the start. This guide walks you through the complete setup process.
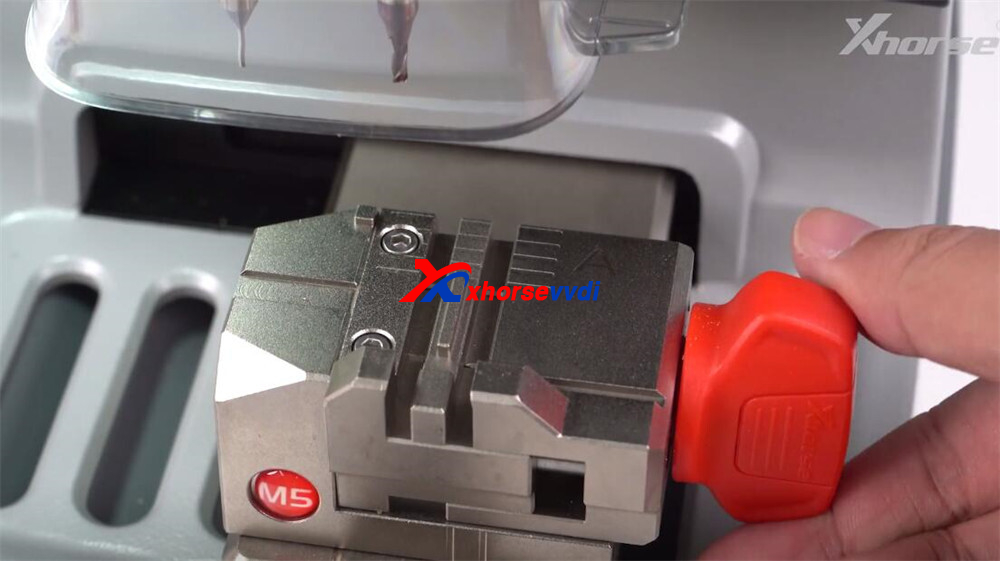
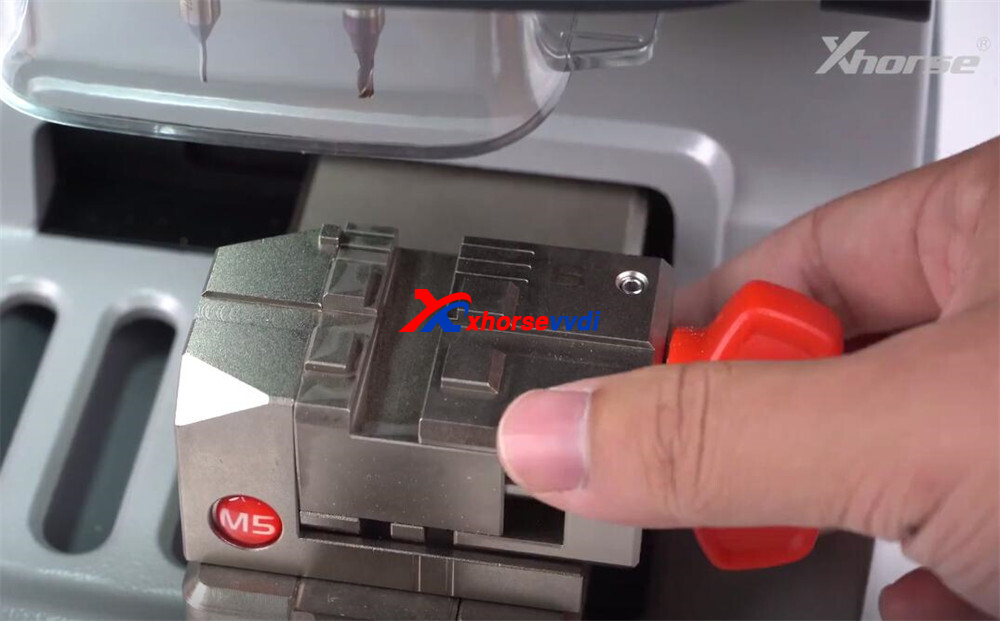
Step 1: Understand the M5 Clamp
The Dolphin XP005L comes with the upgraded M5 clamp, which features dual sides (A and B).
- To switch sides, simply loosen the adjustment knob, rotate the clamp, and secure it again.
- This dual design makes it compatible with a wide range of key types.
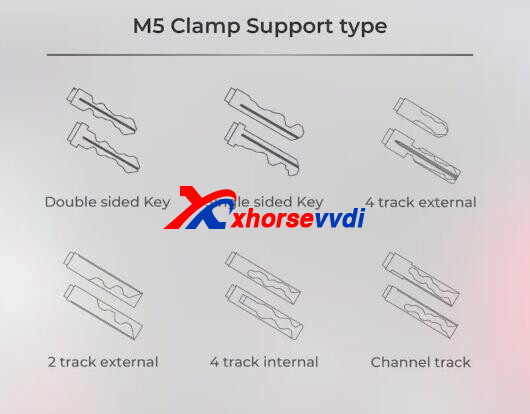
Supported key types:
- Double-sided keys
- Single-sided keys
- 4-track external
- 2-track external
- 4-track internal
- Channel track
Step 2: Calibration Setup
Accurate calibration is essential before cutting any key.
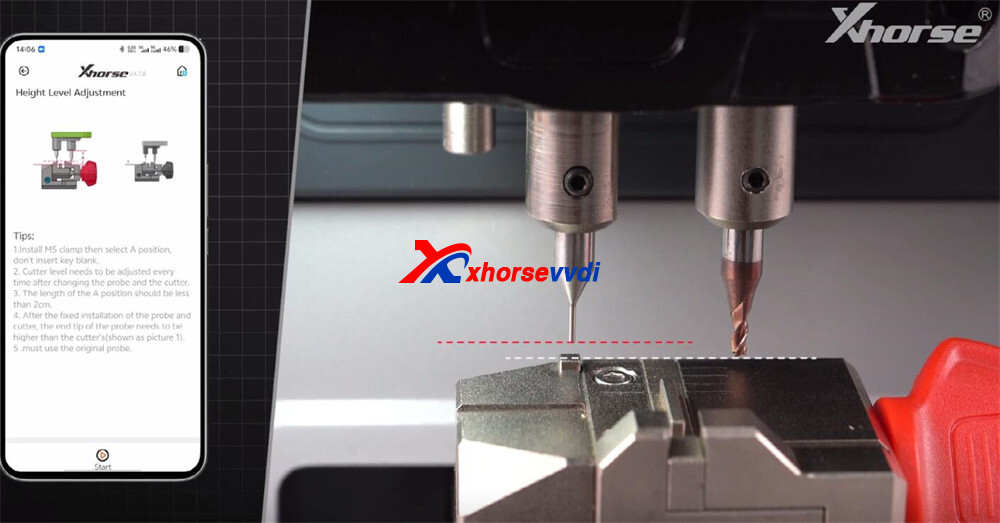
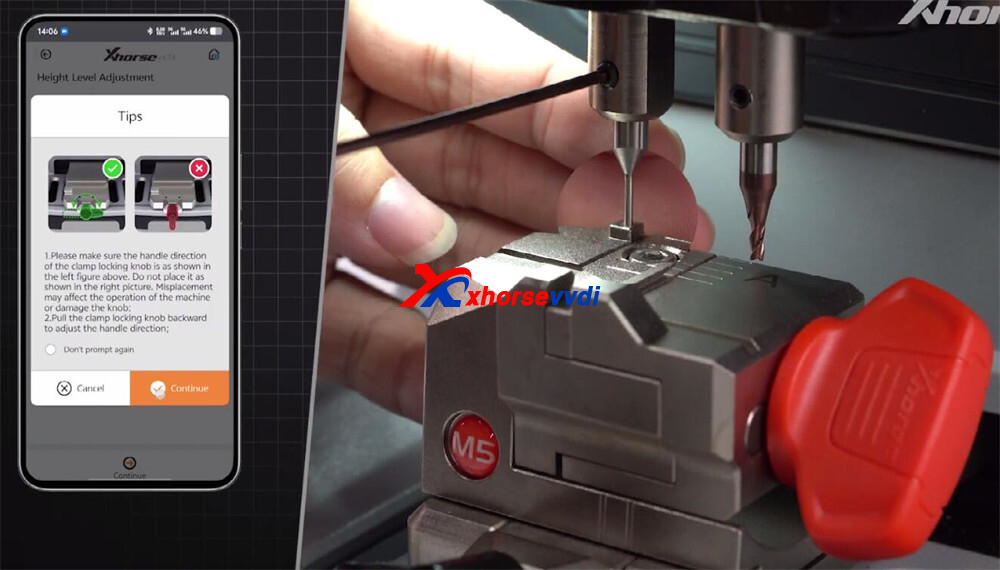
1.Height Level Adjustment
- Navigate to Parameter → Height Level Adjustment.
- Ensure the cutter tip sits slightly higher than the probe tip.
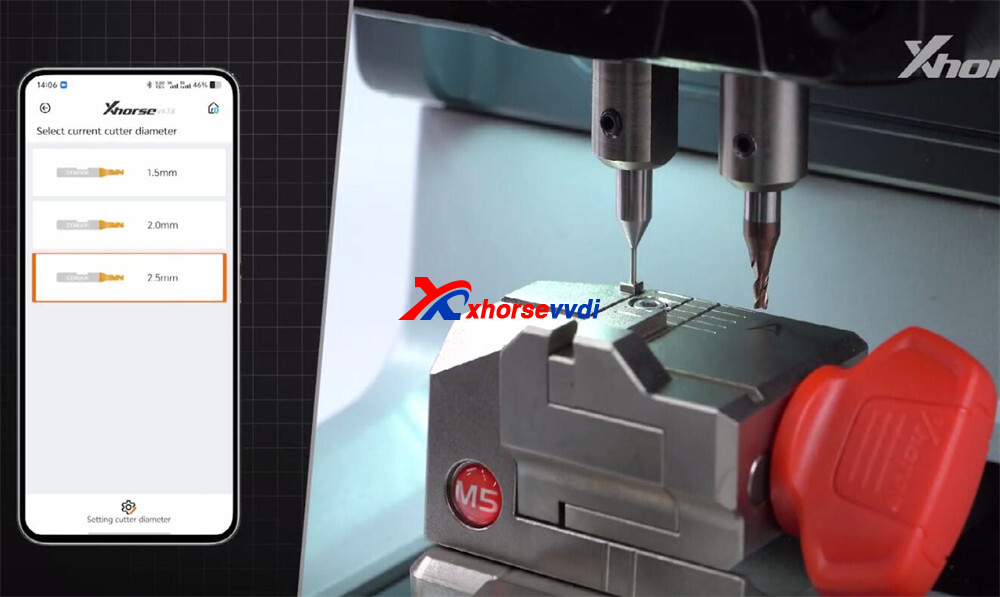
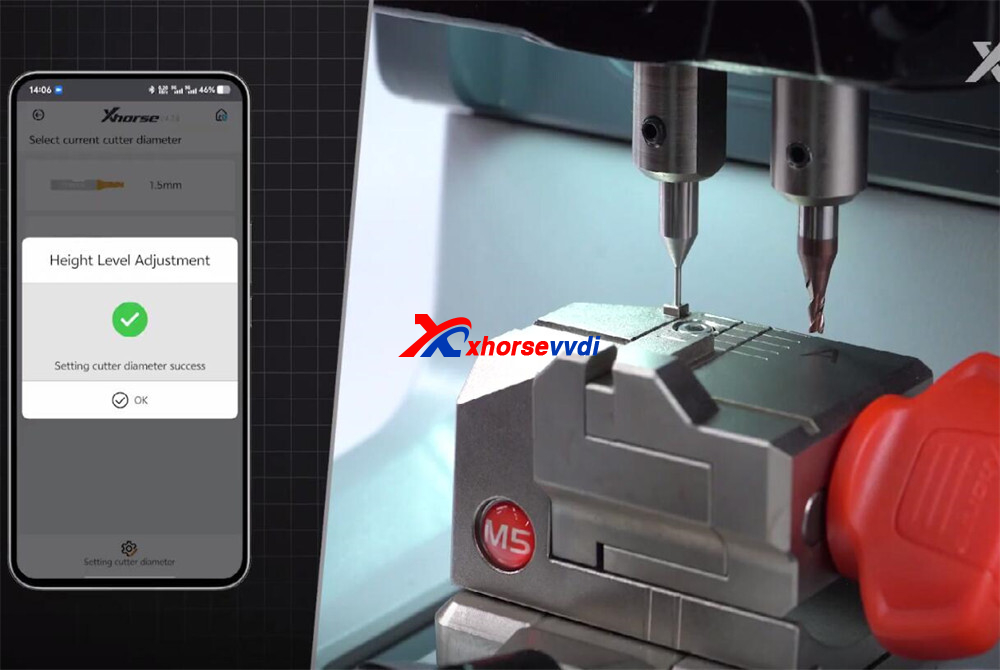
2.Cutter and Probe Calibration
- Select the 2.5mm cutter diameter.
- Calibrate the probe height.
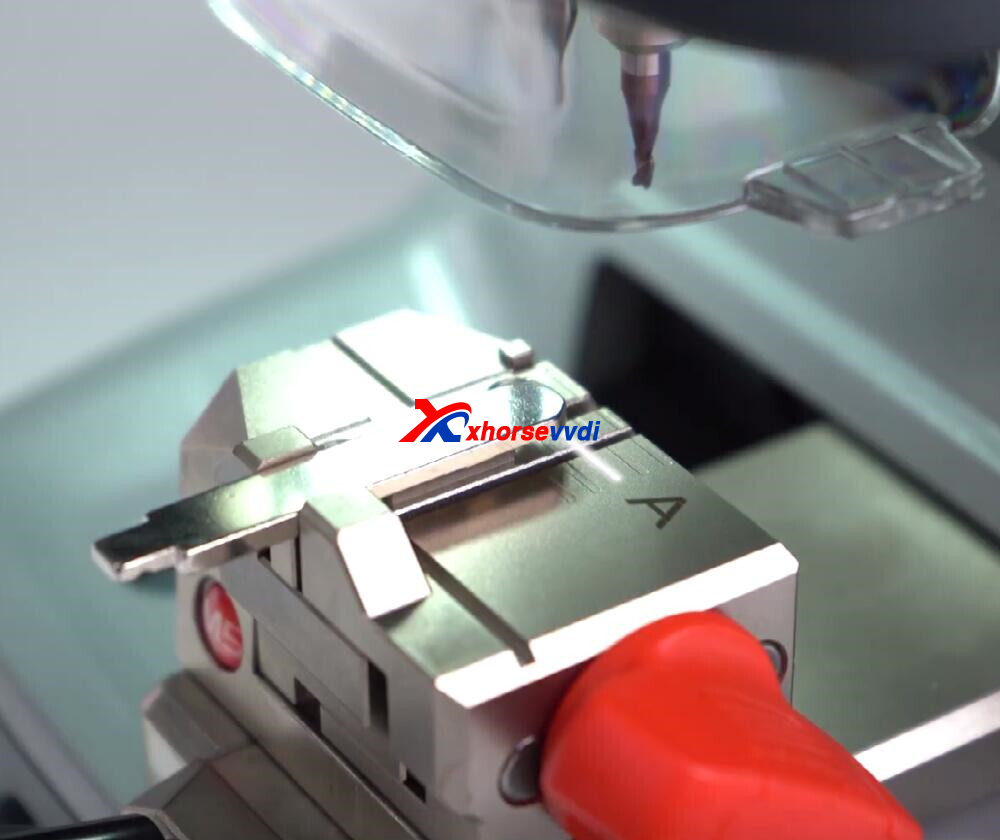
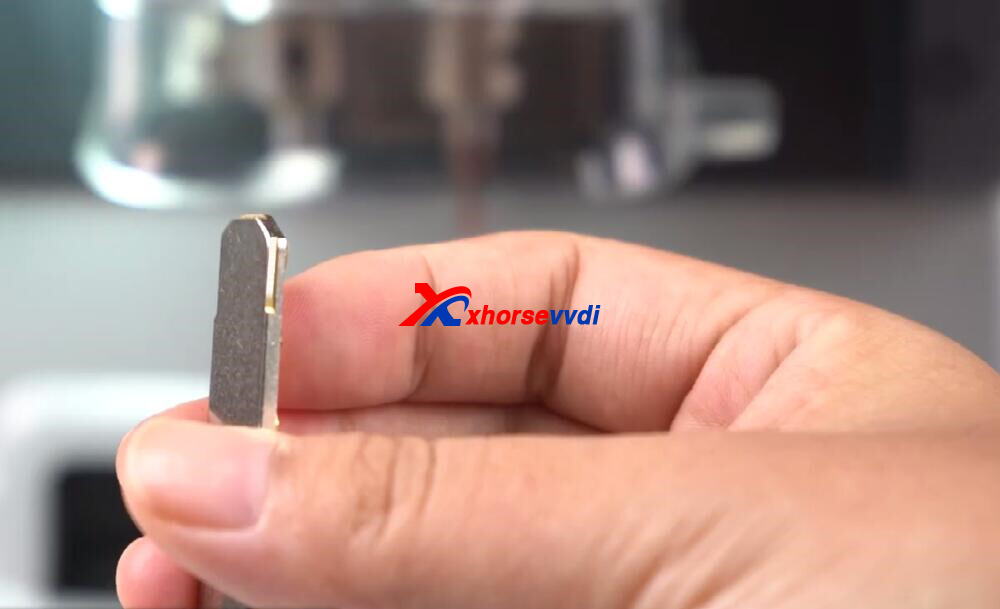
3.Test Cut Calibration
- Insert a blank key into the clamp (Side A).
- Align the top of the key to line three.
- Run the calibration test cut.
- Remember to brush away debris during cutting for a smooth process.
Step 3: Finalizing the Setup
Once the calibration test cut is complete:
- Proceed with the final cutting calibration.
- The machine will now be properly leveled and aligned for precise cutting.
After following these steps, your XP005L Key Cutting Machine is fully set up and ready for use. From clamp positioning to test cut calibration, every step ensures the machine delivers accurate, reliable, and professional-quality key cutting results.
Video Guide:
https://www.youtube.com/watch?v=ithGXU6nNuE
Skype: xhorsevvdi.com
Whatsapp: https://wa.me/8613983756354
Posted by: xhorsevvdi at
09:41 AM
| No Comments
| Add Comment
Post contains 271 words, total size 5 kb.
August 15, 2025
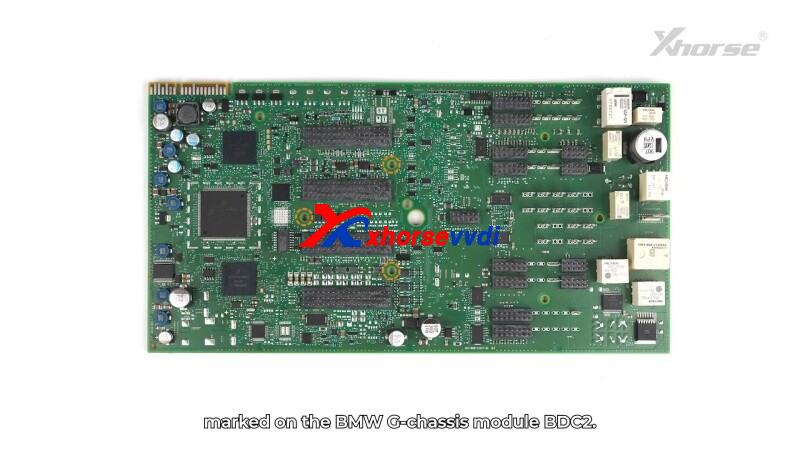
This guide provides step-by-step instructions for using theXhorse BDC2 AdapterwithVVDI KEY TOOL PLUS Tablet(orXhorse VVDI2) to read BMW immobilizer (immo) data.
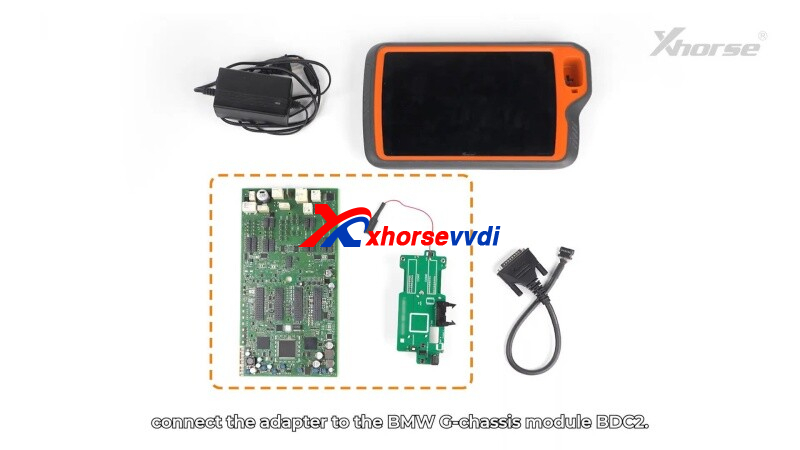
Step 1: Connect the Adapter
- Locate theBDC2 modulein BMW G-chassis vehicles.
- Align the adapter’s3 positioning pointswith the module’s pins.
- Secure the clip and ensureno misaligned pins.
- Use ananti-static wristbandto prevent damage.
- Connect the BDC2 Adapterto KEY TOOL PLUS(or VVDI2) via BMW-G cable.
- Supply12V power- white light confirms proper connection.
Step 2: Read Immobilizer Data
- OpenIMMOprogrammingin the key tool software.
- Read vehicle info→ ClickOKwhen successful.
Step 3: Pre-processing BDC2 IMMO System
- Backup the code→ Save securely.
- Enter mode→ Confirm to proceed.
- Read thesecret key→ Save BDC2 key data.
- Upgrade Programming→ Follow the on-screen instructions.
- Recovery Code→ Restore the module’s coding.
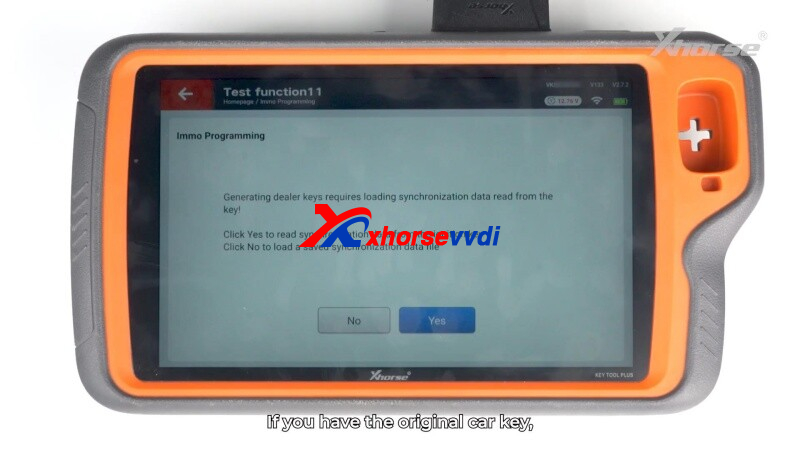
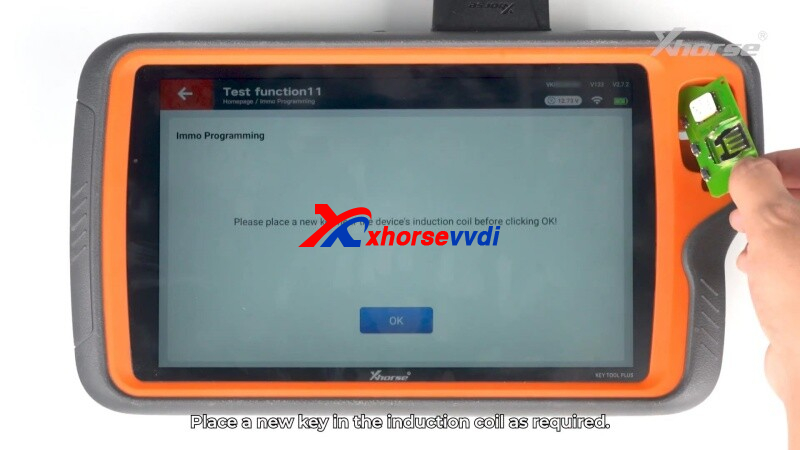
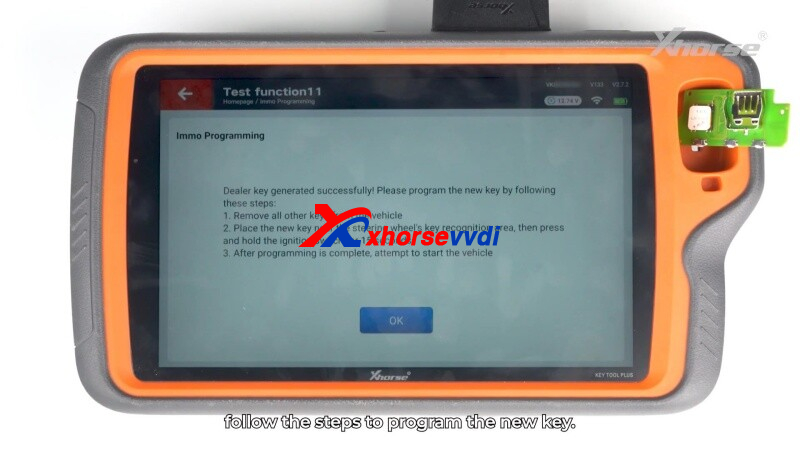
Step 4: Program a New Key
- Generate dealer key→ SelectYes(original key) orNo(load backup).
- Place ablank keyin the induction coil.
- Follow prompts to complete programming.
 " width="460" height="350" />

Safety & Tips
✔ Alwaysbackup databefore coding.
✔ Verify pin alignment to avoid errors.
✔ Test the new key before disconnecting.
Efficient, Reliable& Secure- Perfect for BMW key programming!
Skype: xhorsevvdi.com
Whatsapp: https://wa.me/8613983756354
Posted by: xhorsevvdi at
09:41 AM
| No Comments
| Add Comment
Post contains 192 words, total size 5 kb.
August 04, 2025
Xhorse offers a range of high-quality clamp replacements for their automatic Key Cutting Machines. These precision components ensure accurate key duplication and cutting across various Xhorse models. Below is a comprehensive overview of available clamp replacements and their compatible machines.

Compatible Clamp Models
- Standard Clamp Replacements
- Xhorse M1 Clamp- Compatible with:
- Xhorse M2 Clamp - Works with:
CONDOR XC-MINI
Condor MINI Plus
Condor Dolphin XP-005
- Xhorse M3 Clamp- Fits:
Condor XC-MINI
Condor Mini Plus
Dolphin XP005
- Xhorse M4 Clamp- Designed for:
Condor XC-MINI
Dolphin XP005
- Specialized Clamp Options
Xhorse M5 Clamp- Universal clamp for all Xhorse automatic key cutting machines
Xhorse JAW- Specifically for Dolphin XP-007models
Why Choose Genuine Xhorse Clamp Replacements?
- Precision Engineering- Ensures perfect key alignment during cutting
- Durable Construction- Made from high-grade materials for long-lasting performance
- Perfect Fit- Designed specifically for Xhorse machines
- Consistent Results- Maintains machine accuracy over time
Installation Tips
When replacing your Xhorse machine clamps:
- Always power off the machine before replacement
- Clean the clamp area before installing new jaws
- Follow manufacturer torque specifications
- Test with scrap keys before production use
Where to Purchase
Genuine Xhorse clamp replacements are available through authorized distributors.
For more information, visit www.xhorsevvdi.com.
Posted by: xhorsevvdi at
09:20 AM
| No Comments
| Add Comment
Post contains 210 words, total size 3 kb.
July 01, 2025
New Xhorse BCM2 Solder-free Adapters will come soon.
They will work with VVDI Key Tool Plus/ VVDI Multi Prog.

One customer asked what are the differences between them and old versions.
So, what's new on new BCM2 adapters?
>>New adapters support
BCM2 of all year
BCM2 of all different hardware version/ ID
Cloning BCM2 of the same hardware version/ ID
Full read data (D-flash + P-flash)


New BCM2 adapters in stock, contact us if interested!
http://blog.xhorsevvdi.com/what-is-new-on-vvdi-bcm2-solder-free-adapter/
Posted by: xhorsevvdi at
09:29 AM
| No Comments
| Add Comment
Post contains 84 words, total size 2 kb.
VVDI Multi Prog V67 Database is available!
Opel Astra J DASHBOARD(D70F3423) and more are added!

Free Download MULTI PROG Software
*Download software and update database online
V67 Database Update Info (2025-06-26)
+ Add Opel Astra J DASHBOARD(D70F3423) option in <DASHBOARD>-><OPEL>-><ASTRA>
+ Add YAMAHA ECU(R7F701201) option in <ECU>-><YAMAHA>-><YAMAHA>
+ Add WEY 300 Large Screen Console(2024)(R7F701583) option in <Other>-><GreatWall>-><GreatWall>
+ Add Buick 2.5 Human-Machine Module(D70F3554) option in <Other>-><Buick>-><Buick>
+ Add Hengtong Bus Air Pump Module(TMS320F28069) option in <Other>-><Hengtong>-><Hengtong>
+ Add VMAX Charger Machine Power Board(TMS320F28035) option in <Other>-><VMAX>-><VMAX>
+ Add S29AL016JxxTxx(TSOP4![]() , S29JL032HxxTxx(TSOP4
, S29JL032HxxTxx(TSOP4![]() , S29JL032JxxTxx(TSOP4
, S29JL032JxxTxx(TSOP4![]() , S29JL064JxxTxx(TSOP4
, S29JL064JxxTxx(TSOP4![]() , S29JL064HxxTxx(TSOP4
, S29JL064HxxTxx(TSOP4![]() , S29AL008JxxTxx(TSOP4
, S29AL008JxxTxx(TSOP4![]() , S29AL016JxxTxx(TSOP4
, S29AL016JxxTxx(TSOP4![]() , S29JL032HxxTxx(TSOP4
, S29JL032HxxTxx(TSOP4![]() , S29JL032JxxTxx(TSOP4
, S29JL032JxxTxx(TSOP4![]() , S29JL064JxxTxx(TSOP4
, S29JL064JxxTxx(TSOP4![]() , S29JL064HxxTxx(TSOP4
, S29JL064HxxTxx(TSOP4![]() , S29AL008JxxTxx(TSOP4
, S29AL008JxxTxx(TSOP4![]() , S29GL512SxxTxx(TSOP56), S29GL01GSxxTxx(TSOP56), S29GL256SxxTxx(TSOP56) options in <Parallel FLASH>-><CYPRESS>-><S29xxxxxx>
, S29GL512SxxTxx(TSOP56), S29GL01GSxxTxx(TSOP56), S29GL256SxxTxx(TSOP56) options in <Parallel FLASH>-><CYPRESS>-><S29xxxxxx>
+ Add MKE04Z8VTG4, MKE04Z8VWJ4, MKE04Z8VFK4, MKE02Z16VFM4, MKE02Z16VLC4, MKE02Z16VLD4, MKE02Z32VFM4, MKE02Z32VLC4, MKE02Z32VLD4, MKE02Z32VLH4, MKE02Z32VQH4, MKE02Z64VFM4, MKE02Z64VLC4, MKE02Z64VLD4, MKE02Z64VLH4, MKE02Z64VQH4, MKE04Z64VLD4, MKE04Z64VLH4, MKE04Z64VQH4, MKE04Z64VLK4, MKE06Z64VLD4, MKE06Z64VLH4, MKE06Z64VQH4, MKE06Z64VLK4, MKE04Z128VLD4, MKE04Z128VLH4, MKE04Z128VQH4, MKE04Z128VLK4, MKE06Z128VLD4, MKE06Z128VLH4, MKE06Z128VQH4, MKE06Z128VLK4 options in <MCU>-><MOTOROLA>-><MKE0xx>
+ Add MKV10Z16VLC7, MKV10Z16VFM7, MKV10Z16VLF7, MKV10Z32VLF7, MKV10Z32VFM7, MKV10Z32VLC7, MKV11Z64VLH7, MKV11Z64VLF7, MKV11Z64VFM7, MKV11Z64VLC7, MKV10Z64VLH7, MKV10Z64VLH7P, MKV10Z64VLF7, MKV10Z64VLF7P, MKV10Z64VFM7, MKV10Z64VFM7P, MKV10Z64VLC7, MKV30F64VLH10, MKV30F64VLF10, MKV30F64VFM10, MKV30F64VLH10P, MKV30F64VLF10P, MKV44F64VLH16, MKV44F64VLF16, MKV42F64VLH16, MKV42F64VLF16, MKV11Z128VLH7, MKV11Z128VLH7P, MKV11Z128VLF7, MKV11Z128VLF7P, MKV11Z128VFM7, MKV11Z128VFM7P, MKV11Z128VLC7, MKV10Z128VLH7, MKV10Z128VLF7, MKV10Z128VFM7, MKV10Z128VLC7, MKV31F128VLL10, MKV31F128VLH10, MKV30F128VLH10, MKV30F128VLF10, MKV30F128VFM10, MKV31F128VLH10P, MKV30F128VLF10P, MKV46F128VLL16, MKV46F128VLH16, MKV44F128VLL16, MKV44F128VLH16, MKV44F128VLF16, MKV42F128VLL16, MKV42F128VLH16, MKV42F128VLF16, MKV31F256VLL12, MKV31F256VLH12, MKV31F256VLH12P, MKV46F256VLL16, MKV46F256VLH16, MKV44F256VLL16, MKV44F256VLH16, MKV42F256VLL16, MKV42F256VLH16, MKV31F512VLL12, MKV31F512VLH12, MKV31F512VLL12P, MKV58F512VMD24, MKV58F512VLQ24, MKV58F512VLL24, MKV56F512VMD24, MKV56F512VLQ24, MKV56F512VLL24, MKV58F1M0VMD24, MKV58F1M0VLQ24, MKV58F1M0VLL24, MKV56F1M0VMD24, MKV56F1M0VLQ24, MKV56F1M0VLL24, options in <MCU>-><MOTOROLA>-><MKVxx>
+ Add MKM33Z64ACLH5, MKM33Z64ACLL5, MKM14Z64ACHH5, MKM33Z128ACLH5, MKM33Z128ACLL5, MKM14Z128ACHH5, MKM34Z128ACLL5, MKM35Z256VLL7, MKM35Z256VLQ7, MKM35Z256VLL7R, MKM35Z256VLQ7R, MKM34Z256VLL7, MKM34Z256VLQ7, MKM35Z512VLL7, MKM35Z512VLQ7, MKM35Z512VLL7R, MKM35Z512VLQ7R options in <MCU>-><MOTOROLA>-><MKMxx>
+ Add MKL02Z8VFG4, MKL03Z8VFG4, MKL03Z8VFK4, MKL02Z16VFG4, MKL02Z16VFK4, MKL02Z16VFM4, MKL03Z16VFG4, MKL03Z16VFK4, MKL02Z32VFG4, MKL02Z32VFK4, MKL02Z32VFM4, MKL03Z32VFG4, MKL03Z32CAF4R, MKL03Z32CBF4R, MKL03Z32VFK4, MKL13Z32VFM4, MKL13Z32VFT4, MKL13Z32VLH4, MKL13Z32VMP4, MKL13Z32VLK4, MKL17Z32VLH4, MKL17Z32VDA4, MKL17Z32VFM4, MKL17Z32VMP4, MKL17Z32VFT4, MKL26Z32VFM4, MKL26Z32VFT4, MKL26Z32VLH4, MKL27Z32VLH4, MKL27Z32VDA4, MKL27Z32VFM4, MKL27Z32VMP4, MKL27Z32VFT4, MKL33Z32VFT4, MKL33Z32VLH4, MKL33Z32VMP4, MKL33Z32VLK4, MKL16Z32xxx4, MKL13Z64VFM4, MKL13Z64VFT4, MKL13Z64VLH4, MKL13Z64VMP4, MKL13Z64VLK4, MKL17Z64VLH4, MKL17Z64VDA4, MKL17Z64VFM4, MKL17Z64VMP4, MKL17Z64VFT4, MKL26Z64VFM4, MKL26Z64VFT4, MKL26Z64VLH4, MKL27Z64VLH4, MKL27Z64VDA4, MKL27Z64VFM4, MKL27Z64VMP4, MKL27Z64VFT4, MKL36Z64VLH4, MKL36Z64VLL4, MKL33Z64VFT4, MKL33Z64VLH4, MKL33Z64VMP4, MKL33Z64VLK4, MKL34Z64VLH4, MKL34Z64VLL4, MKL16Z64xxx4, MKL17Z128VFM4, MKL17Z128VFT4, MKL17Z128VLH4, MKL17Z128VMP4, MKL26Z128VFM4, MKL26Z128VFT4, MKL26Z128VLH4, MKL27Z128VFM4, MKL27Z128VFT4, MKL27Z128VLH4, MKL27Z128VMP4, MKL36Z128VLH4, MKL36Z128VLL4, MKL36Z128VMC4, MKL33Z128VLH4, MKL33Z128VMP4, MKL46Z128VLH4, MKL46Z128VLL4, MKL46Z128VMC4, MKL43Z128VLH4, MKL43Z128VMP4, MKL82Z128VMC7, MKL82Z128VLL7, MKL82Z128VLK7, MKL82Z128VMP7, MKL82Z128VLH7, MKL16Z128xxx4, MKL17Z256VFM4, MKL17Z256VFT4, MKL17Z256VLH4, MKL17Z256VMP4, MKL17Z256CAL4R, MKL27Z256VFM4, MKL27Z256VFT4, MKL27Z256VLH4, MKL27Z256VMP4, MKL36Z256VLH4, MKL36Z256VMP4, MKL36Z256VLL4, MKL36Z256VMC4, MKL33Z256VLH4, MKL33Z256VMP4, MKL46Z256VLH4, MKL46Z256VMP4, MKL46Z256VLL4, MKL46Z256VMC4, MKL43Z256VLH4, MKL43Z256VMP4, MKL16Z256xxx4, MKL28Z512VDC7, MKL28Z512VLL7 options in <MCU>-><MOTOROLA>-><MKLxx>
+ Add MKS20FN128VFT12, MKS20FN128VLH12, MKS20FN128VLL12, MKS22FN128VFT12, MKS22FN128VLH12, MKS22FN128VLL12, MKS20FN256VFT12, MKS20FN256VLH12, MKS20FN256VLL12, MKS22FN256VFT12, MKS22FN256VLH12, MKS22FN256VLL12 options in <MCU>-><MOTOROLA>-><MKSxx>


Stay tuned!
http://blog.xhorsevvdi.com/multi-prog-v67-database-update-opel-astra-j-cluster-d70f3423/
Posted by: xhorsevvdi at
09:28 AM
| No Comments
| Add Comment
Post contains 401 words, total size 7 kb.


Posted by: xhorsevvdi at
09:28 AM
| No Comments
| Add Comment
Post contains 63 words, total size 2 kb.
One customer gave feedback his VVDI2 Full Version won't unlock FEM/BDC by OBD. The tool required him to update vvdi2 firmware but it is already the latest version. Is the connection wrong or what is the problem?


Here is the Solution:
BDC 085 version won't allow obd programming/ unlock.
Read BDC unit on BOOT using like VVDI PROG Programmer.

Done! Hope this helps!
http://blog.xhorsevvdi.com/solved-vvdi2-obd-programming-bmw-fem-bdc-fail/
Posted by: xhorsevvdi at
09:27 AM
| No Comments
| Add Comment
Post contains 71 words, total size 2 kb.
Here we are going to share a VVDI MULTI PROG pinout for MM4 Audi A3 2000 cluster.
Data can be used for PIN reading and cluster cloning.
PINOUT:


All tested good.
Xhorse Multi Prog read write no problem.

VVDI2 Full Version decodes pin code and read km.

Write dump file.


Done! Hope this helps!
http://blog.xhorsevvdi.com/multi-prog-pinout-on-mm4-audi-a3-2000-for-pin-and-cluster-cloning/
Posted by: xhorsevvdi at
09:26 AM
| No Comments
| Add Comment
Post contains 68 words, total size 2 kb.
Here we are going to share a VVDI MULTI PROG pinout for MM4 Audi A3 2000 cluster.
Data can be used for PIN reading and cluster cloning.
PINOUT:
All tested good.
Xhorse Multi Prog read write no problem.
VVDI2 Full Version decodes pin code and read km.
Write dump file.
Done! Hope this helps!
http://blog.xhorsevvdi.com/multi-prog-pinout-on-mm4-audi-a3-2000-for-pin-and-cluster-cloning/
Posted by: xhorsevvdi at
09:22 AM
| No Comments
| Add Comment
Post contains 68 words, total size 2 kb.
Xhorse multi prog software add new option for Audi BCM2.
BCM2(D70F3634/D70F3381 )
BCM2(D70F3635/D70F3382 )
In the connection diagram, will need XDNP100 and XDNP101 BCM2 Adapter, as well as the Multi prog connector.

Multi Prog Audi BCM2 D70F3634/D70F3381 Diagram


Multi Prog Audi BCM2 D70F3635/D70F3382 Diagram

Posted by: xhorsevvdi at
09:21 AM
| No Comments
| Add Comment
Post contains 54 words, total size 2 kb.
Xhorse is about to release its BMW G-series BDC2 Add Key solution.
Users need to buy BMW-G BDC2 Adapter and activate BMW license on Xhorse Tools (VVDI Key Tool Plus, VVDI2).
Here we will show you how to add key for BMW G-Series BDC2 with Key Tool Plus and Xhorse BMW G-Series BDC2 Adapter.

Guide:
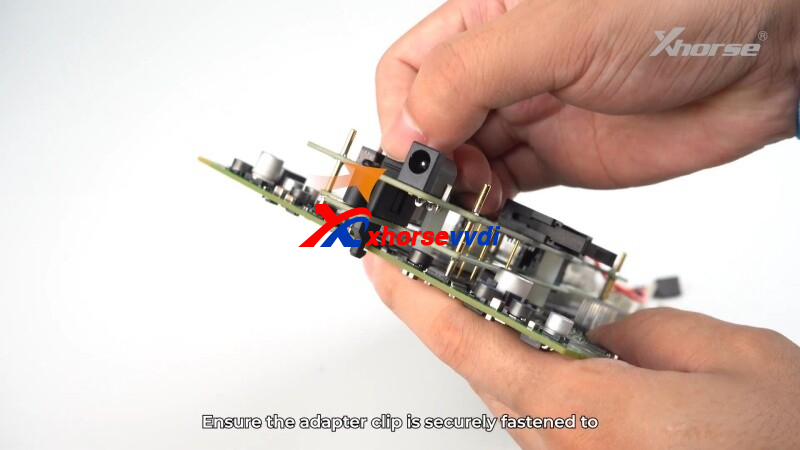
Connect BDC2 Adapter to BDC2 unit by diagrams.


*Make sure PINS are connected, especially eeprom pin2

Tighten adapter.

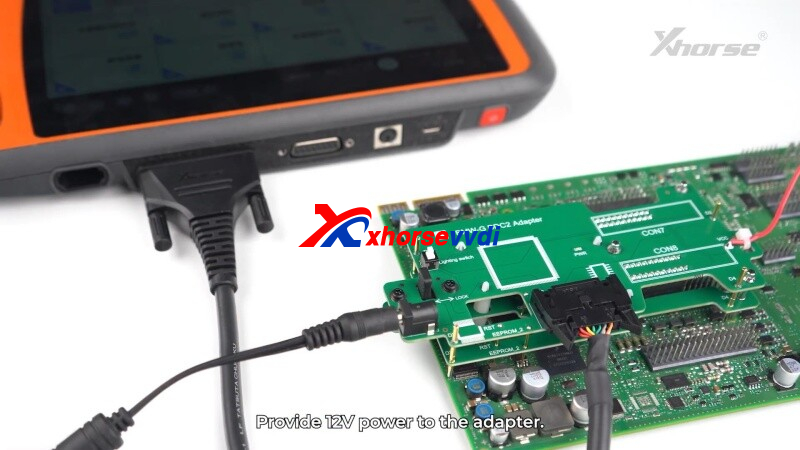
Then connect adapter to Xhorse Tool (here we use VVDI Key Tool Plus) and power adapter.

Turn on adapter and check connection by lights.


*If high or low voltage, lights may flash or be dark
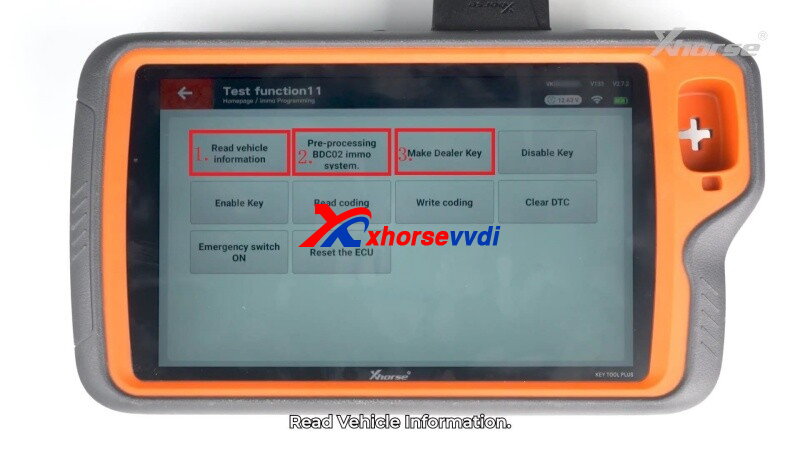
On Key Tool Plus,
Select
Immo programming>>More Function>>Test Function

Read vehicle info.

Preprocess BDC2 immo system.

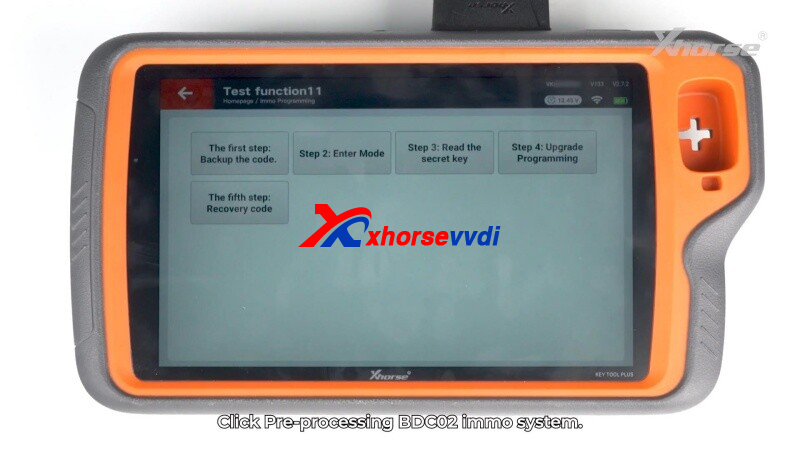
Select 'Step 1.Back up coding'.

Select 'Step 2.Service Mode'.

Select 'Step 3. Read key'.

Select 'Step 4. Programming'.

Select 'Step 5. Restore Coding'.

Go back and select 'Generate dealer key'.
Load key file and make dealer key.

Then just go into vehicle and learn new key.
Done! That's how to add key for BMW G-series BDC2 using Xhorse Key Programmers.
http://blog.xhorsevvdi.com/xhorse-tool-bmw-g-series-bdc2-add-key-guide/
Posted by: xhorsevvdi at
09:19 AM
| No Comments
| Add Comment
Post contains 198 words, total size 6 kb.
V7.5.0 vvdi2 newest software newle add the function for BMW G-Series BDC2 type - Require license+BMW-G BDC2 Adapter. The Xhorse BMW G series bdc2 license and adapter will release soon.
How to connect Xhorse BMW-G BDC2 Adapter with VVDI2, Key Tool Plus?
1. Align the 3 positioning pins with the corresponding holes on the chassis.
2. Press down firmly on th adapter at the CON7/CON8 locations until it is fully seated.
3. Verify the accurate positioning of the RST/EEPROM_2/GND pins.
4. Slide the adapter latch to the LOCK position.

1. Connect the included cable harness to the device.
2. Connect the adapter power lince to PIN 1.
3. Supply +12V power.

Xhorse BMW G-Series BDC2 Support List:
1.SupportaddkeyfunctionforBMWG-SeriesBDC2type-Requirelicense+BMW-GBDC2Adapter
Supportfollowinglist:
5-SeriesG30 2016/11-2020/06
5-SeriesG31 2017/03-2020/06
5-SeriesG38 2017/05-2020/08
6-SeriesG32 2017/07-2020/06
7-SeriesG11/G12 2015/07-2019/02
X3 F97 2019/04-2021/07
X3/IX3 G08 2018/05-2021/08
X3 G01 2017/12-2021/07
X4 G02 2018/04-2021/07
X4 F98 2019/04-2021/07
M5 F90 2017/11-2020/06
http://blog.xhorsevvdi.com/how-to-connect-xhorse-bmw-g-bdc2-adapter-with-vvdi2-key-tool-plus/
Posted by: xhorsevvdi at
09:19 AM
| No Comments
| Add Comment
Post contains 161 words, total size 2 kb.
The latest V7.5.0 VVDI2 Software is released! Get the free download link from Xhorsevvdi.

1. Free Download VVDI2 V7.5.0 Software
2. V7.5.0 VVDI2 Update Info:
!!!This version requires firmware V7.5.0!!!
===== VAG V7.5.0 =====
- Bugfix
===== BMW V7.5.0 =====
- Support add key function for BMW G-Series BDC2 type - Require license+BMW-G BDC2 Adapter
Support list:
5-Series G30 2016/11-2020/06
5-Series G31 2017/03-2020/06
5-Series G38 2017/05-2020/08
6-Series G32 2017/07-2020/06
7-Series G11/G12 2015/07-2019/02
X3 F97 2019/04-2021/07
X3/IX3 G08 2018/05-2021/08
X3 G01 2017/12-2021/07
X4 G02 2018/04-2021/07
X4 F98 2019/04-2021/07
M5 F90 2017/11-2020/06
===== Porsche V7.5.0 =====
- Bugfix
===== PSA V7.5.0 =====
- Bugfix
===== Transponder Programmer V7.5.0 =====
- Improvement prepare remote function
- Immobilizer data tool: Asia->Besturn->B90->STM8 add new type
- Bugfix
===== Copy 48 (96 bits) V7.5.0 =====
- Bugfix
===== J2534 V7.5.0 =====
- Bugfix
===== Online Update Tool V7.5.0 =====
- Bugfix
===== Quick Start V7.5.0 =====
- Bugfix

Stay tuned!
Posted by: xhorsevvdi at
09:17 AM
| No Comments
| Add Comment
Post contains 154 words, total size 4 kb.
Problem:
Xhorse Multi Prog failed on firmware update. I try to reinstall it on an different pc, use different network, reinstall the software still same error i try to rest the multiprog still same error.


Here is the Answer:
This is already fixed.
Just update firmware again and Multi Prog will work fine.
Done!
http://blog.xhorsevvdi.com/solved-cant-update-xhorse-multi-prog-firmware/
Posted by: xhorsevvdi at
09:17 AM
| No Comments
| Add Comment
Post contains 62 words, total size 1 kb.
The other day we've shown you how to learn Xhorse TPMS Sensor.
Today we will show you an easier way to program it, that is copying original TPMS sensor ID.

1.Find ID number on sensor
On original sensors, you may find ID number.

On Key Tool Max Pro,
Select
Program>>Manual create

Enter original sensor ID.

Confirm ID and it is done.

2.Activate sensor and identify ID
If there is no ID number or it is vague, you may activate sensor first and then identify ID using Key Tool Max Pro.

Select
Program>>Activate copy


If original sensor is out of power, you have to remove it and replace battery before activating it.

3.OBD programming
Some cars allow you to program sensor via OBD.
Connect Key Tool Max Pro to OBD port.
Select
TPMS>>Toyota>>Corolla>>2019.01-2022.12(C215 433MHz)
If the tool shows 'Diagnostics', it means this car supports OBD programming.

Select
OBD read ID>>Program>>OBD Copy


Install programmed sensors and they will work find.
If you still don't know how to learn sensors, check out
http://blog.xhorsevvdi.com/how-to-use-xhorse-xdtpm1en-tpms-sensor/
Done! That's how to program Xhorse XTPMS Sensors.
http://blog.xhorsevvdi.com/how-to-program-xhorse-tpms-sensor-by-copying-id/
Posted by: xhorsevvdi at
09:16 AM
| No Comments
| Add Comment
Post contains 188 words, total size 5 kb.
Xhorse VVDI Key Tool Plus all in one lockmith tool, can do benz, bmw, vag key programming, and many other models. Here is the review for xhorse vvdi key tool plus pad program 2005 Mercedes S430 W215 Key.


All photo credit to On Demand Keys
http://blog.xhorsevvdi.com/review-xhorse-vvdi-key-tool-plus-program-2005-mercedes-s430-w215-key-ok/
Posted by: xhorsevvdi at
09:15 AM
| No Comments
| Add Comment
Post contains 73 words, total size 3 kb.
One customer asked why Read Write button on his VVDI Multi Prog is grey. He just updated the tool and found this problem. Is it not supported or what else?

Here is the Solution:
There is a new button 'Connect'.
Click on it before Read Write ecu.
*Only on some ecus

Done! Hope this helps!
http://blog.xhorsevvdi.com/solved-vvdi-multi-prog-read-write-button-in-grey-after-update/
Posted by: xhorsevvdi at
09:15 AM
| No Comments
| Add Comment
Post contains 67 words, total size 1 kb.
Problem:
Xhorse EZS Adapter, what I’m doing wrong that I can’t read that switch?


Here is the
Reason:
Wrong Tool.
Solution
Use VVDI PROG,
or MINI PROG/ KeyTool Plus/ Multi Prog with adapter
Done! Hope this helps!
http://blog.xhorsevvdi.com/xhorse-ezs-adapter-wont-read-eis-solution/
Posted by: xhorsevvdi at
09:14 AM
| No Comments
| Add Comment
Post contains 45 words, total size 2 kb.
One customer gave feedback that he could not update his Dolphin XP005 Machine. On Key Tool Max Pro, it asked to update firmware V1.8.2 but upgrade kit would not let me do it.


Here is the Solution:
Select 'DOLPHIN1' instead of 'DOLPHIN1 (KM12)'.
And select '1.8.2' version and update firmware.

Done! Hope this helps!
http://blog.xhorsevvdi.com/dolphin-xp005-wont-update-firmware-to-v1-8-2-solution/
Posted by: xhorsevvdi at
09:13 AM
| No Comments
| Add Comment
Post contains 63 words, total size 1 kb.
Problem:
I try 5 time same problem
Key original star car ok
Info key is ok
But when finish 100% c not calculate data


Here is the Solution:
1)Remove capacitors as required and try again.
2)If calculation fails or calculation works but verification fails, move key pcb and try again

Done! Hope this helps!
http://blog.xhorsevvdi.com/solved-vvdi-mlb-tool-key-data-calculation-failed32/
Posted by: xhorsevvdi at
09:12 AM
| No Comments
| Add Comment
Post contains 67 words, total size 2 kb.
32 queries taking 0.066 seconds, 131 records returned.
Powered by Minx 1.1.6c-pink.

